
DIY: 2007+ Sedan Door Panel Removal


Joined: Jan 2004
Posts: 21,095
Likes: 47
From: Toronto, GTA north
One more thing, the wire that you have described that is mounted on the panel...
Which wire does it connnect to on the door panel end? Is it the long pink wire that runs along the door panel or the meaty looking wire that is above the speaker? ( On the last image above).
Which wire does it connnect to on the door panel end? Is it the long pink wire that runs along the door panel or the meaty looking wire that is above the speaker? ( On the last image above).
....PDF files added to 1st post
Last edited by InTgr8r; Feb 7, 2009 at 01:19 PM.
Joined: Jan 2004
Posts: 21,095
Likes: 47
From: Toronto, GTA north
Mine is a DIY tool (what else  )
)
I used a small flat pry bar that I got at Home Depot.
I taped it for added protection.
...not prefect but works OK.
something like this:

)I used a small flat pry bar that I got at Home Depot.
I taped it for added protection.
...not prefect but works OK.
something like this:


just want to say thanks for this awesome write up. I just used it to take my drivers side door panel off. Took about 45min-hour altogether. Followed the instructions step by step!
THANKS!
THANKS!


Registered User
Joined: Mar 2014
Posts: 3
Likes: 0
In order to install the http://www.KPtechnologies.com remote window up module I had to remove the drivers door door panel. Luckily, it was pretty easy to get off, if you know how to do it!
First, pull the interior door handle out and pop out the finisher that is behind the door handle to expose a 10mm bolt. Remove this bolt.


Next, the trim piece that holds all the buttons (windows, door locks, mirror) needs to be lifted up. This took the longest, as I didn't want to mar the leather or damage the plastic. I found that if you start at the back (towards back of car) outside corner (away from the door) that you can slip a small pick and gently pry. I then wrapped a small screwdriver blade with foam, just to be safe, and used that in conjunction with the pick to pop the finisher up. Unplug the harnesses and then remove the 2 10mm bolts behind the finisher
Start with this corner:

Once you get the corner started the rest pulls out pretty easy:

Disconnect the wires and time to move on to the next step:

There are only three bolts that hold the panel on, and now they are all out!
The next step is to gently pry the panel away from the door. I used an upholstry removal tool from Parts Express (http://www.partsexpress.com/pe/showd...umber=362-080). For $10 you can't go wrong with this tool. I laid underneath the door and slid the tool between the door and the panel. It is important that you are under the door because you have to find the actual clip and pry at that point. If you don't, you have a good chance of either breaking the clip or breaking the mount. Once you have popped out a few of the clips you can then put the tool down and gently work the rest of the panel free. There are some extra heavy duty clips up near the tweeter in the door (near the a-pillar) so make sure you get them free before you try to take the door panel off.
With all the clips free you should be able to pull the door panel away from the door quite a bit. This is a great time to unhook the wires going to the small light in the bottom of the door. Another option is to pop that light out, but I saw no reason to do that as it was easy to just unplug.
With the light unplugged you can now lift up and away from the door to free the panel. It is a tight fit with the sail panel in place (the panel at the top/front of the door) but with some patience it will come free. Now, remove all the plugs (memory seats, tweeter, etc) and set the panel somewhere safe.

If you are installing a KPtechnologies window module the "hard" part is done!
~~~~~~~~~~~~~~~~~~~~~~~~~~~~~~~
:edit - inTgr8r:
Word of Caution!
Be careful with the tweeter speaker as you remove the panel.
The tweeter is mounted to the panel NOT the door itself.
The small gauge wire/connector is easily damaged.
& if the clip pulls off it can damage the speaker itself. (I've seen it 1st hand)
Disconnect the wire clip before you move the panel too much.
~~~~~~~~~~~~~~~~~~~~~~~~~~~~~~~
:edit #2 - inTgr8r:
The same basic methods apply to removal of all doors.
a few more pics
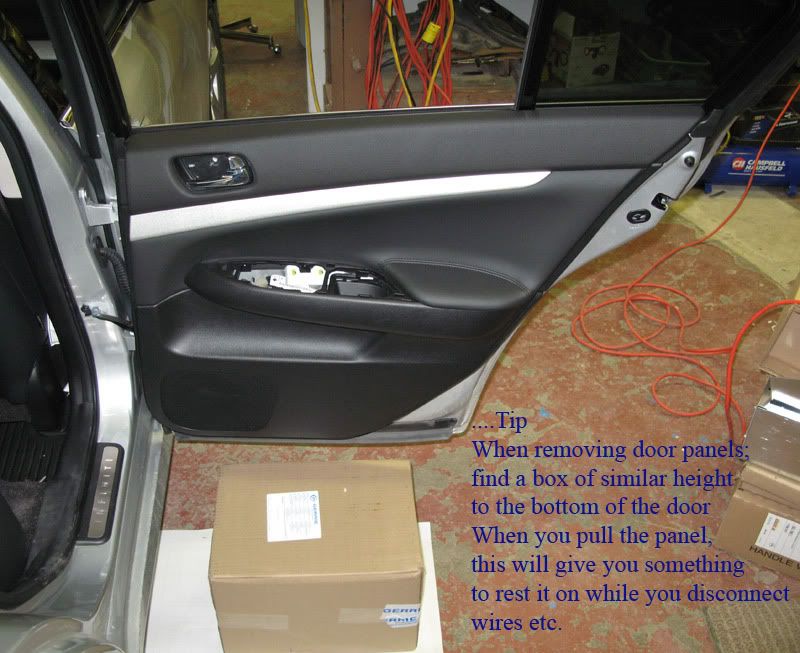
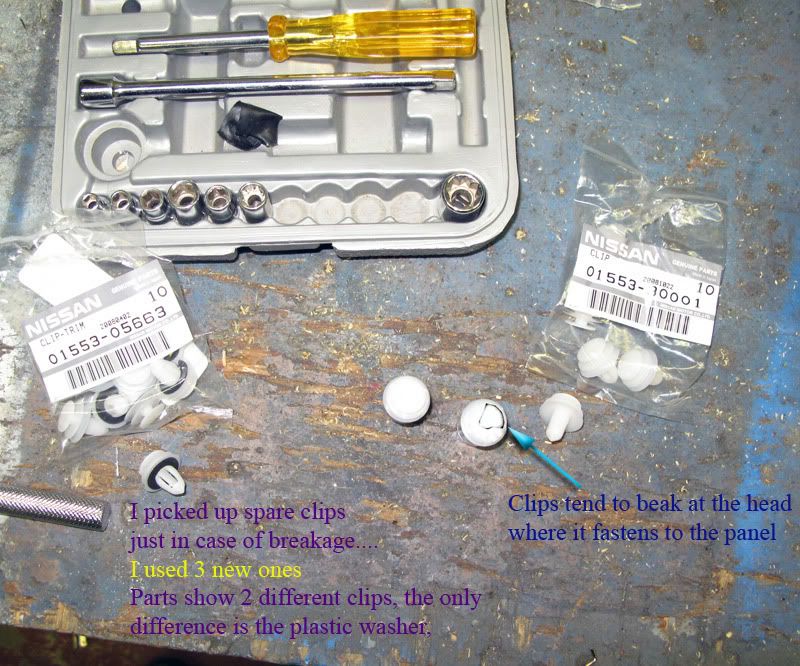
JIC you need clips.....
The proper trim tool really helps save clips & the door panel.
It's basically a flat bar with forked end.
...the normal trim tool you see that looks like a garden tool with a round shaft, is not all that great for this job.
First, pull the interior door handle out and pop out the finisher that is behind the door handle to expose a 10mm bolt. Remove this bolt.
Next, the trim piece that holds all the buttons (windows, door locks, mirror) needs to be lifted up. This took the longest, as I didn't want to mar the leather or damage the plastic. I found that if you start at the back (towards back of car) outside corner (away from the door) that you can slip a small pick and gently pry. I then wrapped a small screwdriver blade with foam, just to be safe, and used that in conjunction with the pick to pop the finisher up. Unplug the harnesses and then remove the 2 10mm bolts behind the finisher
Start with this corner:
Once you get the corner started the rest pulls out pretty easy:
Disconnect the wires and time to move on to the next step:
There are only three bolts that hold the panel on, and now they are all out!
The next step is to gently pry the panel away from the door. I used an upholstry removal tool from Parts Express (http://www.partsexpress.com/pe/showd...umber=362-080). For $10 you can't go wrong with this tool. I laid underneath the door and slid the tool between the door and the panel. It is important that you are under the door because you have to find the actual clip and pry at that point. If you don't, you have a good chance of either breaking the clip or breaking the mount. Once you have popped out a few of the clips you can then put the tool down and gently work the rest of the panel free. There are some extra heavy duty clips up near the tweeter in the door (near the a-pillar) so make sure you get them free before you try to take the door panel off.
With all the clips free you should be able to pull the door panel away from the door quite a bit. This is a great time to unhook the wires going to the small light in the bottom of the door. Another option is to pop that light out, but I saw no reason to do that as it was easy to just unplug.
With the light unplugged you can now lift up and away from the door to free the panel. It is a tight fit with the sail panel in place (the panel at the top/front of the door) but with some patience it will come free. Now, remove all the plugs (memory seats, tweeter, etc) and set the panel somewhere safe.
If you are installing a KPtechnologies window module the "hard" part is done!
~~~~~~~~~~~~~~~~~~~~~~~~~~~~~~~
:edit - inTgr8r:
Word of Caution!
Be careful with the tweeter speaker as you remove the panel.
The tweeter is mounted to the panel NOT the door itself.
The small gauge wire/connector is easily damaged.
& if the clip pulls off it can damage the speaker itself. (I've seen it 1st hand)
Disconnect the wire clip before you move the panel too much.
~~~~~~~~~~~~~~~~~~~~~~~~~~~~~~~
:edit #2 - inTgr8r:
The same basic methods apply to removal of all doors.
a few more pics
JIC you need clips.....
The proper trim tool really helps save clips & the door panel.
It's basically a flat bar with forked end.
...the normal trim tool you see that looks like a garden tool with a round shaft, is not all that great for this job.

I had to remove the door panel and beyond to reconnect the door cable back to the outside door handle. The cable came off when the car was frozen and I tried to open the door. I found this video in Youtube very helpful.
To remove the door handle bezel, I wedge a large flat screwdriver between the rear window switch and the bezel and pull upwards. Once a gap is exposed, use more screwdrivers between the gaps to lift it out.
Now contemplating to repaint or plastic dip the bezel, but wonder how to retain the little white window symbol.

Thread
Thread Starter
Forum
Replies
Last Post
will091195
General Tech Questions
1
Jul 27, 2015 09:19 PM