DIY: Replacing In-Cabin Microfilter

  #61  
Old 10-26-2011, 09:46 PM
Jeff T's Avatar
Registered User
Join Date: Jan 2011
Location: Chicagoland
Posts: 45
Received 0 Likes on 0 Posts
Originally Posted by Feeelax
About to pick one up from walmart. Anyone familiar with the brand "Fram"? Walmart carries filters from this brand for not a lot of $..
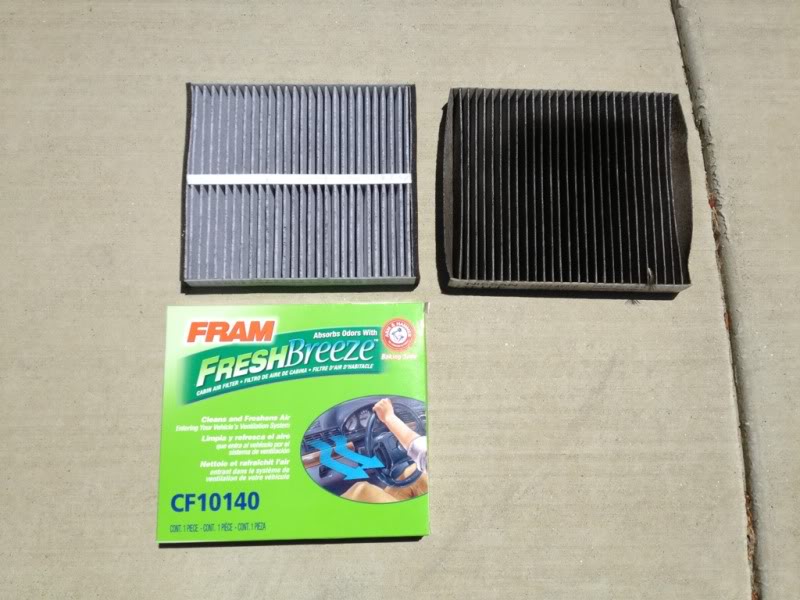
Fram is OK for a cabin filter, just don't let them anywhere near your engine!!
 
  #62  
Old 10-26-2011, 11:41 PM
Feeelax's Avatar
Registered User
iTrader: (2)
Join Date: Jul 2011
Location: NYC Brooklyn/Buffalo
Posts: 293
Received 8 Likes on 8 Posts
^haha gotcha. Just very interested in doing the mod and don't feel like waiting a week for the filter in the mail
 
  #63  
Old 10-28-2011, 12:20 PM
willdogs's Avatar
Registered User
iTrader: (1)
Join Date: Oct 2011
Location: NY City
Posts: 655
Received 68 Likes on 56 Posts
Thanks for this!

Just did my cabin filter in under 15 minutes following your instructions! Thanks!
 
  #64  
Old 03-02-2012, 12:15 PM
G35x2008's Avatar
Registered User
Join Date: Feb 2012
Location: NW Indiana
Posts: 2
Likes: 0
Received 0 Likes on 0 Posts
The original post was a great tutorial!!!! Tried doing it once before with the sevice manual and couldn't put the pieces together to get the dash apart. With the OP made the job a piece of cake!!! THANKS!!!!
 
  #65  
Old 03-02-2012, 02:07 PM
soundmike's Avatar
Registered User
Thread Starter
iTrader: (9)
Join Date: Jul 2008
Location: Inside my G
Posts: 4,093
Received 213 Likes on 156 Posts
You're welcome.
 
  #66  
Old 03-02-2012, 07:58 PM
mikeb2's Avatar
Registered User
Join Date: May 2009
Posts: 105
Likes: 0
Received 6 Likes on 5 Posts
I did mine also thanks to this DIY but here's my question. My car is a victim of pine needles. Would it behoove me to remove the screens that cover the fresh air intakes and try to vacuum as much gunk out of that area as possible? If so, how are those screens removed? (I haven't really looked yet...still too cold here.)

Thanks...

Mike
 
  #67  
Old 03-02-2012, 11:07 PM
soundmike's Avatar
Registered User
Thread Starter
iTrader: (9)
Join Date: Jul 2008
Location: Inside my G
Posts: 4,093
Received 213 Likes on 156 Posts
Worth a shot for sure. The air intake is by the battery compartment. You can somewhat see a glimpse of it in the battery replacement diy.
 
  #68  
Old 05-28-2012, 03:40 PM
a17z's Avatar
Registered User
Join Date: Oct 2007
Posts: 84
Likes: 0
Received 1 Like on 1 Post
Finally changed out my microfilter (68k miles). Great tutorial.

Name:  0a7c2a06.jpg
Views: 249
Size:  77.9 KB
 
  #69  
Old 05-28-2012, 09:00 PM
blnewt's Avatar
Registered User
iTrader: (3)
Join Date: Aug 2007
Location: New Mexico
Posts: 1,699
Received 137 Likes on 128 Posts
Originally Posted by a17z
Finally changed out my microfilter (68k miles). Great tutorial.

Bet that AC smelled like an old gym locker at 68k miles, nice to breathe again eh?
 
  #70  
Old 08-04-2012, 09:25 PM
Mo07G35s's Avatar
Registered User
Join Date: Jul 2012
Location: SRQ, FL
Posts: 127
Received 8 Likes on 8 Posts
I just followed this diy today and it made the task super easy! Thank you so much!
 
  #71  
Old 09-02-2012, 04:32 PM
mikeb2's Avatar
Registered User
Join Date: May 2009
Posts: 105
Likes: 0
Received 6 Likes on 5 Posts
I changed mine for the second time today and this original post was again helpful. One thing that I did discover was that you can remove the glove box without removing that lower panel but it is most difficult to reinstall the box with the panel in place.

It always takes me as long to reinstall the glove box as it does to do the entire rest of the project.

Mike
 
  #72  
Old 02-27-2013, 06:20 AM
Royal2000H's Avatar
Registered User
Join Date: Sep 2009
Posts: 2
Likes: 0
Received 0 Likes on 0 Posts
Someone mentioned a way to see how dirty the filter is without going through this process. Can someone expand on that?

I don't want to go through all this only to discover my filter is fine.
 
  #73  
Old 02-27-2013, 08:12 AM
soundmike's Avatar
Registered User
Thread Starter
iTrader: (9)
Join Date: Jul 2008
Location: Inside my G
Posts: 4,093
Received 213 Likes on 156 Posts
Originally Posted by Royal2000H
Someone mentioned a way to see how dirty the filter is without going through this process. Can someone expand on that?

I don't want to go through all this only to discover my filter is fine.
You can see the filter through the battery compartment, specifically with the battery moved, but it's faster to just go through this process.

How many miles do you have on the filters? Try changing according to length of time the filters were last replaced, or if you're constantly in a dusty environment.
 
  #74  
Old 03-09-2013, 02:45 PM
con's Avatar
con
con is offline
Registered User
Join Date: Oct 2012
Posts: 54
Likes: 0
Received 5 Likes on 5 Posts
Thank you again for the write up. Just changed mine and it was pretty straightforward. I used the purolator brand name. The old one was...eww.
 
  #75  
Old 05-24-2013, 01:54 PM
dbretc's Avatar
Registered User
Join Date: May 2013
Posts: 1
Received 0 Likes on 0 Posts
Thanks for the help !

Used the write up to change the filter and it was extremely helpful. Just took my ipad and set it on the console and followed. Only one self imposed hiccup to note just in case anyone else encounters it. The silver trim on top of the glove box came out when I removed the plastic that was holding the glove box. I didn't put that back on first when I went to reassemble everything. The trim doesn't just snap in, it gets screwed into the plastic with 4 of those seven screws.
 

Thread Tools
Search this Thread
Rate This Thread
Rate This Thread:
You have already rated this thread Rating: Thread Rating: 1 votes, 5.00 average.

Quick Reply: DIY: Replacing In-Cabin Microfilter


All times are GMT -4. The time now is 04:47 AM.