DIY: How to REMOVE taillights, reverse lights & trunk lip spoiler - PICS

Thread Tools
 
Search this Thread
 
Rate Thread
 
Old Jul 28, 2010 | 04:37 AM
  #1  
ILLicit's Avatar
Thread Starter
|
Registered User
Joined: Sep 2006
Posts: 1,918
Likes: 9
From: Brooklyn, NYC
DIY: How to REMOVE taillights, reverse lights & trunk lip spoiler - PICS

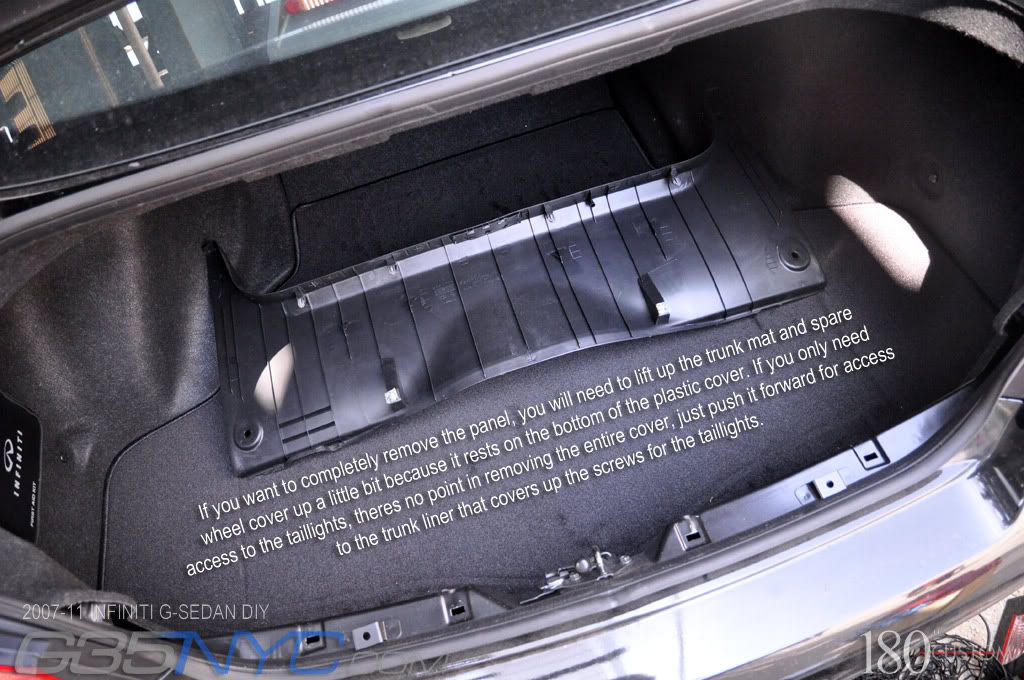
A lot of people have been asking on how to remove the taillights, reverse lamps and the trunk lid lip spoiler on your 07+ Sedans. All writing and illustrations are in the pictures, so feel free to print it out or take a laptop with you next time you want to remove any of those 3 things.

If you only want to remove the trunk lip spoiler, scroll down to the second half of the pictures.

Tools required:
  • Flat-Head screw driver
  • Ratchet with an 8MM socket or a 8MM wrench (ratchet is 100x easier)
  • Something along the lines of a credit card, or a plastic spackle
  • 2 Hands
I did this with no help so I had to hold the camera with one hand and use the other hand to take the trunk apart, so excuse the weird camera angles.

I also wrote this up at 4AM so excuse the spelling (if there any) as well.

Any questions, feel free to post a reply.

REMOVING THE TAILLIGHTS


Name:  DIY.jpg
Views: 1641
Size:  64.2 KB

Name:  DSC_9715.jpg
Views: 1331
Size:  109.2 KB


Name:  DSC_9717.jpg
Views: 1447
Size:  98.7 KB

Name:  DSC_9718.jpg
Views: 1369
Size:  151.4 KB

Name:  DSC_9719.jpg
Views: 1364
Size:  106.1 KB

Name:  DSC_9720.jpg
Views: 1633
Size:  101.4 KB

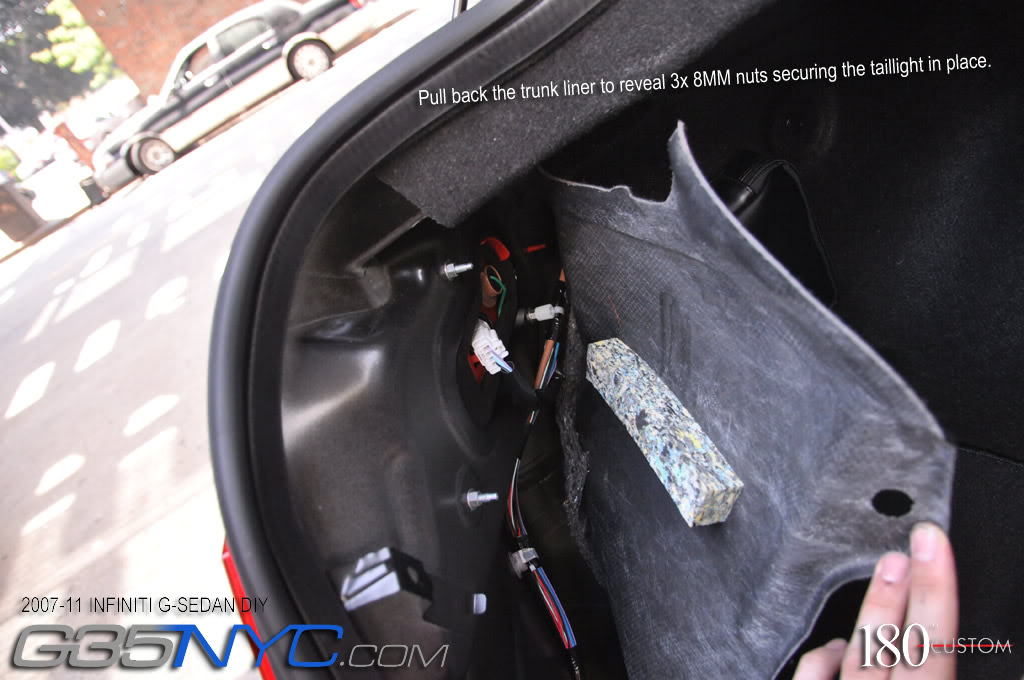
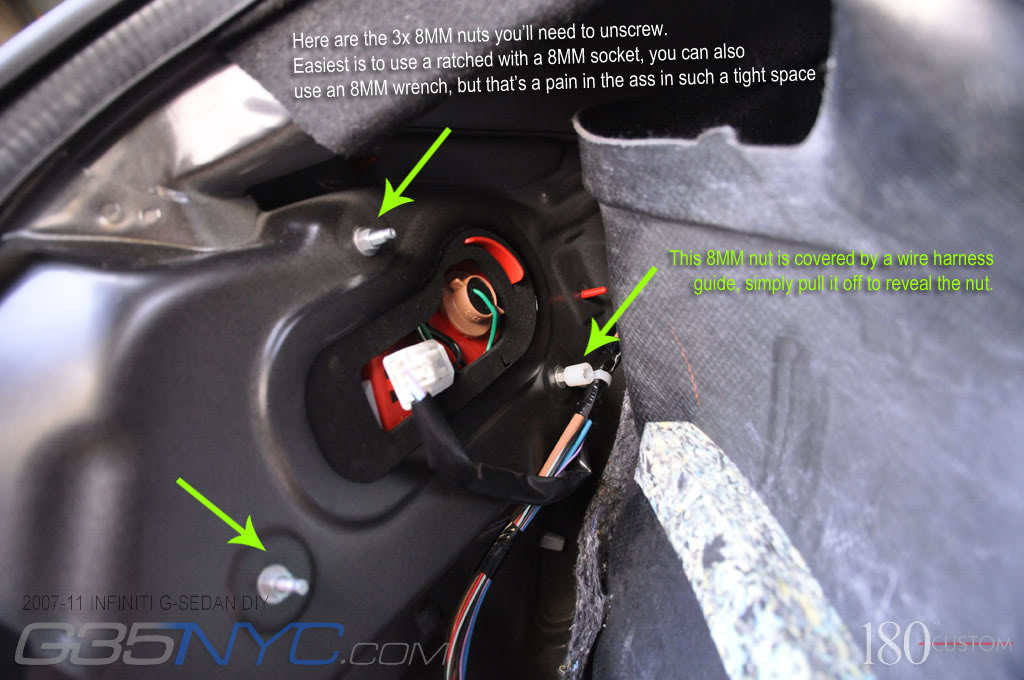
Once you removed the 8MM nuts and unplugged the taillight, lightly pull on the taillight and it should easily come out, hold the taillight with one hand as you pull the rubber grommet out of the chassis with the other.

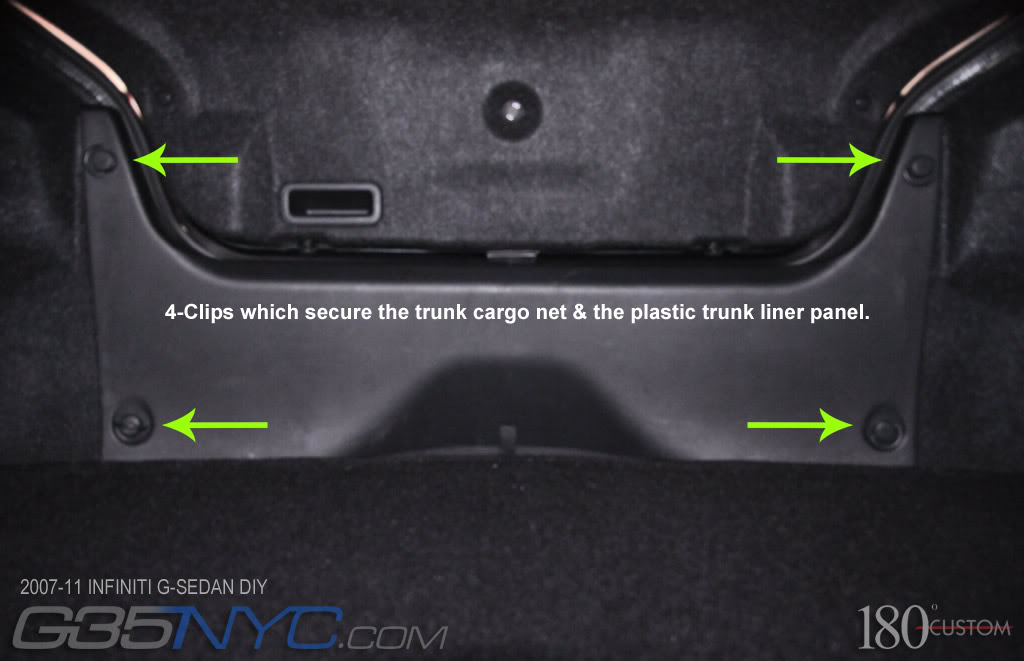
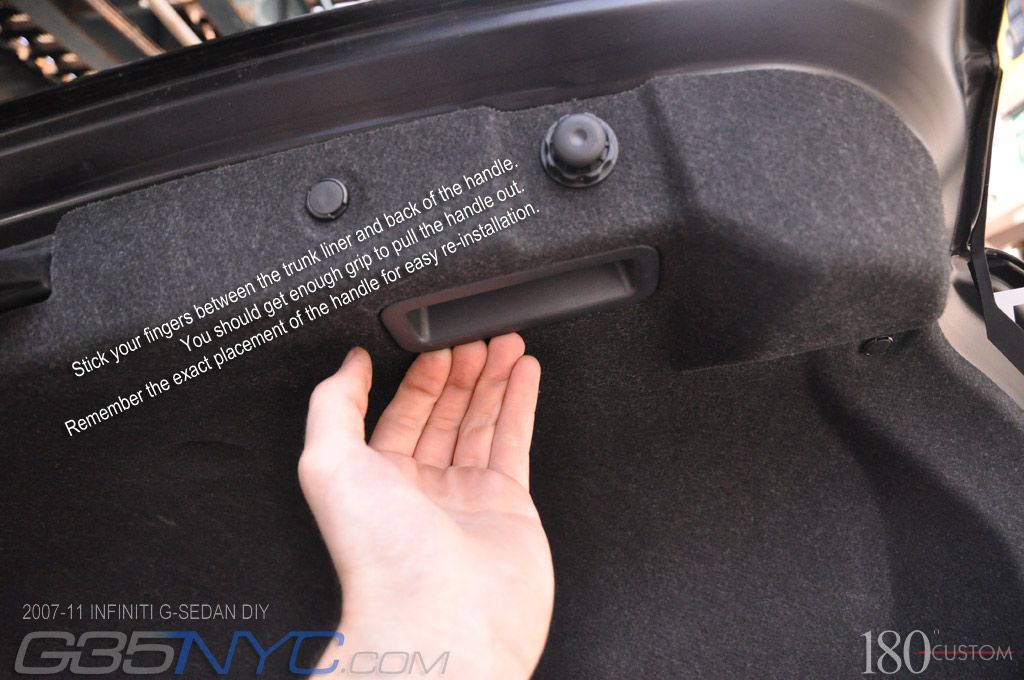
REMOVING THE REVERSE LAMPS &/OR TRUNK LIP SPOILER
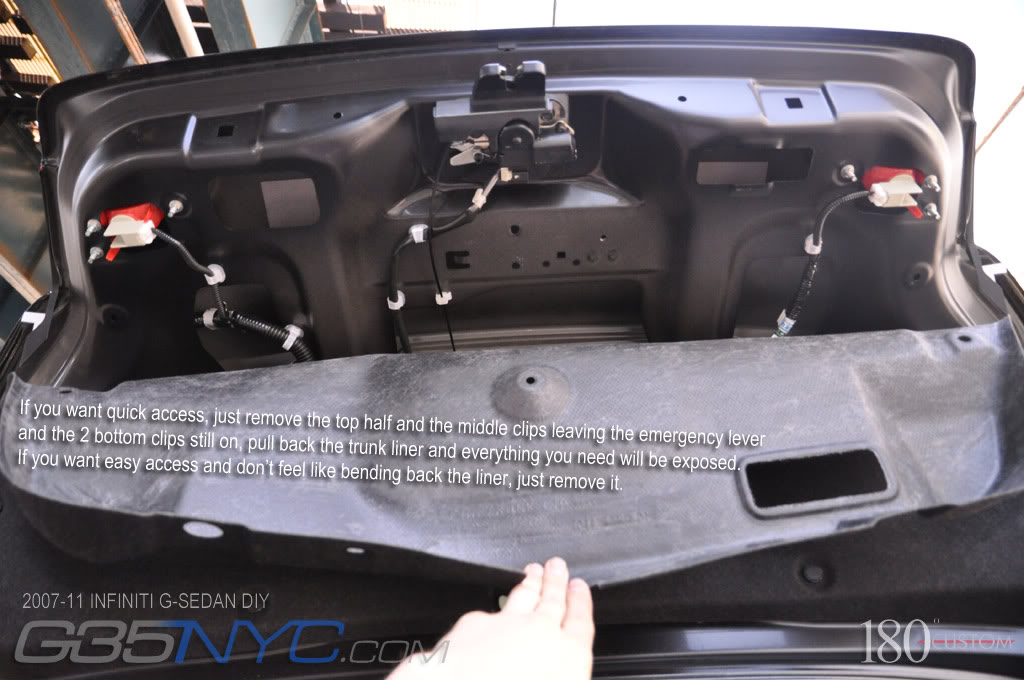
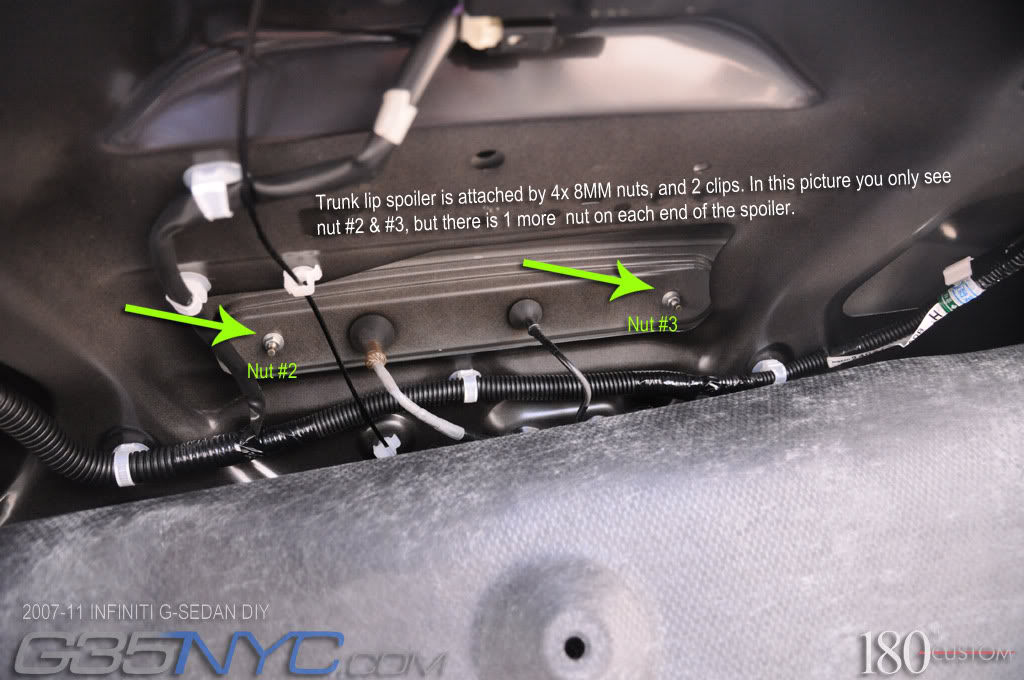
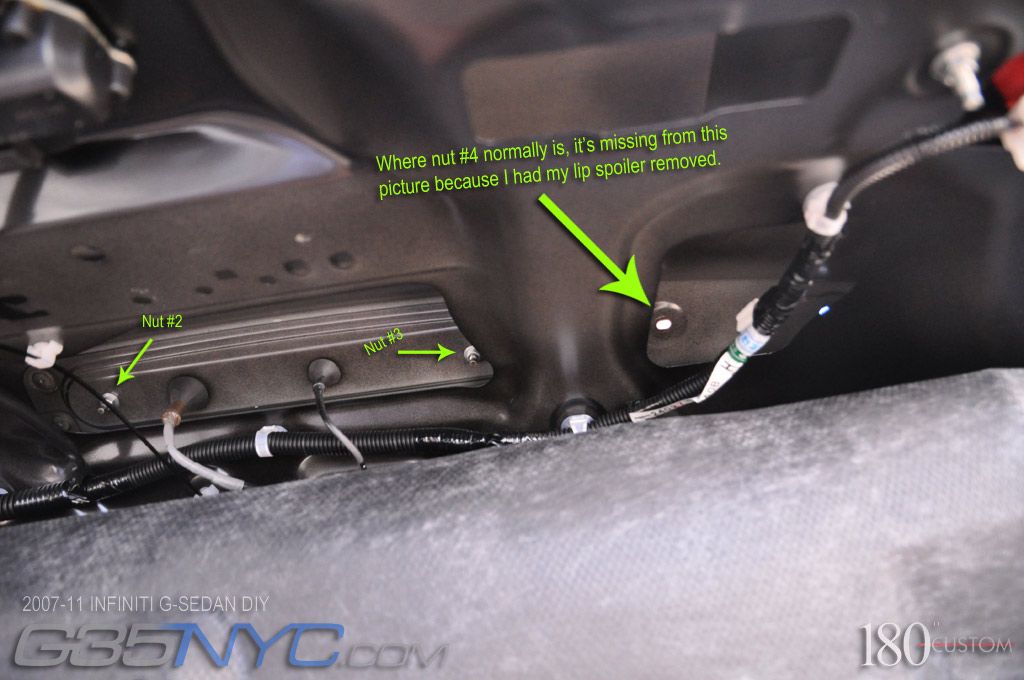
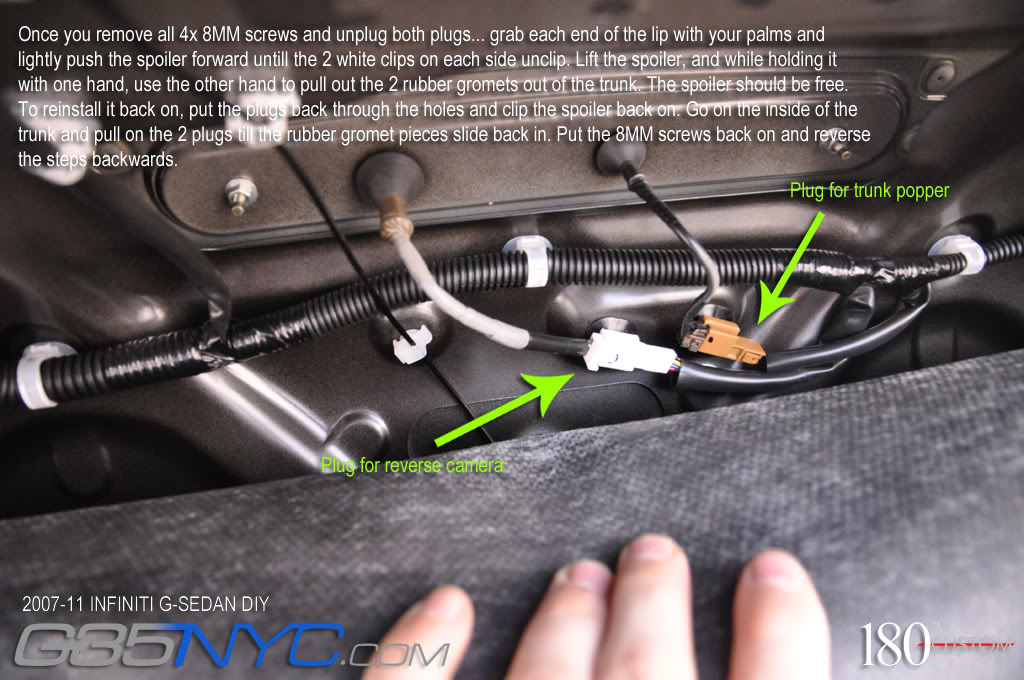

Name:  DSC_9724.jpg
Views: 1880
Size:  154.5 KB


Name:  DSC_9722.jpg
Views: 1365
Size:  89.1 KB

Name:  DSC_9725.jpg
Views: 1297
Size:  113.7 KB

Name:  DSC_9729.jpg
Views: 1353
Size:  125.7 KB

Name:  DSC_9727.jpg
Views: 1354
Size:  102.8 KB

Name:  DSC_9730.jpg
Views: 1316
Size:  105.3 KB


Name:  DSC_9733.jpg
Views: 1337
Size:  140.8 KB
 
Reply
Old Jul 28, 2010 | 05:12 AM
  #2  
g35sedan5at's Avatar
Registered User
iTrader: (2)
Joined: Aug 2006
Posts: 1,178
Likes: 1
nice! glad to see someone else awake at this time on the east coast, gives me hope.

Cmon guys! more v36 stuff! i think ill just make DIY's for ever single part i put on my car, minus air fresheners, lol
 
Reply
Old Jul 28, 2010 | 07:49 AM
  #3  
RaginCajun's Avatar
Registered User
Joined: Jun 2010
Posts: 51
Likes: 0
From: Baton Rouge, La
Nice DIY. I'll be swapping my reverse lights for LEDs soon and this will help alot. Thanks
 
Reply
Old Jul 28, 2010 | 08:10 AM
  #4  
Blue Dream's Avatar
I drove ttrank's car solo
iTrader: (50)
Joined: Mar 2009
Posts: 18,299
Likes: 1,488
From: By the sea, Tx
G35 sedan w/ too much money in mods
Premier Member

Awesome DIY!!
 
Reply
Old Jul 28, 2010 | 08:28 AM
  #5  
Defratos's Avatar
You're Despicable
Joined: May 2008
Posts: 6,167
Likes: 33
From: on a sand dune
Premier Member

Sweet DIY, I'll be using these instructions in a week or so, thanks
 
Reply
Old Jul 29, 2010 | 01:31 PM
  #6  
OMG35S's Avatar
Registered User
iTrader: (2)
Joined: Jun 2005
Posts: 782
Likes: 8
Great Write Up Vert!
 
Reply
Old Jul 29, 2010 | 02:36 PM
  #7  
sakataj's Avatar
Registered User
iTrader: (4)
Joined: Jan 2010
Posts: 129
Likes: 0
From: Tenn
good write up but instead of using the flat head on those plastic clips that tear up easily....

try one of 2 things, buying a interior tool set for like 20 bucks (you'll use it more than just this i promise) or two use a zip tie (on the ones that have holes in them) and feed it through there and then pull it out
 
Reply
Old Jul 29, 2010 | 05:53 PM
  #8  
djfarhan's Avatar
Registered User
15 Year Member
Liked
Loved
Community Favorite
iTrader: (6)
Joined: Aug 2009
Posts: 14,344
Likes: 324
From: Dubai, UAE
sticky status!
 
Reply
Old Aug 1, 2010 | 01:46 AM
  #9  
apexi957's Avatar
Registered User
iTrader: (1)
Joined: May 2010
Posts: 1,677
Likes: 53
From: Atlanta
This is seriously way too late lol. If I read this sticky a few weeks ago then my painting job would be easier.
 
Reply
Old Aug 23, 2010 | 11:38 PM
  #10  
LakeShore_Slate's Avatar
Registered User
iTrader: (1)
Joined: Aug 2009
Posts: 935
Likes: 12
From: Central Florida
perrrfect ty
 
Reply
Old May 24, 2011 | 05:14 PM
  #11  
mishmosh's Avatar
Registered User
iTrader: (2)
Joined: Sep 2005
Posts: 1,782
Likes: 73
From: NE Ohio
Just wanted to say thanks for the awesome DIY!
 
Reply
Old Dec 16, 2011 | 07:45 PM
  #12  
luger303's Avatar
Registered User
Joined: Oct 2010
Posts: 690
Likes: 23
From: Denver
Do I need to worry about putting some sort of weather stripping or glue back onto the reverse lights after I install them?
 
Reply
Old Dec 16, 2011 | 07:47 PM
  #13  
mishmosh's Avatar
Registered User
iTrader: (2)
Joined: Sep 2005
Posts: 1,782
Likes: 73
From: NE Ohio
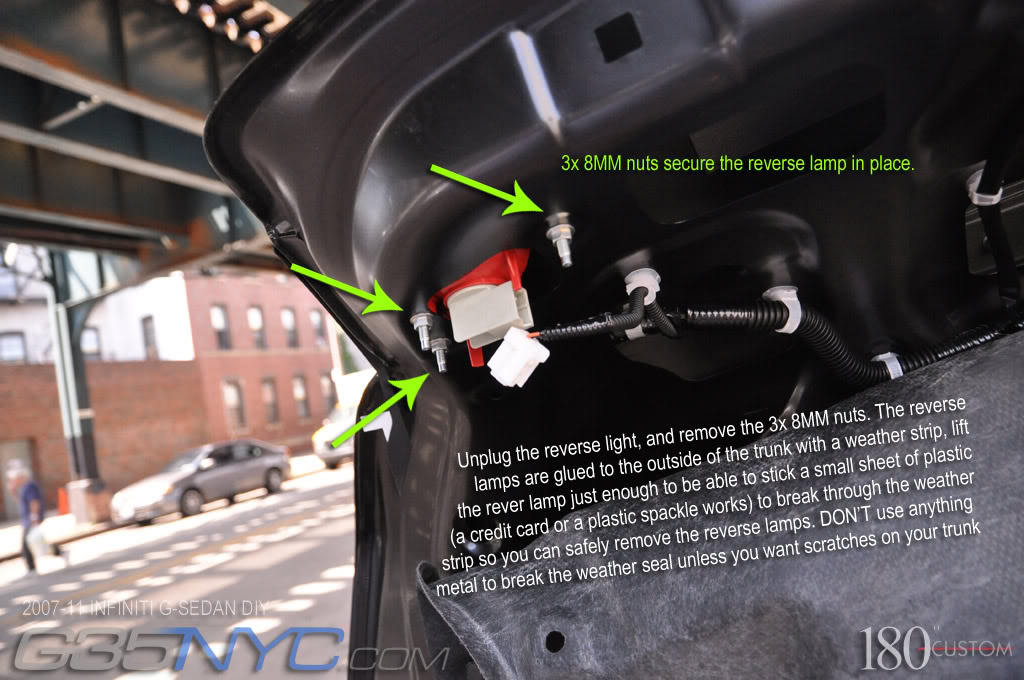
The foam weather strip was pretty much split after removal so I put a bead of 3M weatherstrip adhesive all the way around to join it back together. Since I had to remove them after that, I noticed it worked very well.
 
Reply
Old Jan 16, 2012 | 11:30 PM
  #14  
PERKS11's Avatar
Registered User
iTrader: (2)
Joined: Dec 2010
Posts: 387
Likes: 14
From: St. Louis
thanks for this write up. will help me out tomm.
 
Reply
Old Sep 3, 2014 | 05:14 AM
  #15  
takeapieandrun's Avatar
Registered User
iTrader: (2)
Joined: Dec 2013
Posts: 310
Likes: 20
From: Bay Area, CA
4 years later.. and another thanks. I already changed all my front lights just waiting on a couple more LED's for the rear.
 
Reply
Related Topics
Thread
Thread Starter
Forum
Replies
Last Post
911Turbo
19 Inch
10
Aug 24, 2016 08:31 AM
wonderizm
G35 Coupe V35 2003 - 07
8
Sep 24, 2015 03:09 AM
netcbc
Exterior - Body Parts CDN
2
Aug 21, 2015 09:50 AM
Frostbite91
New Members Check In
8
Jul 27, 2015 05:25 AM


You have already rated this thread Rating: Thread Rating: 0 votes,  average.


All times are GMT -4. The time now is 01:54 AM.