How To - Subwoofer and Amplifer Install on a 2007 G35 Sedan with BOSE
#1
 06-25-2013, 12:20 AM


How To - Subwoofer and Amplifer Install on a 2007 G35 Sedan with BOSE
Hey all.
Some of you may recognize me from searching and posting over and over again regarding a subwoofer install I was attempting. Well needless to say the install is complete and I am thrilled with the upgrade to my stereo system.
What I will be outlining here is EXACTLY what I did. I will reference some of the online articles that I used and will try and reference with pictures I took as well as possible.
This may not be the best method for everyone, but overall it worked well for me and I will actually cover some points that's worked for me well whereas other "how to's" did not suffice for me. I am not super technical with stereos or anything but this would probably be my 4th subwoofer install but my 1st on a BOSE equipped system.
My hope is that since I was not able to find a specific "how to" for a 2007 G35 sedan that this may help others in the future. Since so many others helped me with their forum posts, I figured I would do the same
Ok so here goes...
My Setup:
2007 G35 Journey w/ Nav/Tech/Premium package
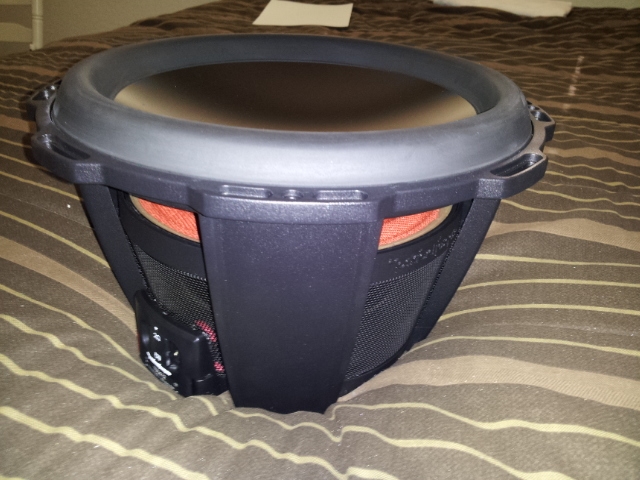
1 - 12" Rockford Fosgate T0D212 = $205
1 - Pioneer GM-D9601 Mono Amplifier = $135
1 - KnuKoncepts 4G Amplifier Install kit = $25
1 - CustomEnclosures G35 Subwoofer box = $140
1 - Schosche 80w 2-channel Lineout Converter = $11
1 - Dynamat 2-door Sound Dampening kit - $50
Total Price: All shipped to my door, ~$600
Best part of it all is I sold my previous kit (alpine type r/pioneer amp) for $225 so my overall price for this install was reduced
References (to name a few)
http://forums.nicoclub.com/sub-insta...n-t511364.html
http://forums.nicoclub.com/2007-m35-...n-t529737.html
So... onto the install.
First thing I did was remove the front door panels so I could install the dynamat. I purchased a 4 piece 12"x36" kit from Amazon (where I got everything except the box) and it was more than enough for the front two doors. I was able to completely cover the front two doors and even the rear decklid and select pieces of the trunk.
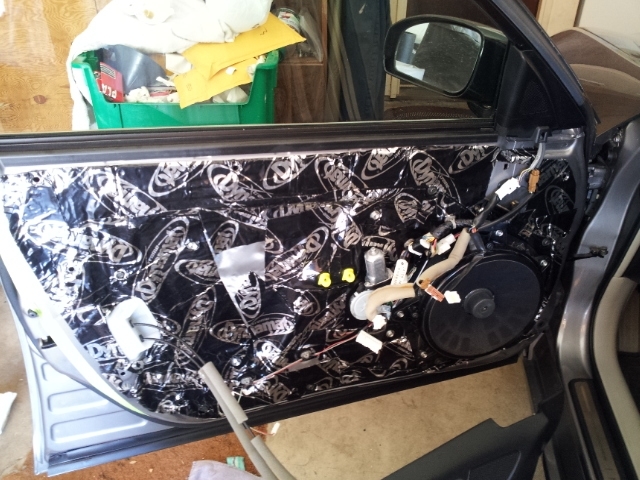
This was my first experience with dyamant. The product is easy to use, however, a few words of wisdom.
Try and get the piece you are pasting on lined up the first time. It can be removed, but sometimes leaves its sticky residue over. Also, make sure you know what you are covering, I cut out all holes for screws and fasteners, but the first time around I didnt recognize the trim area (in the end the door panel covers all the dynamat) and when I put the trim back on some pieces of dynamat were exposed and I had to trim them down.
This stuff is awesome though. Easy to use and when I was done even before the sub was installed the doors creaks and rattles were gone and the stock system sounded better.
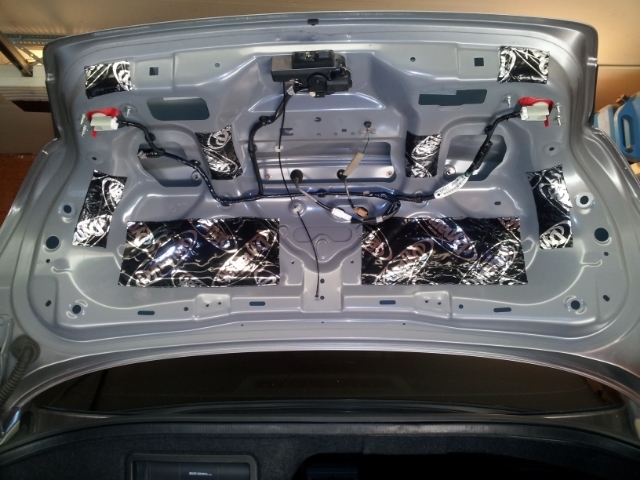
I did this same type of cut and paste on the trunk but in more select areas (where the trunk trim touched the most) because the dynamat does add weight and I didnt want my trunk to get all heavy.
Once I had all the desired dynamat done I then proceeded to run the power wire. This part was not necessarily hard, but it was a little time consuming because you do have to take the glove box off (the way I did it) and you have to run wires down the panels so it just takes time.
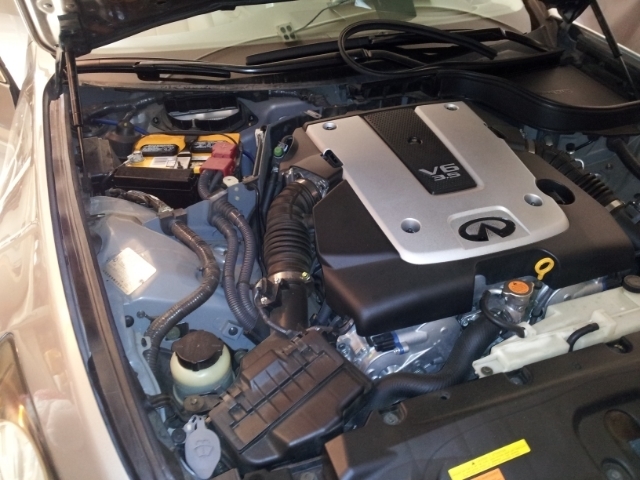
I started by popping the hood and removing the battery cover and lower windshield cover (yes my Infiniti engine emblem fell off, and yes I did paint it with a black sharpie dammit)
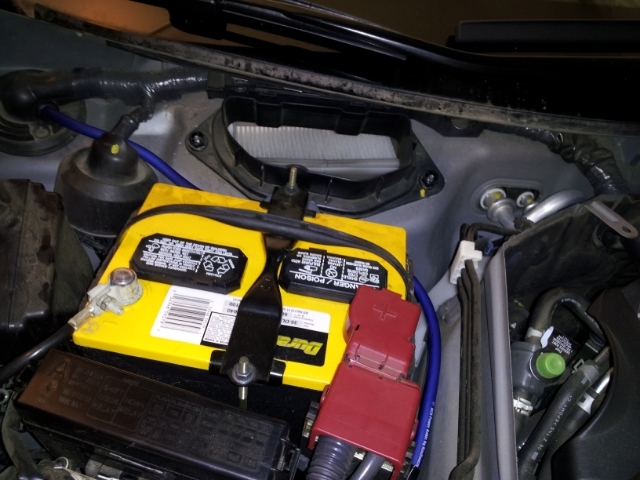
Here you can see the cabin air filter (mine was new, otherwise you can change it if you want) and it gives you great access to where I ran the power cable.
What I did to find the right spot is after I removed the glovebox I ran my hand up into the top most part of the interior until i felt the grommet. Then I put my blade on the other side and pushed it gently down into the grommet (don't worry, the grommet is SUPER strong) just so I could feel where I was pressing and I marked it. Now on the link I referenced, he cut open the taped portion and ran it into there. Also a great idea but I took a different route. From there I ran the power cable into it. I then placed the KnuKoncepts amp kit waterproof grommet in there and then I put a clear windows sealer on there and about an hour later covered that with a light layer of thick black silicone sealant (pic is before the sealant) and it sealed it up right.
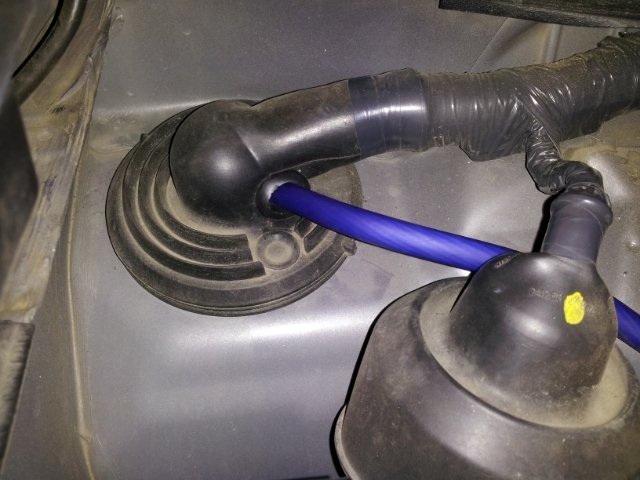
Note: I mesaured out the amount of cable I would have in the engine bay with about 3 inches of leeway since I still had to splice in the fuse holder. This is important because you don't want too much or too little wire in there. Also, I would recommend doing the sealant last so that you know exactly where the power wire will be positioned. I got lucky
From there I removed the glove box (you can search how to do this on the forum) which was not hard. I have a interior detail remover tool which helped, but just take your time and go slow, make sure you remove all necessary screws, clips, etc, and finesse the parts off. Once the glove box is off (I didnt take it off I just removed it and dropped it down) the rest was easy.
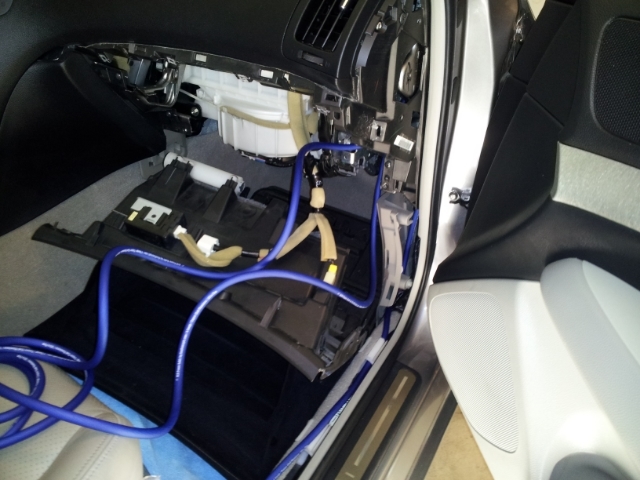
So once I had the power cable run down through the glove box area I popped off the door sills which was pretty simple. They have these cool white wire guides and I only had one taped wire in there so there was plenty of room for the thick 4 gauge cable to run.
When I ran the wire from the front to the back I used the coat hanger trick. I just put the coat hanger through the back into into the front, taped it, and then pulled back which worked fine. Once the power cable was run into the back then ran it underneath the seat, up the back portion, and then into the trunk. If you do it this way just make sure you place the wire low enough below the seat that you can put the door sill back on. Took a few minutes to get it right but eventually everything popped back in place.
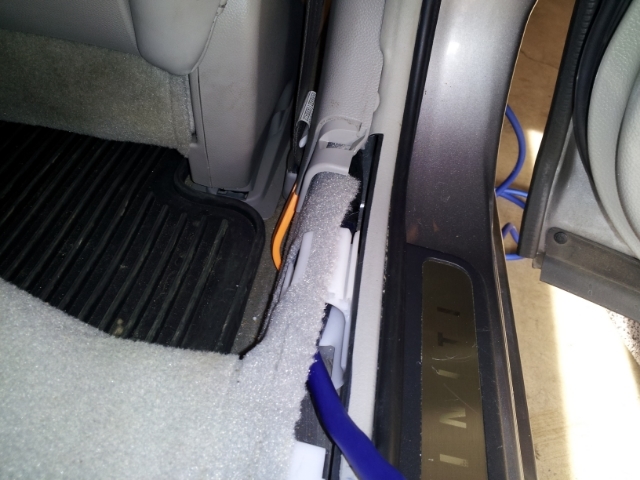
The power cable almost fit through an opening in the metal behind the back seat but I did have to enlarge the hole slightly by giving it a hard circular motion with my screwdriver. It bent the metal just enough to let the wire run through. Once that was done the hardest part was over. Everything clicked back in place and it all looked pretty good.
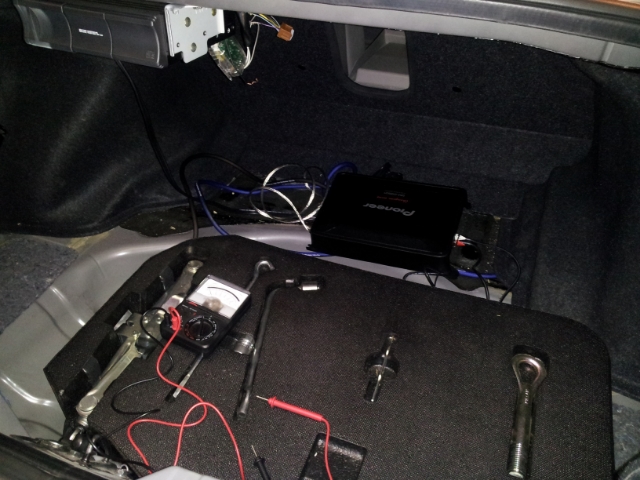
When it came to the ground it took me a minute to find the right spot. I used a multimeter to test some spots and the ideal location was a factory screw put in place on the left side underneath the spare tire. I just used a dremmel and sanded around it, placed a washer on it, found a nut to match and tightened it down. Sits under the carpet and pops up behind the subwoofer with no issues.
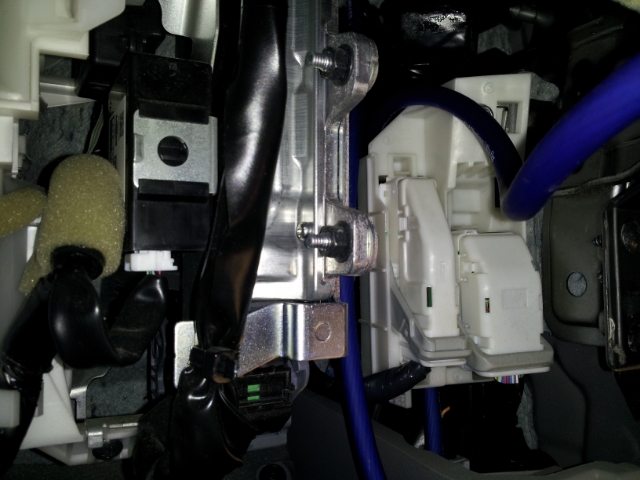
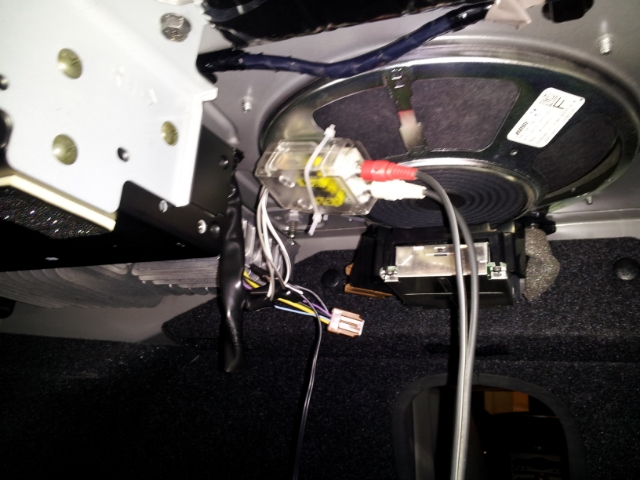
Ok, so from here is where the tricky part came in and the multimeter saved me. When I wired my LOC up (which technically I didnt need since my amp has speaker level inputs to RCA) I was told to splice into the subwoofer harness before it goes into the Bose SUB amp. The reason I emphasise this is because the big amp in there is a Bose amp, but there is also another 100w amp that sits right below the sub. I popped out the connector and tapped the light blue wire (+) and the violet wire (-) and then the gray wire (amp on signal).
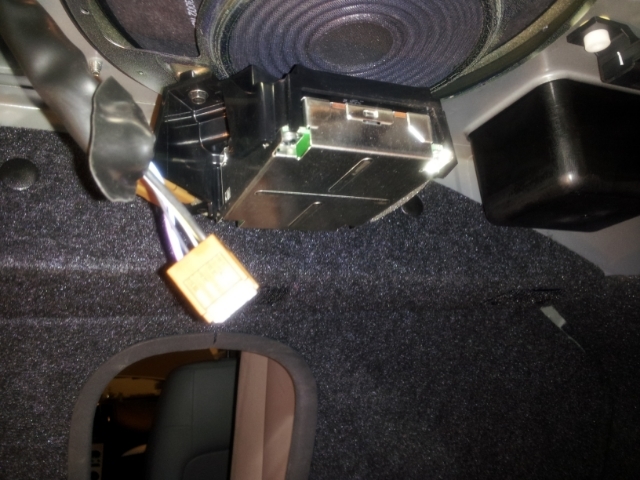
Now, here is where it went wrong for me. I was told I could plug the stock sub back in. Not that I cared as the 12" would drown it out anyways and the stock "blose" sub sucks anyways, but I figured hey, extra bass, no big deal. After I hooked everything up, I could not get my Pioneer amp to turn on. The stock Bose sub was turning on so I assumed I wired it right. Well as it turns out (thanks to the multimeter) that with the stock sub connector plugged in, the amp remote turn on signal going to my sub was only getting 7.5 volts. That is enough to turn on the Bose sub, but not my amp. So once I determined this, I left it unplugged, mounted the LOC, and to my relief the amp light on my Pioneer turned blue and I knew I was good
Once this was all done, the end was in sight.
Some of you may recognize me from searching and posting over and over again regarding a subwoofer install I was attempting. Well needless to say the install is complete and I am thrilled with the upgrade to my stereo system.
What I will be outlining here is EXACTLY what I did. I will reference some of the online articles that I used and will try and reference with pictures I took as well as possible.
This may not be the best method for everyone, but overall it worked well for me and I will actually cover some points that's worked for me well whereas other "how to's" did not suffice for me. I am not super technical with stereos or anything but this would probably be my 4th subwoofer install but my 1st on a BOSE equipped system.
My hope is that since I was not able to find a specific "how to" for a 2007 G35 sedan that this may help others in the future. Since so many others helped me with their forum posts, I figured I would do the same
Ok so here goes...
My Setup:
2007 G35 Journey w/ Nav/Tech/Premium package
1 - 12" Rockford Fosgate T0D212 = $205
1 - Pioneer GM-D9601 Mono Amplifier = $135
1 - KnuKoncepts 4G Amplifier Install kit = $25
1 - CustomEnclosures G35 Subwoofer box = $140
1 - Schosche 80w 2-channel Lineout Converter = $11
1 - Dynamat 2-door Sound Dampening kit - $50
Total Price: All shipped to my door, ~$600
Best part of it all is I sold my previous kit (alpine type r/pioneer amp) for $225 so my overall price for this install was reduced
References (to name a few)
http://forums.nicoclub.com/sub-insta...n-t511364.html
http://forums.nicoclub.com/2007-m35-...n-t529737.html
So... onto the install.
First thing I did was remove the front door panels so I could install the dynamat. I purchased a 4 piece 12"x36" kit from Amazon (where I got everything except the box) and it was more than enough for the front two doors. I was able to completely cover the front two doors and even the rear decklid and select pieces of the trunk.
This was my first experience with dyamant. The product is easy to use, however, a few words of wisdom.
Try and get the piece you are pasting on lined up the first time. It can be removed, but sometimes leaves its sticky residue over. Also, make sure you know what you are covering, I cut out all holes for screws and fasteners, but the first time around I didnt recognize the trim area (in the end the door panel covers all the dynamat) and when I put the trim back on some pieces of dynamat were exposed and I had to trim them down.
This stuff is awesome though. Easy to use and when I was done even before the sub was installed the doors creaks and rattles were gone and the stock system sounded better.
I did this same type of cut and paste on the trunk but in more select areas (where the trunk trim touched the most) because the dynamat does add weight and I didnt want my trunk to get all heavy.
Once I had all the desired dynamat done I then proceeded to run the power wire. This part was not necessarily hard, but it was a little time consuming because you do have to take the glove box off (the way I did it) and you have to run wires down the panels so it just takes time.
I started by popping the hood and removing the battery cover and lower windshield cover (yes my Infiniti engine emblem fell off, and yes I did paint it with a black sharpie dammit)
Here you can see the cabin air filter (mine was new, otherwise you can change it if you want) and it gives you great access to where I ran the power cable.
What I did to find the right spot is after I removed the glovebox I ran my hand up into the top most part of the interior until i felt the grommet. Then I put my blade on the other side and pushed it gently down into the grommet (don't worry, the grommet is SUPER strong) just so I could feel where I was pressing and I marked it. Now on the link I referenced, he cut open the taped portion and ran it into there. Also a great idea but I took a different route. From there I ran the power cable into it. I then placed the KnuKoncepts amp kit waterproof grommet in there and then I put a clear windows sealer on there and about an hour later covered that with a light layer of thick black silicone sealant (pic is before the sealant) and it sealed it up right.
Note: I mesaured out the amount of cable I would have in the engine bay with about 3 inches of leeway since I still had to splice in the fuse holder. This is important because you don't want too much or too little wire in there. Also, I would recommend doing the sealant last so that you know exactly where the power wire will be positioned. I got lucky
From there I removed the glove box (you can search how to do this on the forum) which was not hard. I have a interior detail remover tool which helped, but just take your time and go slow, make sure you remove all necessary screws, clips, etc, and finesse the parts off. Once the glove box is off (I didnt take it off I just removed it and dropped it down) the rest was easy.
So once I had the power cable run down through the glove box area I popped off the door sills which was pretty simple. They have these cool white wire guides and I only had one taped wire in there so there was plenty of room for the thick 4 gauge cable to run.
When I ran the wire from the front to the back I used the coat hanger trick. I just put the coat hanger through the back into into the front, taped it, and then pulled back which worked fine. Once the power cable was run into the back then ran it underneath the seat, up the back portion, and then into the trunk. If you do it this way just make sure you place the wire low enough below the seat that you can put the door sill back on. Took a few minutes to get it right but eventually everything popped back in place.
The power cable almost fit through an opening in the metal behind the back seat but I did have to enlarge the hole slightly by giving it a hard circular motion with my screwdriver. It bent the metal just enough to let the wire run through. Once that was done the hardest part was over. Everything clicked back in place and it all looked pretty good.
When it came to the ground it took me a minute to find the right spot. I used a multimeter to test some spots and the ideal location was a factory screw put in place on the left side underneath the spare tire. I just used a dremmel and sanded around it, placed a washer on it, found a nut to match and tightened it down. Sits under the carpet and pops up behind the subwoofer with no issues.
Ok, so from here is where the tricky part came in and the multimeter saved me. When I wired my LOC up (which technically I didnt need since my amp has speaker level inputs to RCA) I was told to splice into the subwoofer harness before it goes into the Bose SUB amp. The reason I emphasise this is because the big amp in there is a Bose amp, but there is also another 100w amp that sits right below the sub. I popped out the connector and tapped the light blue wire (+) and the violet wire (-) and then the gray wire (amp on signal).
Now, here is where it went wrong for me. I was told I could plug the stock sub back in. Not that I cared as the 12" would drown it out anyways and the stock "blose" sub sucks anyways, but I figured hey, extra bass, no big deal. After I hooked everything up, I could not get my Pioneer amp to turn on. The stock Bose sub was turning on so I assumed I wired it right. Well as it turns out (thanks to the multimeter) that with the stock sub connector plugged in, the amp remote turn on signal going to my sub was only getting 7.5 volts. That is enough to turn on the Bose sub, but not my amp. So once I determined this, I left it unplugged, mounted the LOC, and to my relief the amp light on my Pioneer turned blue and I knew I was good
Once this was all done, the end was in sight.
Last edited by MikeJones916; 09-07-2017 at 04:16 PM.
#2
06-25-2013, 12:21 AM
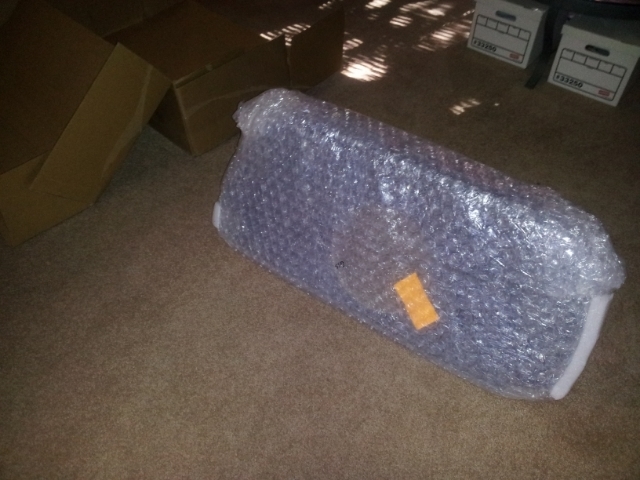
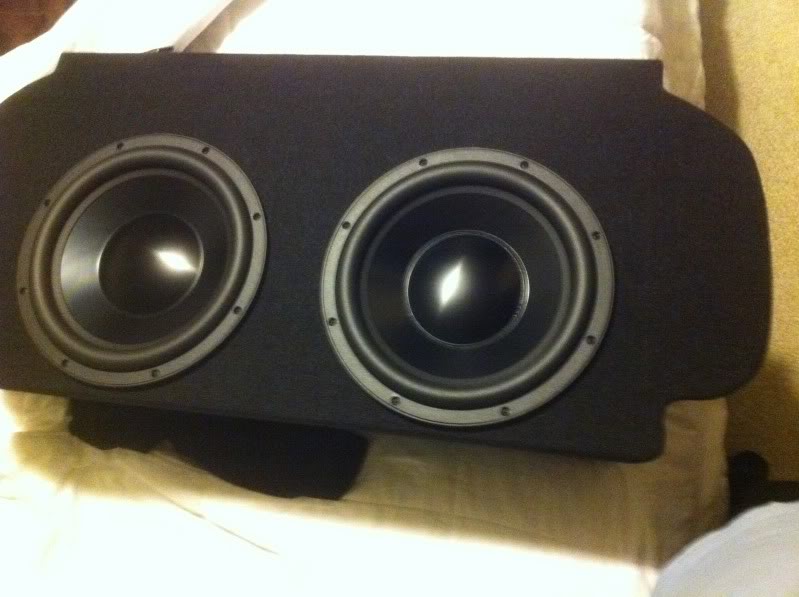
The enclosure I purchased from Tyler at CustomEnclosures was exactly what I wanted. He can be found on ebay by typing "2007 G35 sedan subwoofer box" and he sells tons of other custom boxes. His original design is for 2 - 12" subwoofers but the cubic ft per 12" was only about .85 so I decided to go with 1 - 12" and have him put dual ports on. This was what Rockford recommended which turned out well for me.
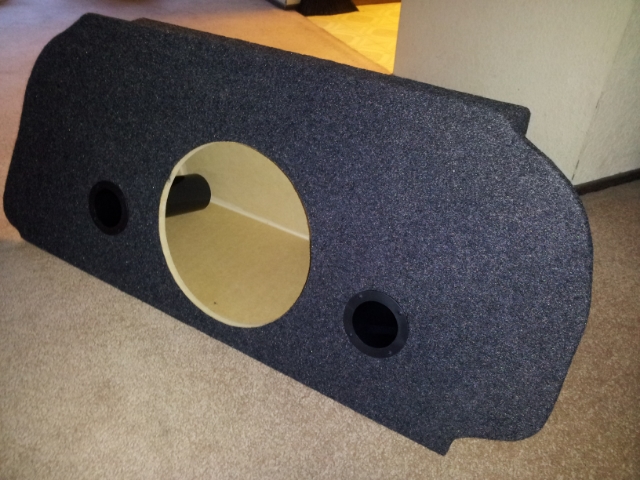
Color match on the carpet was almost dead on, it fits so snug in the trunk that it needs no bracing. I spoke with some of his previous customers and they said it never comes out of place except maybe under some heavy donuts. Now that being said, I did have two issues with the box that I mentioned to its creator. I did not like that when looking through the ports you can see the wood and white sealant. This could be corrected with a black vinyl sticker or paint like I did.
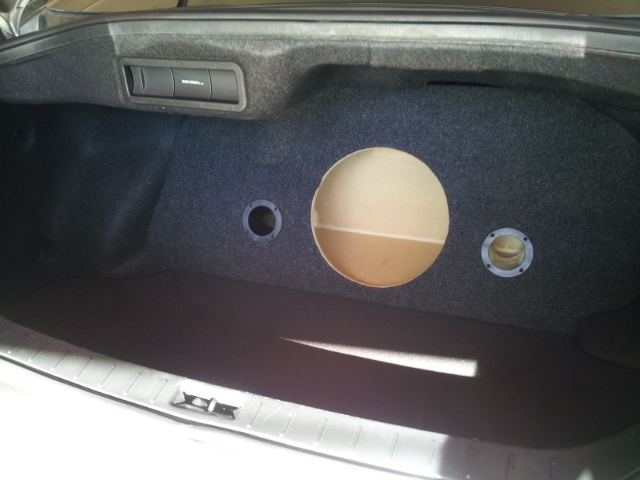
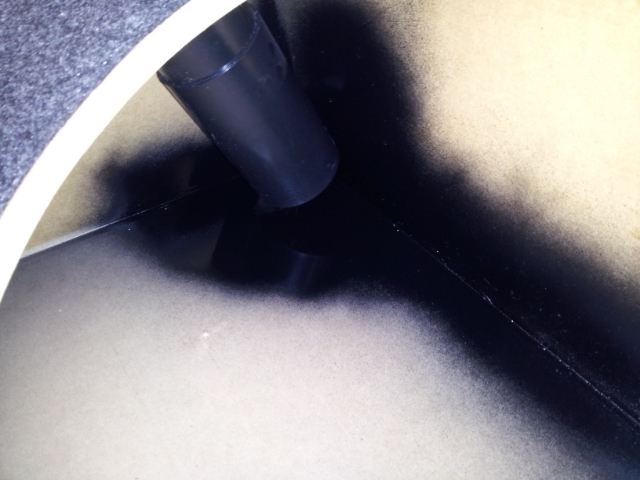
Once the paint dried and I reinstalled everything it looked way better IMO. The ports just look black almost as if they are not even open instead of the wood and white color.
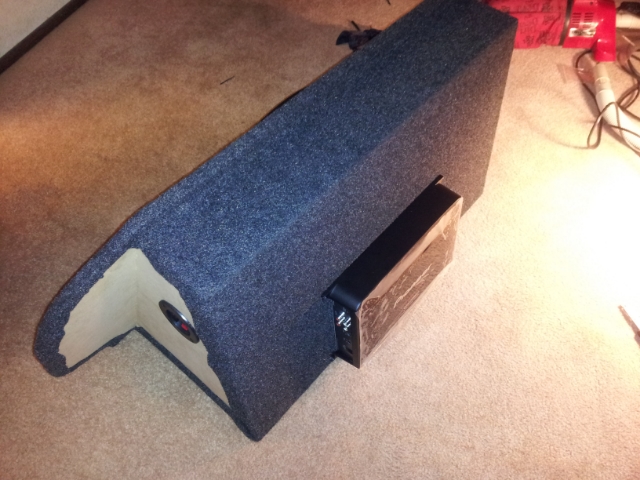
My second issue with this box is how my sub fit into it. If you notice that Rockford subwoofer I bought has an ohm converter on the bottom of it. This is a nice feature for the sub, but it did not fit into the box, that little extra "bump" on the bottom meant it didn't fit. At first I freaked out, then I realized I could just turn the subwoofer upside down. It fit perfect after that, but my OCD makes me hate it a little bit because it says "etagsoF drofkcoR" on the subwoofer. Not that I see it or that anyone noticed it that I didn't tell, but I am OCD and it bothered me. Other than that, best box I have ever seen. Tyler leaves space in between the box and seats to mount the amp and not only that but enough that it has plenty of breathing room (not that mono amps get that hot).
The amp installation kit was also excellent. The 4 gauge wire is super thick but also very malleable. KnuKoncepts uses high quality parts and were very friendly with their customer service. My only critiques of their kit (at least the one I received) is that the RCA's on either end did not fit securely on my LOC or in my AMP. I tried to bend them and flex them but it was not to my liking so I ended up using another pair that I had. I also didn't like that they were so long. I get it, they are long so you can run them to the deck, but since I tapped into the back, I had all this extra wire so I didn't end up using them. Otherwise, thick wire, excellent fuse holder (make sure you buy the right fuse, my amp is 120a so I actually had to buy new fuses which were like $4 shipped on ebay for 5 of them) and connecting accessories were all legit.
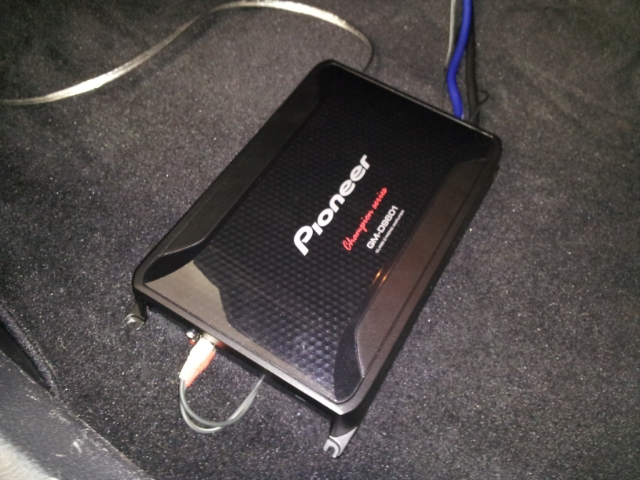
So in the end, here is the finished setup.
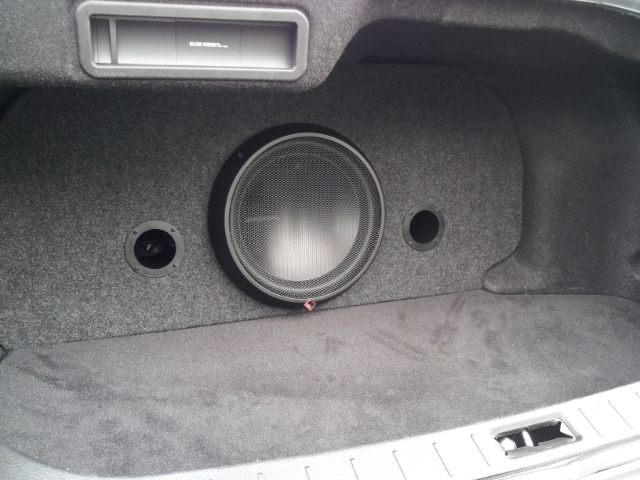
It looks fantastic, sounds amazing, and was well worth all the money and effort. I highly recommend Tyler's custom boxes as he really knows what he is doing and can customize and tune the frequency to whatever you want. I like all custom setups, but this one takes the cake IMO just because it looks so factory. I am running about 55% gain and moderate LPF and have my head unit controlling the bass (right now at -4) and it sounds fantastic. I listen to my music moderate volume, but when I showed this SLAP off to my friends they were blown away by it. It looks as good as it sounds, only added about 75 lbs to the vehicle, amp runs cool, and it is easy to tune.
I hope this "how to" is slightly helpful to you guys.

Color match on the carpet was almost dead on, it fits so snug in the trunk that it needs no bracing. I spoke with some of his previous customers and they said it never comes out of place except maybe under some heavy donuts. Now that being said, I did have two issues with the box that I mentioned to its creator. I did not like that when looking through the ports you can see the wood and white sealant. This could be corrected with a black vinyl sticker or paint like I did.
Once the paint dried and I reinstalled everything it looked way better IMO. The ports just look black almost as if they are not even open instead of the wood and white color.
My second issue with this box is how my sub fit into it. If you notice that Rockford subwoofer I bought has an ohm converter on the bottom of it. This is a nice feature for the sub, but it did not fit into the box, that little extra "bump" on the bottom meant it didn't fit. At first I freaked out, then I realized I could just turn the subwoofer upside down. It fit perfect after that, but my OCD makes me hate it a little bit because it says "etagsoF drofkcoR" on the subwoofer. Not that I see it or that anyone noticed it that I didn't tell, but I am OCD and it bothered me. Other than that, best box I have ever seen. Tyler leaves space in between the box and seats to mount the amp and not only that but enough that it has plenty of breathing room (not that mono amps get that hot).
The amp installation kit was also excellent. The 4 gauge wire is super thick but also very malleable. KnuKoncepts uses high quality parts and were very friendly with their customer service. My only critiques of their kit (at least the one I received) is that the RCA's on either end did not fit securely on my LOC or in my AMP. I tried to bend them and flex them but it was not to my liking so I ended up using another pair that I had. I also didn't like that they were so long. I get it, they are long so you can run them to the deck, but since I tapped into the back, I had all this extra wire so I didn't end up using them. Otherwise, thick wire, excellent fuse holder (make sure you buy the right fuse, my amp is 120a so I actually had to buy new fuses which were like $4 shipped on ebay for 5 of them) and connecting accessories were all legit.
So in the end, here is the finished setup.
It looks fantastic, sounds amazing, and was well worth all the money and effort. I highly recommend Tyler's custom boxes as he really knows what he is doing and can customize and tune the frequency to whatever you want. I like all custom setups, but this one takes the cake IMO just because it looks so factory. I am running about 55% gain and moderate LPF and have my head unit controlling the bass (right now at -4) and it sounds fantastic. I listen to my music moderate volume, but when I showed this SLAP off to my friends they were blown away by it. It looks as good as it sounds, only added about 75 lbs to the vehicle, amp runs cool, and it is easy to tune.
I hope this "how to" is slightly helpful to you guys.
Last edited by MikeJones916; 06-25-2013 at 11:51 AM.

 [/URL]

#5
07-09-2013, 03:52 PM
#7
07-10-2013, 12:02 AM
Trending Topics
#8
07-10-2013, 06:07 PM
There is ample space to mount an amp behind the box but it is not infinite. Since the box slopes inward, you have more space in the middle and to the lower part of the box than you do in the upper portion.
That being said, I had more than enough room to mount it and run all of the wires.
I emailed the seller with both the subwoofer and amplifier I was going to use and he assured me it would fit. I would recommend doing the same if you were to buy from him.
You always have the option of mounting the amplifier elsewhere, but I think behind the box is a good spot, makes it look clean, has enough air to allow it to cool, and keeps everything secure.
The following users liked this post:
iweb (07-14-2013)
#9
10-25-2013, 12:59 PM

So I'm a little confused on how the LOC was installed. I'm not good with Audio stuff so this probably sounds stupid. I get the light blue is where you tap the (+) and the violet is where you tap the (-) wire from the LOC. The grey wire will be the remote wire for you amp right? and what did you do for the ground on the LOC? Again i know sounds stupid but never done this.
#10
10-28-2013, 11:44 AM
So I'm a little confused on how the LOC was installed. I'm not good with Audio stuff so this probably sounds stupid. I get the light blue is where you tap the (+) and the violet is where you tap the (-) wire from the LOC. The grey wire will be the remote wire for you amp right? and what did you do for the ground on the LOC? Again i know sounds stupid but never done this.
I could be wrong about it, but I only rememver it having 5 wires total, none of them being a ground.
I'll have to double check on this tho.
#11
10-28-2013, 04:11 PM

Excellent step by step install. Wish it was here when I did mine. Yours almost mirrors mine ( I even used the same amp wiring kit). I tapped into the other harness using the rear speaker leads. My question is does your LOC have a remote out signal? I tried using the PAC SOEM-2 LOC and the remote didnt work. It worked great for the speaker wire to RCA conversion, but the remote turn on feature WONT work for Infinitis with Bose, so I just ended up tapping into the power wire going into the CD changer for my amp turn on signal, and just spliced a set of Fosgate hi to low level RCA leads onto the rear speaker wires. Only cons to this method is I do get a bit of interference/ humming when the volume is low (which I didnt get with the LOC), and my amp is always on if the car is on - even when the radio is turned off. Amp only goes off when the car is turned off. I tried hooking up a relay to the remote wire going to the Bose amp to beef up the signal strength, but it still is underpowered at 7.5? volts even going thru the relay! It seems the only way for the factory amp turn on to work on an add on amp, is to unplug the Bose sub and keep it unplugged. Has anyone found a way to keep the Bose amps intact while adding a usable remote amp turn on signal for an aftermarket amp without automatic line level sensing?
#12
02-06-2014, 01:31 PM
Excellent step by step install. Wish it was here when I did mine. Yours almost mirrors mine ( I even used the same amp wiring kit). I tapped into the other harness using the rear speaker leads. My question is does your LOC have a remote out signal? I tried using the PAC SOEM-2 LOC and the remote didnt work. It worked great for the speaker wire to RCA conversion, but the remote turn on feature WONT work for Infinitis with Bose, so I just ended up tapping into the power wire going into the CD changer for my amp turn on signal, and just spliced a set of Fosgate hi to low level RCA leads onto the rear speaker wires. Only cons to this method is I do get a bit of interference/ humming when the volume is low (which I didnt get with the LOC), and my amp is always on if the car is on - even when the radio is turned off. Amp only goes off when the car is turned off. I tried hooking up a relay to the remote wire going to the Bose amp to beef up the signal strength, but it still is underpowered at 7.5? volts even going thru the relay! It seems the only way for the factory amp turn on to work on an add on amp, is to unplug the Bose sub and keep it unplugged. Has anyone found a way to keep the Bose amps intact while adding a usable remote amp turn on signal for an aftermarket amp without automatic line level sensing?
I had to plug it into the AMP on signal from the BOSE sub but it only works if the connector is never plugged back into the BOSE sub, for some reason it wasn't getting enough power to turn them both on.
Feedback is non existent and the amp will shut off when I shut off the head unit. No love on the dual sub connection but I am fine with that since the aftermarket sub slaps so damn hard anyways.
_Michael
#13
12-08-2014, 12:40 PM

so glad i came across this, only thing im concerned with is can i control the amount of bass with this same setups by just using the stock dash unit? (audio, bass,tune) plan on using 12" kicker 10C124 and a boss 1100 watt amp (peak) @ RMS the amp runs at 250 watts and the kicker at RMS runs at 150 watts while peaking at 300 watts. is this a good combo? all i need to know, you seem to know what youre doing, so thanks for your time!
#14
12-08-2014, 05:05 PM
so glad i came across this, only thing im concerned with is can i control the amount of bass with this same setups by just using the stock dash unit? (audio, bass,tune) plan on using 12" kicker 10C124 and a boss 1100 watt amp (peak) @ RMS the amp runs at 250 watts and the kicker at RMS runs at 150 watts while peaking at 300 watts. is this a good combo? all i need to know, you seem to know what youre doing, so thanks for your time!
The short answer is yes, you will be able to control the amount of bass from the dash unit, however, I would not recommend it.
I originally installed it this way and it does work, but altering the amount of bass from the sub using the head unit also alters the amount pushing to the doors.
I didnt always want to change the bass volume from the door speakers so eventually I installed the included bass ****. Once I did this, I tuned put the bass **** a little under 1/2 way and tuned it exactly to where I wanted it to be. From there, I can turn the bass almost completely down from the sub without altering the bass from the doors, or I can turn it up to the point where I might knock my back window out of place.
As far as your combo goes, I would say this is more than adequate. It all depends on what your going for. My setup can make my car sound like a rattle box, while my friend has TWO, yes, TWO JL W7's with TWO 1,500 watt MONO amps and it makes my chest hurt when I sit in his car. For some reason he loves that, for me, I was looking for the ability to have an upgraded stereo for normal day-to-day but also be able to turn it up to impress my friends from time to time.
Good luck with the install, let me know if you need any other support!
_Michael
#15
12-10-2014, 10:22 AM
Hey Camacho.
The short answer is yes, you will be able to control the amount of bass from the dash unit, however, I would not recommend it.
I originally installed it this way and it does work, but altering the amount of bass from the sub using the head unit also alters the amount pushing to the doors.
I didnt always want to change the bass volume from the door speakers so eventually I installed the included bass ****. Once I did this, I tuned put the bass **** a little under 1/2 way and tuned it exactly to where I wanted it to be. From there, I can turn the bass almost completely down from the sub without altering the bass from the doors, or I can turn it up to the point where I might knock my back window out of place.
As far as your combo goes, I would say this is more than adequate. It all depends on what your going for. My setup can make my car sound like a rattle box, while my friend has TWO, yes, TWO JL W7's with TWO 1,500 watt MONO amps and it makes my chest hurt when I sit in his car. For some reason he loves that, for me, I was looking for the ability to have an upgraded stereo for normal day-to-day but also be able to turn it up to impress my friends from time to time.
Good luck with the install, let me know if you need any other support!
_Michael