
Low Buck Brake Ducts for the G

Thread Starter
|
Registered User
Joined: Sep 2003
Posts: 38
Likes: 0
Low Buck Brake Ducts for the G
In spite of installing an AP BBK, my on-track brake temps have been higher than I'm comfortable with. I'd been looking for a way to add additional cooling but nobody seemed to be making a kit of any kind for the G. I brought this up to Todd and Joel at VTR a couple of months ago and this was the relatively inexpensive solution they came up with.
One of the prefabbed urethane front lips in the Stillen catalog had two dummy ducts that could be cut open and routed through the front bumper to the wheel wells.
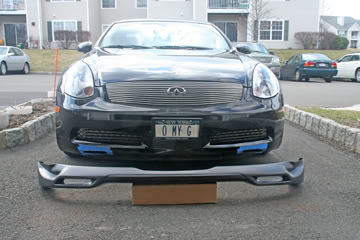
When the piece arrived I immediately checked the fit to see how much work would be involved. It actually snapped into place with no alterations and the fit was as good as any aftermarket body part I've ever seen, right out of the box. I removed the lip, cut away the back walls of the dummy ducts with a Dremmel, put some tape on the bumper behind the duct locations and refitted the lip to the bumper. I traced the inside duct outline onto the tape, removed the lip and cut out the two 2"x8" duct windows in the bumper.
Here the lip with the opened ducts is on a box in front of the bumper with the cut outs through the blue tape.
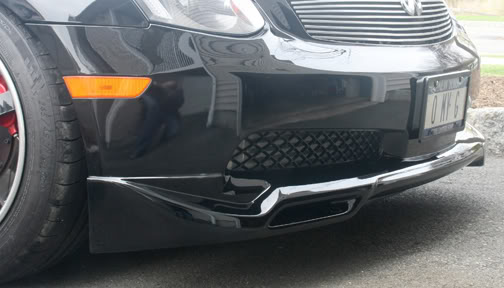
Inside the wheel wells we cut a 5"x6" opening in the front wall and covered that with a louvered metal air register (Home Depot), cut to size, with the louvers adjusted for max flow at the disk. After installation the register received a couple of coats of rustproof black paint.
The final attachment and finishing of the lip was done by Frank and his great team at Rick's Autobody up here in nearby Congers, NY
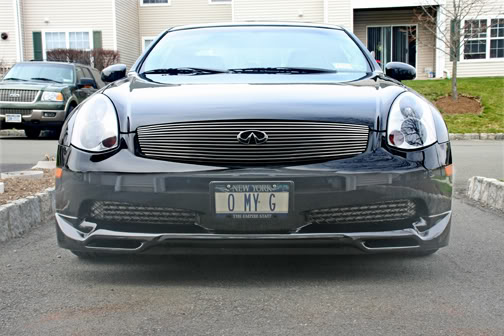
This would work just as well without the Stillen piece. The two openings in the bumper, if done neatly, are almost unnoticeable anyway. I just liked the way it looked and any additional down force is always welcome.
One of the prefabbed urethane front lips in the Stillen catalog had two dummy ducts that could be cut open and routed through the front bumper to the wheel wells.
When the piece arrived I immediately checked the fit to see how much work would be involved. It actually snapped into place with no alterations and the fit was as good as any aftermarket body part I've ever seen, right out of the box. I removed the lip, cut away the back walls of the dummy ducts with a Dremmel, put some tape on the bumper behind the duct locations and refitted the lip to the bumper. I traced the inside duct outline onto the tape, removed the lip and cut out the two 2"x8" duct windows in the bumper.
Here the lip with the opened ducts is on a box in front of the bumper with the cut outs through the blue tape.
Inside the wheel wells we cut a 5"x6" opening in the front wall and covered that with a louvered metal air register (Home Depot), cut to size, with the louvers adjusted for max flow at the disk. After installation the register received a couple of coats of rustproof black paint.
The final attachment and finishing of the lip was done by Frank and his great team at Rick's Autobody up here in nearby Congers, NY
This would work just as well without the Stillen piece. The two openings in the bumper, if done neatly, are almost unnoticeable anyway. I just liked the way it looked and any additional down force is always welcome.


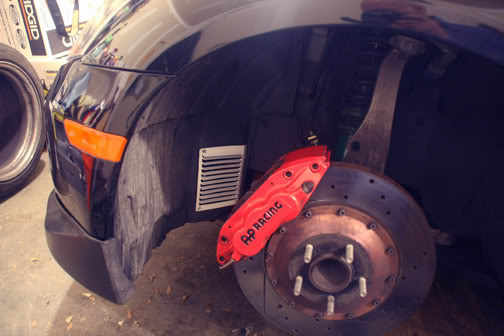
Not sure how effective this will be once the wheel is wrapped back around the brakes. All the brake ducts I've seen use something like dryer hose to route air to the middle of the inside face of the brake disc like so:
http://i72.photobucket.com/albums/i1...0/IMG_1361.jpg
http://i72.photobucket.com/albums/i1...0/IMG_1361.jpg

Why didn’t you run ducting to the brakes?... I had an instructor at road course event and he showed me what he did to his Z (pics of the same below)… he does a bunch of custom fabrication – eventually I’m going to have him do this to my car:
http://my350z.com/forum/members/beta...e-ducting.html
Eidt: similar to post above (didnt see it when I posted)
http://my350z.com/forum/members/beta...e-ducting.html
Eidt: similar to post above (didnt see it when I posted)
We were just working on this last weekend... thanks for the pics Mike!
As mentioned above, you definitely want the air to be directed at the center (or as close to the center) of the rotor as possible, and not pointed directly at the rotor or caliper. By directing air towards the center of the rotor, you allow the rotor to cool evenly from the center out as intended - by pointing the airflow directly at the rotor you can cause warping and cracking from uneven cooling.
The OP's ducting has a nice setup for the air intake, but I'd be curious to see how effective the open venting in the wheel well is.
Trending Topics
Thread Starter
|
Registered User
Joined: Sep 2003
Posts: 38
Likes: 0
Wow, that 350Z ducting is some beautiful job, and is certainly the most effective way to cool the disk. After I'd cooked the Brembos, the AP Racing set up cured the fade but I knew I'd be going faster this season with upgraded turbos and finally getting off street tires (Michelain PS2s) for wider Toyo R888s. The turbos in the JWT kit are mounted below the exhaust manifolds, adjacent to the wheel wells and I'd noticed very high wheel temperatures after fast runs that didn't involve any heavy breaking. I was looking for an inexpensive way to just push a higher volume of air through that space.
I ran the car last weekend at Lime Rock and the tire temps were much less than I've ever had (145-160 as apposed to 250+). Next test will be to block off one duct with some foam and check the difference right to left to eliminate the effect of the different tires. And then another reading after running the same number of laps with the foam switched to the other duct to eliminate any difference due to unequal loads on the tires (road course = mostly right turns). That will give a more objective reading of how effective my "low bucks" set-up is.
I ran the car last weekend at Lime Rock and the tire temps were much less than I've ever had (145-160 as apposed to 250+). Next test will be to block off one duct with some foam and check the difference right to left to eliminate the effect of the different tires. And then another reading after running the same number of laps with the foam switched to the other duct to eliminate any difference due to unequal loads on the tires (road course = mostly right turns). That will give a more objective reading of how effective my "low bucks" set-up is.


Thread
Thread Starter
Forum
Replies
Last Post
Jiggerjuice
Buying, Selling & Leasing Discussion
3
Aug 17, 2015 08:41 AM