
G35x front wheel bearings


Props to you for tackling this as a DIY job! Hopefully the hub is salvageable so you can reuse it - good thing they use the same part on both sides. Please keep this thread updated with pics, especially of the disassembly process. My X has 68K; no vibes yet, but I'd love to see what I might be up against some day with this car.

Joined: Jul 2005
Posts: 8,818
Likes: 468
From: Taxachusetts
I'll update with pics and progress. I figure someone needs to do a DIY of a front awd bearing job since most people bring to dealer.
Right now, just acquiring tools. Picked up the required 32mm axle nut socket, and a 17mm 1/2drive socket for the bearing bolts.
Gonna get a slide hammer, and 3-jaw puller to keep on hand as well.
Just need to figure out what suspension components I need to unbolt to be able to push the half-shaft out. Once I do that, and get necessary tools...it's go time.
According to the FSM, it looks like you just need to pop the upper balljoint and it should clear the front halfshaft. Here's the procedure copied out -
1. Remove tire from vehicle with power tool.
2. Remove undercover with power tool.
3. Remove brake caliper with power tool. Hang it in a place where it will not interfere with work.
NOTE:
Avoid depressing brake pedal while brake caliper is removed.
4. Remove disc rotor.
5. Remove wheel sensor from steering knuckle.
CAUTION:
Do not pull on wheel sensor harness.
6. Remove brake hose bracket from steering knuckle. Refer to BR-11, "BRAKE PIPING AND HOSE" .
7. Remove cotter pin. Then remove lock nut from drive shaft with power tool.
8. Remove cotter pin at steering outer socket, then loosen mounting nut.
9. Use a ball joint remover (SST) to remove steering outer socket from steering knuckle. Be careful not to damage ball joint boot.
CAUTION:
Tighten temporarily mounting nut to prevent damage to
threads and to prevent ball joint remover (SST) from coming
off.
10. After removing upper link and cotter pin at steering knuckle, loosen mounting nut.
11. Use a ball joint remove (suitable tool) to remove upper link from steering knuckle. Be careful not to damage ball joint boot.
CAUTION:
Tighten temporarily mounting nut to prevent damage to threads and to prevent ball joint remover (suitable tool) from coming off.
12. Remove drive shaft from wheel hub and bearing assembly.
13. Remove fixing bolts of front final drive assembly drive shaft, then remove drive shaft from vehicle.
Doesn't seem too bad; that'll get the halfshaft out of the way and then you'll have full access to remove the bearing/hub from the spindle. I'm sending you a PM now as well with some other info.

I'll update with pics and progress. I figure someone needs to do a DIY of a front awd bearing job since most people bring to dealer.
Right now, just acquiring tools. Picked up the required 32mm axle nut socket, and a 17mm 1/2drive socket for the bearing bolts.
Gonna get a slide hammer, and 3-jaw puller to keep on hand as well.
Just need to figure out what suspension components I need to unbolt to be able to push the half-shaft out. Once I do that, and get necessary tools...it's go time.
Right now, just acquiring tools. Picked up the required 32mm axle nut socket, and a 17mm 1/2drive socket for the bearing bolts.
Gonna get a slide hammer, and 3-jaw puller to keep on hand as well.
Just need to figure out what suspension components I need to unbolt to be able to push the half-shaft out. Once I do that, and get necessary tools...it's go time.
I STILL cant find the bearing in stock anywhere that sells it cheaper than $170, rockauto is still sold out, and even though autopartswarehouse.com said they had it in stock, they let me completely place the order, and even charged my card before they sent me an email telling me it was out of stock and that they are refunding my money...FUUUUUUUUUUU
Joined: Jul 2005
Posts: 8,818
Likes: 468
From: Taxachusetts
According to the FSM, it looks like you just need to pop the upper balljoint and it should clear the front halfshaft. Here's the procedure copied out -
9. Use a ball joint remover (SST) to remove steering outer socket from steering knuckle. Be careful not to damage ball joint boot.
CAUTION:
Tighten temporarily mounting nut to prevent damage to
threads and to prevent ball joint remover (SST) from coming
off.
10. Aftervin upper link and cotter pin at steering knuckle, loosen mounting nut.
11. Use a ball joint remove (suitable tool) to remove upper link from steering knuckle. Be careful not to damage ball joint boot.
CAUTION:
Tighten temporarily mounting nut to prevent damage to threads and to prevent ball joint remover (suitable tool) from coming off.
What tool can i use to pop the upper ball joint and steering link?
I'll need to pull a fromt wheel this weekend and really get a good look at the suspension. Gotta plan this right and make sure I have all the right tools for the job.
Ok this os the part I need clarification on.
What tool can i use to pop the upper ball joint and steering link?
I'll need to pull a fromt wheel this weekend and really get a good look at the suspension. Gotta plan this right and make sure I have all the right tools for the job.
What tool can i use to pop the upper ball joint and steering link?
I'll need to pull a fromt wheel this weekend and really get a good look at the suspension. Gotta plan this right and make sure I have all the right tools for the job.
Not sure on the steering link.
Edit: Just re-read it and not sure what 'pop the ball joint' means. Does that mean separate or actually remove it?
Sorry - pop means to separate the balljoint from the steering knuckle. No need to remove the balljoint from the upper control arm. I haven't looked at my car either, but from the pics in the FSM it seems like you can use a trusty pickle fork and BFH to get the job done. Just don't tear the boot on the balljoint with the pickle fork, or that'll need to be replaced.

Sorry - pop means to separate the balljoint from the steering knuckle. No need to remove the balljoint from the upper control arm. I haven't looked at my car either, but from the pics in the FSM it seems like you can use a trusty pickle fork and BFH to get the job done. Just don't tear the boot on the balljoint with the pickle fork, or that'll need to be replaced.
Joined: Jul 2005
Posts: 8,818
Likes: 468
From: Taxachusetts
Ok, so I hit a roadblock with pressing the bearing...
Sees in the FSM, it shows the hub is not pressed in all the way. They use a drift that stops at a specific point.
Does anyone know any more details on this? I dint want to press the bearing in too far.
Sees in the FSM, it shows the hub is not pressed in all the way. They use a drift that stops at a specific point.
Does anyone know any more details on this? I dint want to press the bearing in too far.
Joined: Jul 2005
Posts: 8,818
Likes: 468
From: Taxachusetts
Ok, roadblock averted. I'll explain later.
SO, took a trip to work today to use the press. Took me all of 5 mins.
Here's the setup. Hub on bottom with a round block to distribute the load to the hub ring.
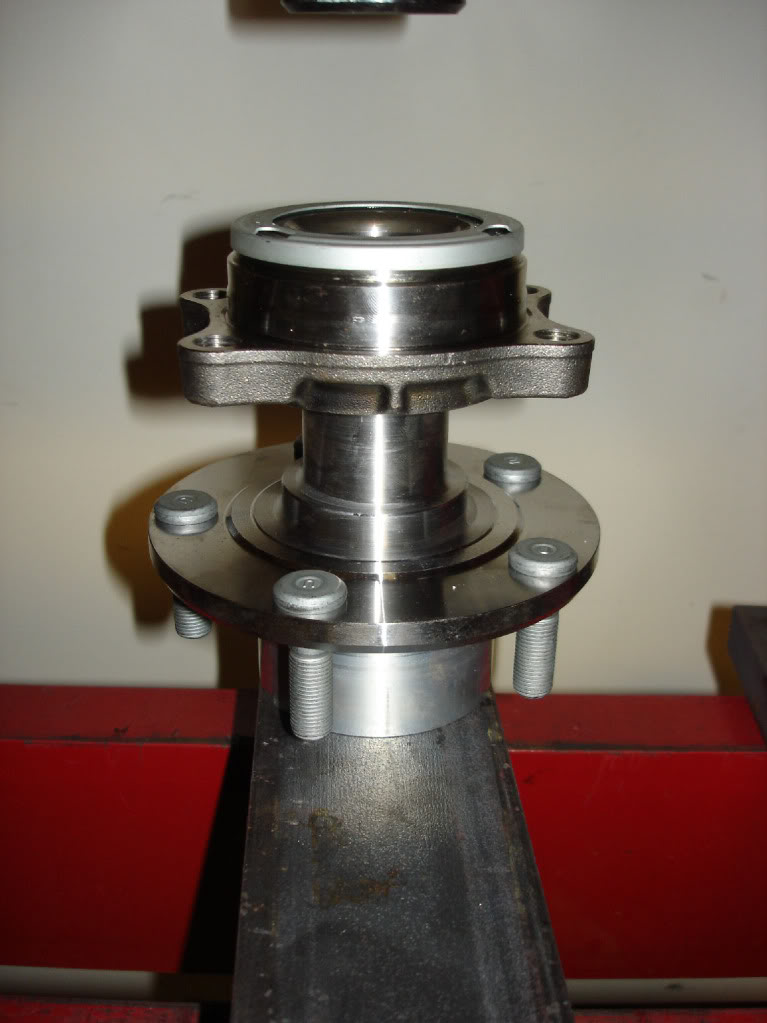
On top, another small spacer to put the load on the race only, not the cage. This is where you want to press from
Once i had those two parts, it took me literally a couple mins to press the hub onto the bearing. I used a 12-ton press, but it handled it easily.
This is where I stopped, because I wasn't sure how far the hub needed to be pressed on.
Btw, in my searches, seems like a lot of guys are turned off to the thought of doing this themselves due to the fact the bearings needs to ne pressed. Most seem to think it's a shop only type deal. It's not. Harbor frieght sells a press for under $130 like this that will do the job. This is 20 ton, mine was 12 ton and worked fine. Ask around, and you might find a friend with one, or might use it as an excuse to buy one anyway. They sometimes have deals for $100 for these, so figure a shop charges you $25 per bearing to press....well you could have bought a press for that if you have to change all 4
http://www.harborfreight.com/12-ton-...:referralID=NA

SO, took a trip to work today to use the press. Took me all of 5 mins.
Here's the setup. Hub on bottom with a round block to distribute the load to the hub ring.
On top, another small spacer to put the load on the race only, not the cage. This is where you want to press from
Once i had those two parts, it took me literally a couple mins to press the hub onto the bearing. I used a 12-ton press, but it handled it easily.
This is where I stopped, because I wasn't sure how far the hub needed to be pressed on.
Btw, in my searches, seems like a lot of guys are turned off to the thought of doing this themselves due to the fact the bearings needs to ne pressed. Most seem to think it's a shop only type deal. It's not. Harbor frieght sells a press for under $130 like this that will do the job. This is 20 ton, mine was 12 ton and worked fine. Ask around, and you might find a friend with one, or might use it as an excuse to buy one anyway. They sometimes have deals for $100 for these, so figure a shop charges you $25 per bearing to press....well you could have bought a press for that if you have to change all 4
http://www.harborfreight.com/12-ton-...:referralID=NA
Last edited by Mustang5L5; Jul 3, 2011 at 11:14 PM.
Joined: Jul 2005
Posts: 8,818
Likes: 468
From: Taxachusetts
Then, today, i did some diagnostic work. In trying to determine WHICH bearing was bad, i simply couldn't in the car. The sound didn't change much when i shifted the weight of the car, but it definitely got louder when braking. SO i knew it was a front bearing, but didn't know which one.
Well, with both front wheels up, spinning them did nothing. I tried the 12 and 6 o'clock shake, and nothing moved. There was no play at all. Was really starting to hope it wasn't the carrier bearings in the diff.
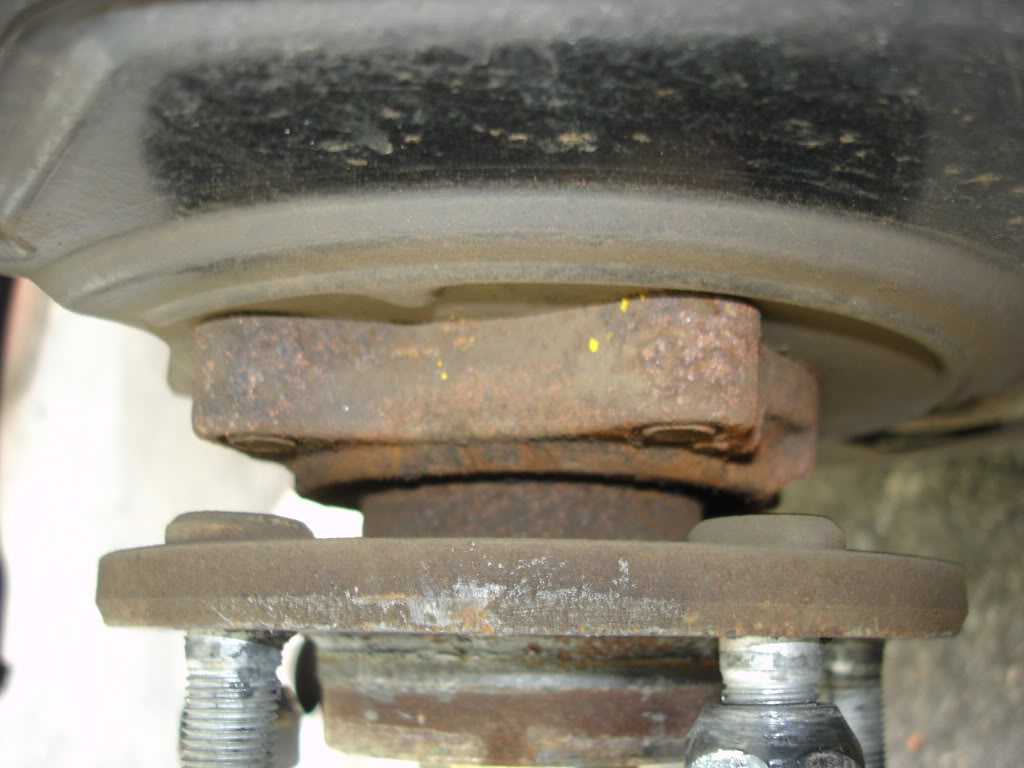
I pulled the brakes off, had a friend spin the wheel from the opposite side...and still nothing.
UNTIL i put a tine bit of side load on the bearing, and then you could feel it. It's funny though because they are smooth with no load on them turning from opposite side, but the minute you press on the edge of a hub. you can feel the vibration from them.
SO, BOTH of my front bearings are bad, with the passenger side bearing being the worse of the two. So...that one will need to get changed first.
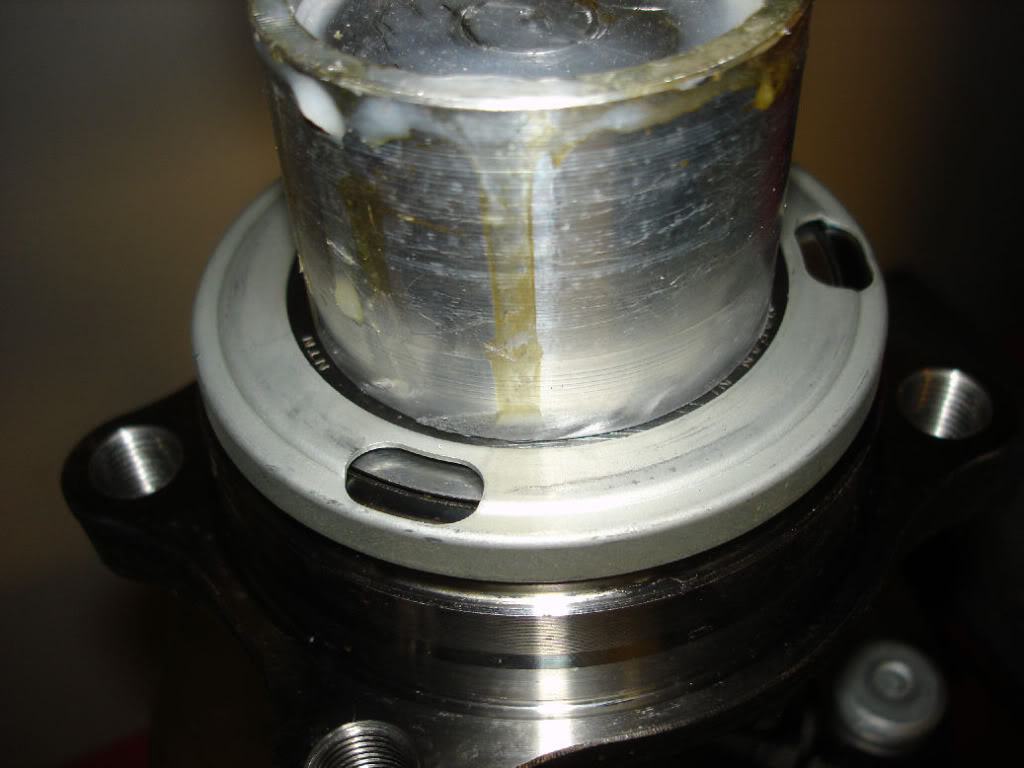
Oh, and to answer my question of how far to press the hub in...this should answer it. The flange of the hub gets bottomed out on the face of the bearing. The FSM does not show this and shows a gap. However, i didn't trust it as leaving a gap would automatically tighten it up when you crank the axle nut to 250 ft-lbs or so.
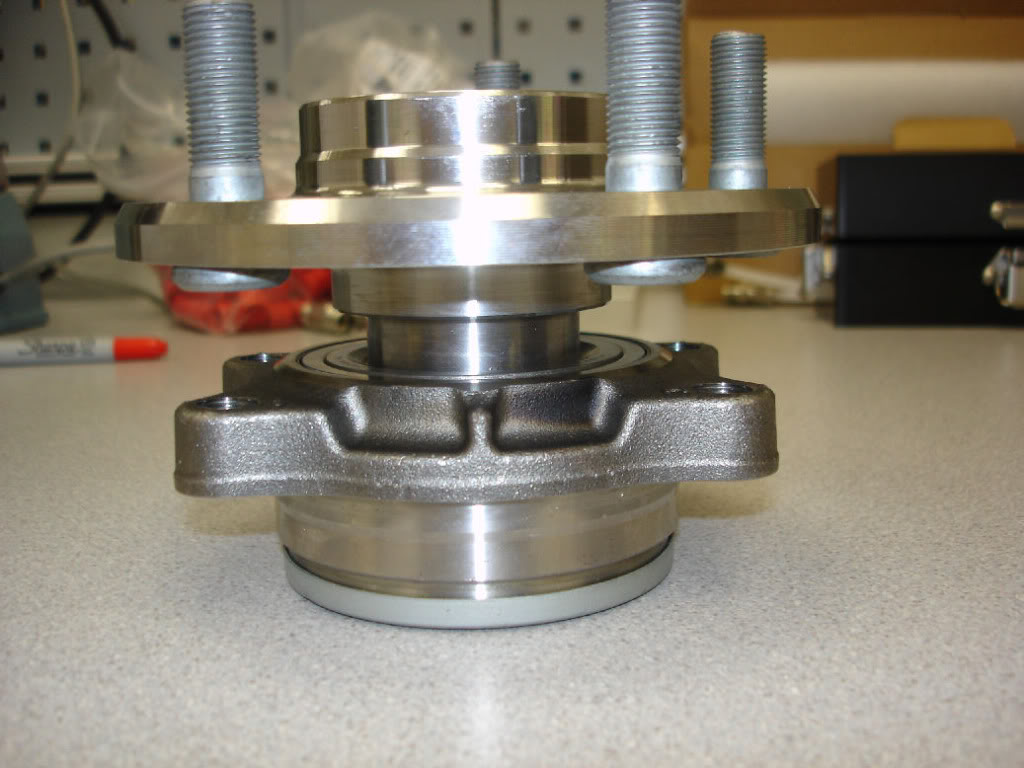
The FSM shows the bearing being torn apart if you try to press the hub off the old bearing, so that's why i wanted to make sure of how far to press it. If any of you've seen teh rear bearing DIY, the outer race pulls from the bearing when you try to separate the hub from the bearing. Then you gotta spend the time to try and pull the outer race from the hub. It's tough when you have them pressed up against each other like shown. Not a lot of room to get in there, so more than likely you'll have to split the race with a dremel and crack it off.
Now you know why i chose to buy a hub and press the bearing ahead of time. I want to do this job as quickly as possible.
Oh yeah..i started soaking everything in PB blaster already...even though it might be a few weeks before i can do this job
If/When I do a DIY, i'll make a new thread and link it here. WOuld be nice to have all the posts in order without any chatting betweeen them,
Well, with both front wheels up, spinning them did nothing. I tried the 12 and 6 o'clock shake, and nothing moved. There was no play at all. Was really starting to hope it wasn't the carrier bearings in the diff.
I pulled the brakes off, had a friend spin the wheel from the opposite side...and still nothing.
UNTIL i put a tine bit of side load on the bearing, and then you could feel it. It's funny though because they are smooth with no load on them turning from opposite side, but the minute you press on the edge of a hub. you can feel the vibration from them.
SO, BOTH of my front bearings are bad, with the passenger side bearing being the worse of the two. So...that one will need to get changed first.
Oh, and to answer my question of how far to press the hub in...this should answer it. The flange of the hub gets bottomed out on the face of the bearing. The FSM does not show this and shows a gap. However, i didn't trust it as leaving a gap would automatically tighten it up when you crank the axle nut to 250 ft-lbs or so.
The FSM shows the bearing being torn apart if you try to press the hub off the old bearing, so that's why i wanted to make sure of how far to press it. If any of you've seen teh rear bearing DIY, the outer race pulls from the bearing when you try to separate the hub from the bearing. Then you gotta spend the time to try and pull the outer race from the hub. It's tough when you have them pressed up against each other like shown. Not a lot of room to get in there, so more than likely you'll have to split the race with a dremel and crack it off.
Now you know why i chose to buy a hub and press the bearing ahead of time. I want to do this job as quickly as possible.
Oh yeah..i started soaking everything in PB blaster already...even though it might be a few weeks before i can do this job
If/When I do a DIY, i'll make a new thread and link it here. WOuld be nice to have all the posts in order without any chatting betweeen them,
Last edited by Mustang5L5; Jul 3, 2011 at 04:50 PM.
Joined: Jul 2005
Posts: 8,818
Likes: 468
From: Taxachusetts
I STILL cant find the bearing in stock anywhere that sells it cheaper than $170, rockauto is still sold out, and even though autopartswarehouse.com said they had it in stock, they let me completely place the order, and even charged my card before they sent me an email telling me it was out of stock and that they are refunding my money...FUUUUUUUUUUU
SUmmitracing shows they can special order them. Of course, no idea if they actually can
http://www.summitracing.com/parts/TMK-BM500013
A little more expensive around $135 shipped...but still better than dealer pricing for the same bearing.
If you google around, summitt somestimes has promo codes like free shipping, or 5% off or something