
Painting Engine Cover - Progress pics


Registered User
Joined: Sep 2008
Posts: 27
Likes: 1
From: Atlanta, GA
^^^ +1
The problem people are having with you is this:
This thread makes people wonder why were you posting in the first place. If you're posting pictures, generally you're looking for comments on the pictures, otherwise, why post them? If not everybody likes it, you have to decide whether you really do. If you do, forget what they say, it's your ride, but if you get upset because people don't like it, chances are you were trying to boost your ego and showoff and then got shut down. You're doing the latter, and it's pissing people off.
That being said, I'm not feeling the colors, I don't get the yellow and black. However, if you do, go for it, you'll get enjoyment every time you look at it and know you did it yourself. I second the 'do it again' comments because it could be better. Try sanding the plastic with a VERY fine grade sand paper to remove the old paint and better prepare the surface. Be sure to clean the plastic prior to painting otherwise you'll be painting in dust and that'll look crappy. Long, even, quick, strokes while it's hanging to prevent drips and non-uniform paint. Most of all TAKE YOUR TIME! You can tell a rushed and job done improperly.
Sorry for the wall of text.
TL;DR Don't get pissy if someone doesn't like your work. Redo job, see advice above if you want.
Originally Posted by chord42
honestly, if ALL youre going to do is come in here and tear down what im doing, then dont post at all. i dont want to hear your opinion.
This thread makes people wonder why were you posting in the first place. If you're posting pictures, generally you're looking for comments on the pictures, otherwise, why post them? If not everybody likes it, you have to decide whether you really do. If you do, forget what they say, it's your ride, but if you get upset because people don't like it, chances are you were trying to boost your ego and showoff and then got shut down. You're doing the latter, and it's pissing people off.
That being said, I'm not feeling the colors, I don't get the yellow and black. However, if you do, go for it, you'll get enjoyment every time you look at it and know you did it yourself. I second the 'do it again' comments because it could be better. Try sanding the plastic with a VERY fine grade sand paper to remove the old paint and better prepare the surface. Be sure to clean the plastic prior to painting otherwise you'll be painting in dust and that'll look crappy. Long, even, quick, strokes while it's hanging to prevent drips and non-uniform paint. Most of all TAKE YOUR TIME! You can tell a rushed and job done improperly.
Sorry for the wall of text.
TL;DR Don't get pissy if someone doesn't like your work. Redo job, see advice above if you want.
Joined: Jul 2008
Posts: 628
Likes: 0
From: Atlanta, GA
yellow and black is because of yellow brakes coming soon. and im already doing it again. i wish i had read ur post b4 i started as a sanded with too low grit sandpaper and messed it up a tiny bit, but i dont think it will be noticeable. im changing the look tho. satin black with yellow fuji well see how it looks
yellow and black is because of yellow brakes coming soon. and im already doing it again. i wish i had read ur post b4 i started as a sanded with too low grit sandpaper and messed it up a tiny bit, but i dont think it will be noticeable. im changing the look tho. satin black with yellow fuji well see how it looks
Last edited by xXHotelCrazyXx; Jan 24, 2009 at 01:14 PM.

Registered User
Joined: Mar 2006
Posts: 362
Likes: 10
From: Philly, PA
See that's what I'm talking about, everyone being civil. After seeing it in the engine bay, I'm not really feeling it. Too much black surrounding the yellow if you know what I'm trying to say.
Maybe try accenting the cover and adding to the yellow with yellow wire looms or something of the sort to break up a lot of the surrounding black engine bay and it may look nice afterwards.
Maybe try accenting the cover and adding to the yellow with yellow wire looms or something of the sort to break up a lot of the surrounding black engine bay and it may look nice afterwards.

Registered User
Joined: Nov 2008
Posts: 177
Likes: 0
From: New Jersey
when u go to tape up something dont use cheap masking tape. if u want nice sharp edges use the skinny blue tape that kinda looks like a pinstripe then use masking tape on that. definatly take your time sanding because the preparation is what will give you a nice final product. take your time painting too bc it looks like u were holding the can an inch away from the cover. hold it atleast 6-8 inches away and use multiple powder coats. your not painting a wall. u dont have to have a complete color change on your first coat. wait a few minutes between coats, go drink a beer and do another coat and then drink another and repeat.... hope this helps.

Example of how this thread should have turned out...
http://www.mygfrenzy.com/forum/showthread.php?t=14176
http://www.mygfrenzy.com/forum/showthread.php?t=14176

Go back and tune it up. Thats whats great about paint is you can fix your mistakes. Your at a huge disadvantage with spray cans but keep trying.
3m blue fineline and razor blades are your friend
3m blue fineline and razor blades are your friend


when u go to tape up something dont use cheap masking tape. if u want nice sharp edges use the skinny blue tape that kinda looks like a pinstripe then use masking tape on that. definatly take your time sanding because the preparation is what will give you a nice final product. take your time painting too bc it looks like u were holding the can an inch away from the cover. hold it atleast 6-8 inches away and use multiple powder coats. your not painting a wall. u dont have to have a complete color change on your first coat. wait a few minutes between coats, go drink a beer and do another coat and then drink another and repeat.... hope this helps.
^ What he said
Doesn't matter if we like your decision or not....point is to try and do the most professional job you can....
Take your time masking the areas, and use quality tape with a sharp edge. If anything looks crooked before painting, believe me it will look worse when you lift the tape.
Rattle cans can and will give you a professional finish if done right. If needed, sand in between coats of primer to ensure your painting surface is smooth to start. Avoid laying "wet" coats of paint. Less is more in painting. Slow and even coats build up the coats, do not attempt to flood the cover in one shot.....thats a big and time consuming mistake....especially when you have to strip it to do it over.
Kudos for trying your hand at painting the cover.
Joined: Jul 2008
Posts: 628
Likes: 0
From: Atlanta, GA
^^ thank you for being helpful. ya it didnt start really changing color for me till coat 3 so i think i was doing light coats. i just had no idea what do about sanding and prep, never done it b4. hopefully the second time will turn out better i think it has so far
Registered User
Joined: Nov 2008
Posts: 177
Likes: 0
From: New Jersey
when u prep it clean it off really good to get all the grease and grime off. dry it really well and wipe it down with denatured alcohol. or an alcohol prep pad.... then sand it. as mentioned in another comment work your way up with the grit of the sand paper. start off with a more coarse sandpaper and work your way up until its as smooth as a baby's a$$. before painting it clean it off again by blowing off all the dust. use an air compressor to get in all the cracks. dont have an air compressor? then go to the closest gas station with a tire pump and blow it off. its only $.75.... then wipe it down again with the prep pad and start your base coat.
All threads turn out like this on Driver now lol
Not a bad job for a first go at it Chord and the color scheme goes well with OB...well, you can pull off just about any color on OB IMO
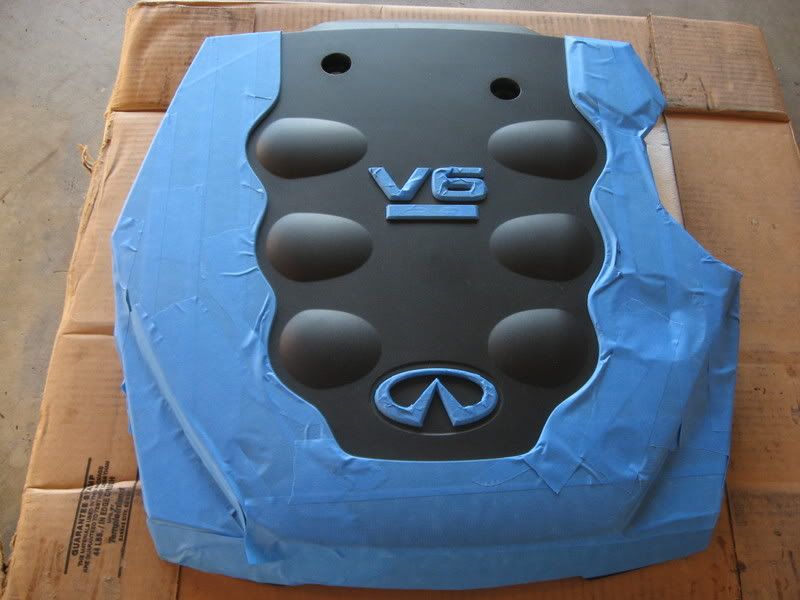
I have one suggestion for the next go round. To help the division between the center and outer parts, when taping the outer parts, also do the raised part/lip that goes around the outer most part of the center. Does that make sense? You have it painted yellow right now. This will mean only the true center is painted and the lip and outer sections will remain black (or whatever color you paint it).
You can see in this pic what I mean....the lip where the outer section dips in towards the center is taped off. I used a razor to cut the excess tape off
Not a bad job for a first go at it Chord and the color scheme goes well with OB...well, you can pull off just about any color on OB IMO
I have one suggestion for the next go round. To help the division between the center and outer parts, when taping the outer parts, also do the raised part/lip that goes around the outer most part of the center. Does that make sense? You have it painted yellow right now. This will mean only the true center is painted and the lip and outer sections will remain black (or whatever color you paint it).
You can see in this pic what I mean....the lip where the outer section dips in towards the center is taped off. I used a razor to cut the excess tape off

Not bad for a first attempt at painting. My first time looked so bad, I was disappointed. It takes a lot of practice and patience to paint with a spray can. I learned several things...
1. Take your time with the prep work and taping.
2. Apply 2 light coats to start.
3. Make sure the paint is dry before applying another coat.
I found it easier to hang what you're going to paint if possible as it enables you to evenly coat the object. Make sure the temp is not too cold where you are painting. Make sure there is no breeze.
If posting progress pics on a forum be prepared for many to criticize. You'll just have to take the good with the bad.
Again, not a bad job for your first time. If you decide to redo it keep us posted!