Skene Design License Plate Bracket
#1
 04-17-2011, 04:54 PM


Skene Design License Plate Bracket
Since I replaced the front bumper a while back, I never really had a chance to put the front plates back on. I finally finally tackle it here using Skene Design’s simple approach to a bracket that can easily be removed if you need to for show purposes. (Ok, so i got pulled over by a state trooper, inside our subdivision... good thing all i got was a warning) 
The kit comes with a left and right mount/bracket, a bunch of washers, self-tapping screws – four of which mount the license plate to the brackets, two that secures the brackets to the bumper – along with the double-sided tape as shown below. It also comes with a drill bit, two soft rubber bump stops, small allen wrench and manual.
As most of what you need is already installed, all you really need tool-wise are:
* Philips head screwdriver
* Measuring tape
* Painters tape for measurement marking and temporary mounting
Installation is fairly simple, but here’s the G sedan specific ones. Links to larger photos are on my site:
http://gshack.org/?p=283
Here’s the package contents.

Initial assembly of left and right brackets. You can adjust height and angle of mount.

Test fit of plate onto right mount with supplied screw and washer.

Measure the center-point of your bumper as well as that of the assembled plate/bracket. Notice where i placed blue painters tape across the top of the plate, this is so i can properly mark its center-point. The tall strip is to temporarily mount it to the bumper while i verify my measurements.
From the edge of the plate to and around the corner of the bumper (to where it ends at the wheel arch) is roughly 3 feet. Your measurements may vary depending on your license plate, although i would guess most in the US mainland are sized the same.

Placing the initial soft rubber bump stops. Two are included, but i added more for peace of mind.

The super sticky double-sided tape for final mounting, secured further by a screw for each bracket. (Note the hole in the center, between tape strips)

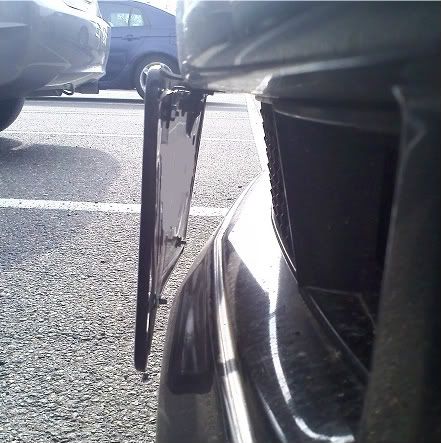
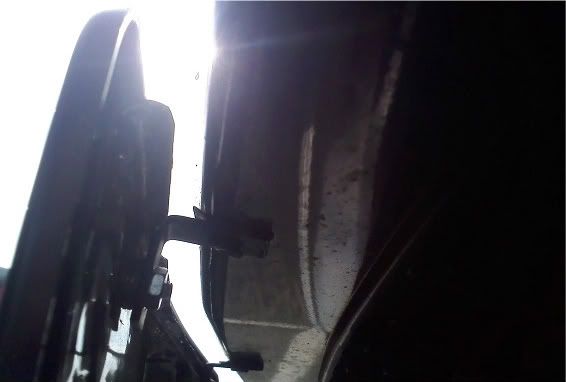
Looking at the bracket from the floor, looking up. License plate to the left, lower bumper mesh to the right. This is prior to securing it with the supplied screw.

The final product. As noted earlier, you can adjust the angle of the mount as well as the vertical height. As shown below, this is pretty much as high as it can go with the kit i got. You can also adjust it all the way down to cover most of the mesh (i.e. where bottom of the plate will touch the lower lip).

The beauty of it is there are no visible holes on the bumper and you can easily, temporarily, remove a big chunk of the assembly for show purposes, if you’re into that.
The kit comes with a left and right mount/bracket, a bunch of washers, self-tapping screws – four of which mount the license plate to the brackets, two that secures the brackets to the bumper – along with the double-sided tape as shown below. It also comes with a drill bit, two soft rubber bump stops, small allen wrench and manual.
As most of what you need is already installed, all you really need tool-wise are:
* Philips head screwdriver
* Measuring tape
* Painters tape for measurement marking and temporary mounting
Installation is fairly simple, but here’s the G sedan specific ones. Links to larger photos are on my site:
http://gshack.org/?p=283
Here’s the package contents.
Initial assembly of left and right brackets. You can adjust height and angle of mount.
Test fit of plate onto right mount with supplied screw and washer.
Measure the center-point of your bumper as well as that of the assembled plate/bracket. Notice where i placed blue painters tape across the top of the plate, this is so i can properly mark its center-point. The tall strip is to temporarily mount it to the bumper while i verify my measurements.
From the edge of the plate to and around the corner of the bumper (to where it ends at the wheel arch) is roughly 3 feet. Your measurements may vary depending on your license plate, although i would guess most in the US mainland are sized the same.
Placing the initial soft rubber bump stops. Two are included, but i added more for peace of mind.
The super sticky double-sided tape for final mounting, secured further by a screw for each bracket. (Note the hole in the center, between tape strips)
Looking at the bracket from the floor, looking up. License plate to the left, lower bumper mesh to the right. This is prior to securing it with the supplied screw.
The final product. As noted earlier, you can adjust the angle of the mount as well as the vertical height. As shown below, this is pretty much as high as it can go with the kit i got. You can also adjust it all the way down to cover most of the mesh (i.e. where bottom of the plate will touch the lower lip).
The beauty of it is there are no visible holes on the bumper and you can easily, temporarily, remove a big chunk of the assembly for show purposes, if you’re into that.


#3
04-17-2011, 11:42 PM


#6
04-18-2011, 01:11 AM

Nice job mike, i did the same exact thing ahile back for $2, went to homedepot and got a packet of small L-bracket with holes on both ends, sprayed it black, applied 3m foam tape on one side to avoid scratches and then screwed it on the bottom side of the bumper, same exact location as soundmike used, i can take it off in seconds as well and no one can tell since the holes or on the bottom and are 100% not visible. You dont even have to use screws i ran with just the tape for a week with no probs but then added screws just to feel safer. I can post pics if you guys want separately dont want to jack mikes thread but thought i should pitch in to help a few broke folks like me save some $$! 
#7
04-18-2011, 01:17 AM

Trending Topics
#8
04-18-2011, 09:20 AM


I have to check the order, i actually got this back in August '10 and only got to it this past weekend.
$2? Why aren't you posting about it? That would have been a waaaaayy better solution IMHO. What other tricks do you have up your sleeve that you're keeping from us?


#12
04-18-2011, 12:00 PM
Nice job mike, i did the same exact thing ahile back for $2, went to homedepot and got a packet of small L-bracket with holes on both ends, sprayed it black, applied 3m foam tape on one side to avoid scratches and then screwed it on the bottom side of the bumper, same exact location as soundmike used, i can take it off in seconds as well and no one can tell since the holes or on the bottom and are 100% not visible. You dont even have to use screws i ran with just the tape for a week with no probs but then added screws just to feel safer. I can post pics if you guys want separately dont want to jack mikes thread but thought i should pitch in to help a few broke folks like me save some $$!
#13
04-18-2011, 12:32 PM
Originally Posted by soundmike
$2? Why aren't you posting about it? That would have been a waaaaayy better solution IMHO. What other tricks do you have up your sleeve that you're keeping from us?

Just recently i got another one and had to get my front plate install inspected by state police within a week, i wanted to get the motorized show-n-go plate but it was to expensive and would have taken a while to get and install. Which is why i tried this as a temp solution but the cost and effectiveness made me leave it there. i didnt share cause i thought it was a bit ghetto at first, lol
 ill post pics soon.
#14
04-18-2011, 06:17 PM
Here are some crappy camera phone pics... the car is super dirty thanks to thunderstorms last night.
So i got a pack of 4 of the smallest L-brackets homedepot carried for about $1.50 and painted them black. and the crappy frame was $3 from advanceauto. If u guys want ill try to find the leftover brackets and snap[ a pic but they should be an easy find in most hardware stores.
The plate does not make any contact with the bumper at all.
Enjoy!

The plate is perfectly center but cause the pic was taken at a bad angle it might seem a bit crooked
So i got a pack of 4 of the smallest L-brackets homedepot carried for about $1.50 and painted them black. and the crappy frame was $3 from advanceauto. If u guys want ill try to find the leftover brackets and snap[ a pic but they should be an easy find in most hardware stores.
The plate does not make any contact with the bumper at all.
Enjoy!
The plate is perfectly center but cause the pic was taken at a bad angle it might seem a bit crooked
Last edited by kool_yaar; 04-18-2011 at 06:23 PM.