
DIY: Fuel Door Lock Actuator REPAIR


Thread Starter
|
Registered User
Joined: Apr 2011
Posts: 11
Likes: 0
From: Palm Beach Gardens
DIY: Fuel Door Lock Actuator REPAIR
The fuel door lock actuator on my '03 coupe has been on the fritz... it unlocks sometimes, and sometimes I need to manually open it (pull back the carpet and manually activate the pin). I work in a somewhat shoddy area and sometimes leave my car at night... so completely removing the lock is not in my best interest. I tried to clean it with WD-40... but it still only worked intermittently. This is how to disassemble it and repair the motor (by cleaning the brushes and contact ring).
First off, I want to thank 19kdrill and earlyg35sdn. The original thread (located here) gave me the initial motivation to do something. This DIY is basically a picture-ized version of what earlyg35sdn posted in that thread. I recommend using 19kdrill's DIY to remove the old actuator. Give this option below a shot before you buy a new actuator... because it is free to do.
I forgot to take pictures when I actually fixed the actuator, so I took it back apart so that I could take some pics. And I did go a bit picture happy, but it should help if you decide to attempt this yourself.
After following 19kdrill's DIY to remove the actuator, this is what we have:
Photo 1 - Get your tools ready. I had an Xacto knife, flat head screwdriver, atwood prybaby, and beer.
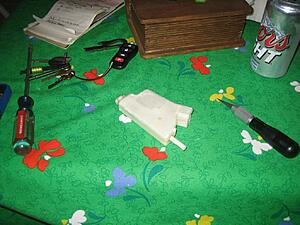
Photo 2 - Started to trim around the edges with the Xacto knife.
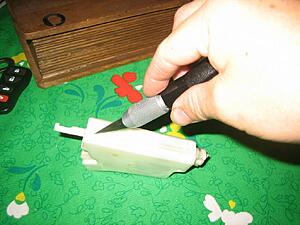
Photo 3 - Eventually, I just decided to chip away around the plug area so I could pry with a flat head. (See the right side of the plug in the photo)
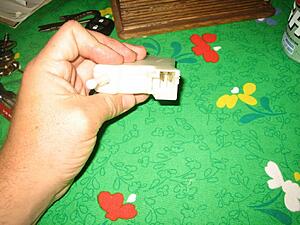
Photo 4 - I shoved a flat head in there.

Photo 5 - Also used my little pry tool

Photo 6 - After getting it started, I was able pull the top off.
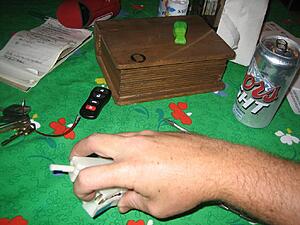
Photo 7 - Victory.
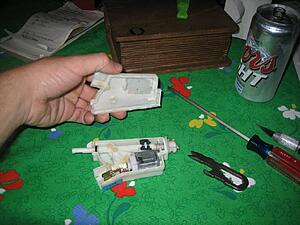
Photo 8 - Shot from above showing the sector gear, worm gear, pin, and motor.
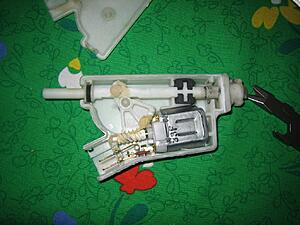
Photo 9 - Here you can see the little reddish brown deal. Use an ohmmeter and make sure it is reading 0 ohms.
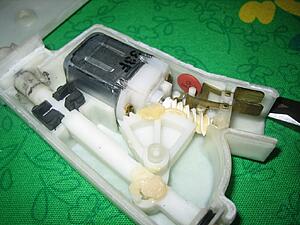
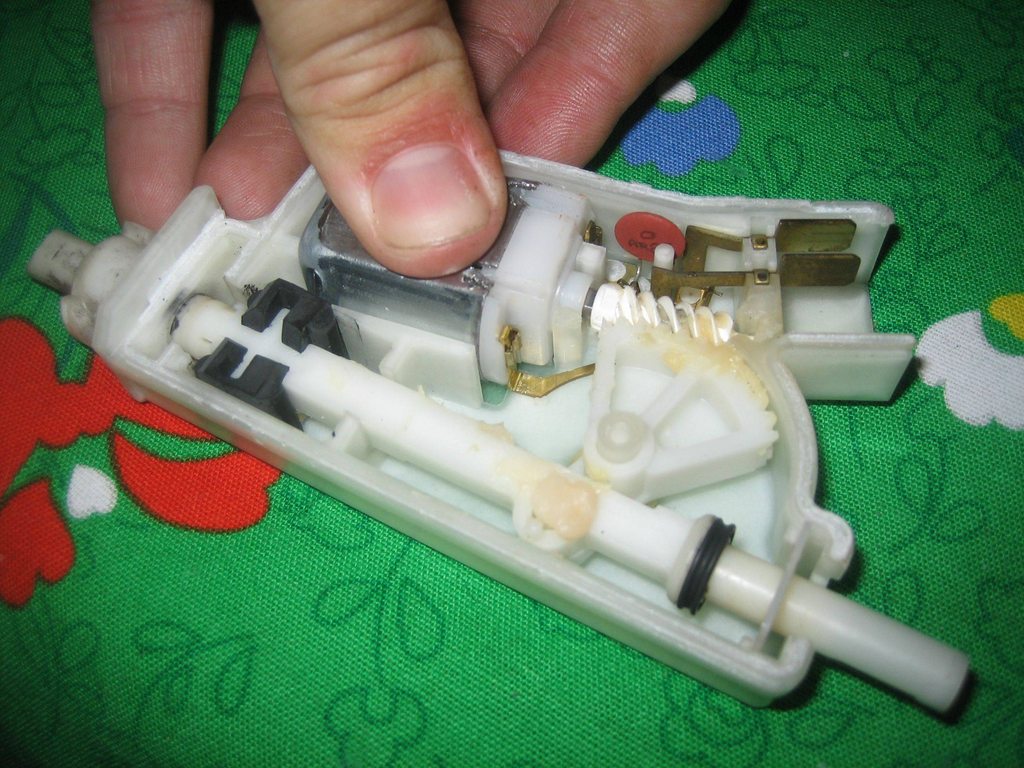
Photo 10 - I found it tough to get the motor out...
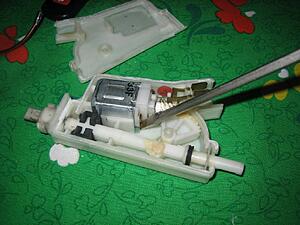
Photo 11 - If you pry next to the little tab, you can get one of the sides to work up. Hard to 'splain... just copy the picture.
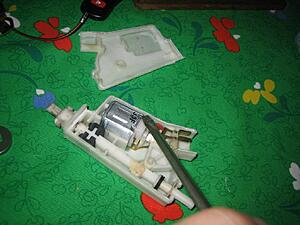
Photo 12 - The pry tool and flat head worked as a team to get the other side worked up and off.
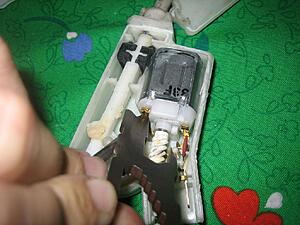
Photo 13 - And this is how it comes off.
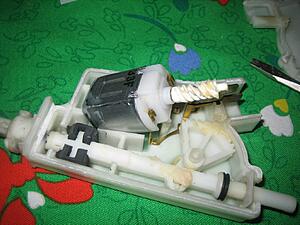
Photo 14 - Careful to not lose the worm gear. It is not actually attached to the motor.
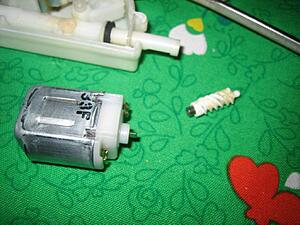
Photo 15 - Pry the four little metal tab jobbies up and you will be able to lift the plastic off of the housing. Lift the plastic slowly so you don't damage the brushes.

Photo 16 - The two metal jobbies in the middle are called the brushes. You gotta clean these honkies off. Use a tissue, maybe some rubbing alcohol, AND BE CAREFUL.
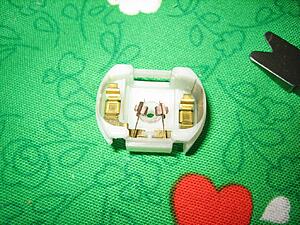
Photo 17 - My little plastic washer stayed on the shaft of the motor.
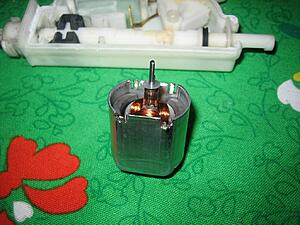
Photo 18 - You are able to easily pull the inner coil out of the housing.
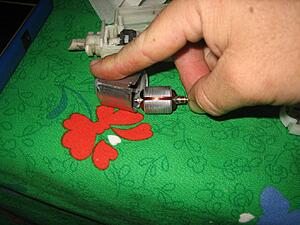
Photo 19 - You can see the plastic washer easier has been taken all the way off so that I can clean all the crud off of the coil. I used a tissue and some elbow grease (you can pick some up at the grocery store next to the raw meat).
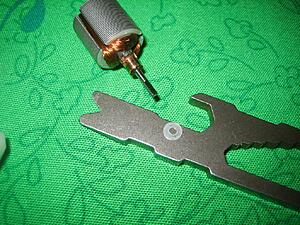
Photo 20 - I used my Xacto knife to set the washer in place behind the brushes.
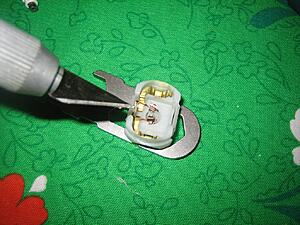
Photo 21 - There is an opening that will let you access the brushes as you are putting the shaft back through to the white plastic housing.
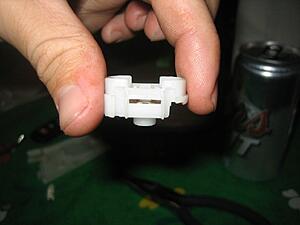
Photo 22 - NICELY place the shaft through the plastic washer and into the white plastic housing. Use an Xacto knife to pull the brushes to the side to that it seats completely without bending the thin metal holding the brushes.

Photo 23 - Put the worm gear back on (it is keyed so that it only goes on one way)
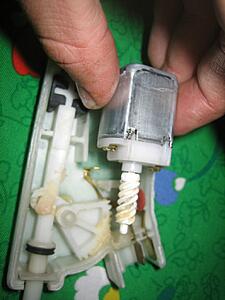
Photo 24 - Line the motor up with the connections

Photo 25 - Push that beast back on.

Now hold the shell together and go test it out on your car (MAKE SURE YOU HOLD THE SHELL TOGETHER WHEN YOU DO THIS). You are testing to make sure that it completely works. If you are still having issues, you can try recleaning and repositioning the brushes... but chances are you done gone messed it up and you need to go find a new actuator.
If everything works, seal the shell with whatever adhesive you desire... be it super glue, epoxy, duct tape, rubber bands, or chewing gum. Just remember that this little guy will hopefully be lasting a long time, and you might need to clean it again. Also, you want to ensure that it does not come open and become stuck in the locked position because your twine couldn't keep the shell together. So I guess what I am saying is seal it tight, but not so tight that you have to break it completely to get it apart again.
First off, I want to thank 19kdrill and earlyg35sdn. The original thread (located here) gave me the initial motivation to do something. This DIY is basically a picture-ized version of what earlyg35sdn posted in that thread. I recommend using 19kdrill's DIY to remove the old actuator. Give this option below a shot before you buy a new actuator... because it is free to do.
I forgot to take pictures when I actually fixed the actuator, so I took it back apart so that I could take some pics. And I did go a bit picture happy, but it should help if you decide to attempt this yourself.
After following 19kdrill's DIY to remove the actuator, this is what we have:
Photo 1 - Get your tools ready. I had an Xacto knife, flat head screwdriver, atwood prybaby, and beer.

Photo 2 - Started to trim around the edges with the Xacto knife.

Photo 3 - Eventually, I just decided to chip away around the plug area so I could pry with a flat head. (See the right side of the plug in the photo)
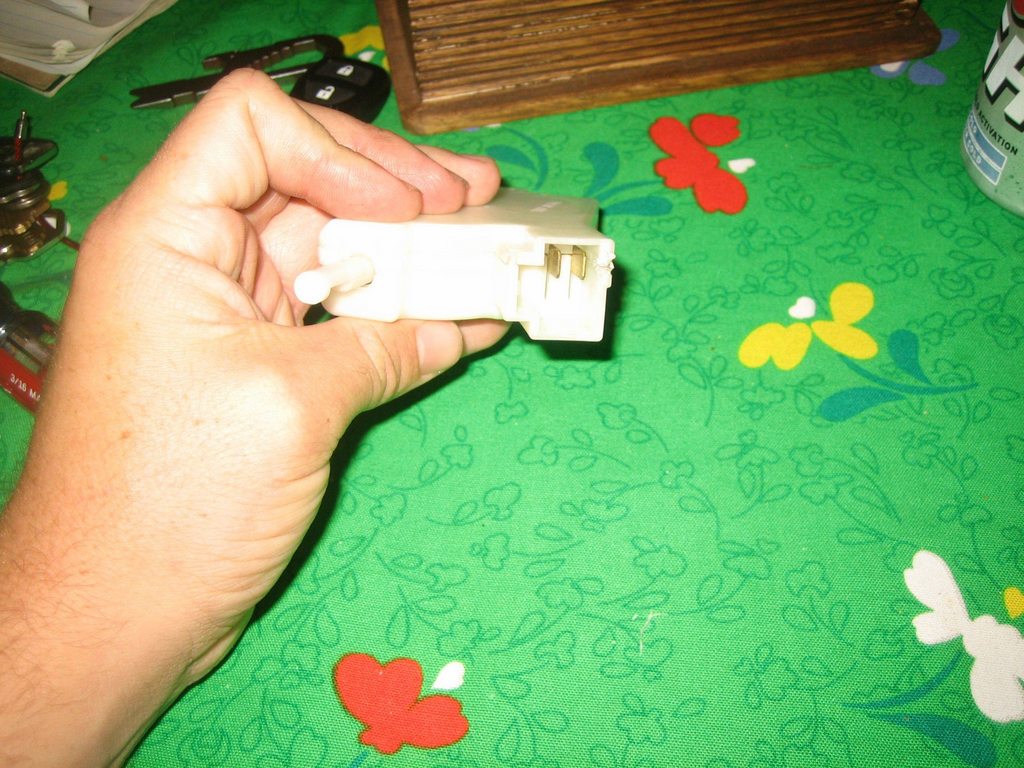
Photo 4 - I shoved a flat head in there.
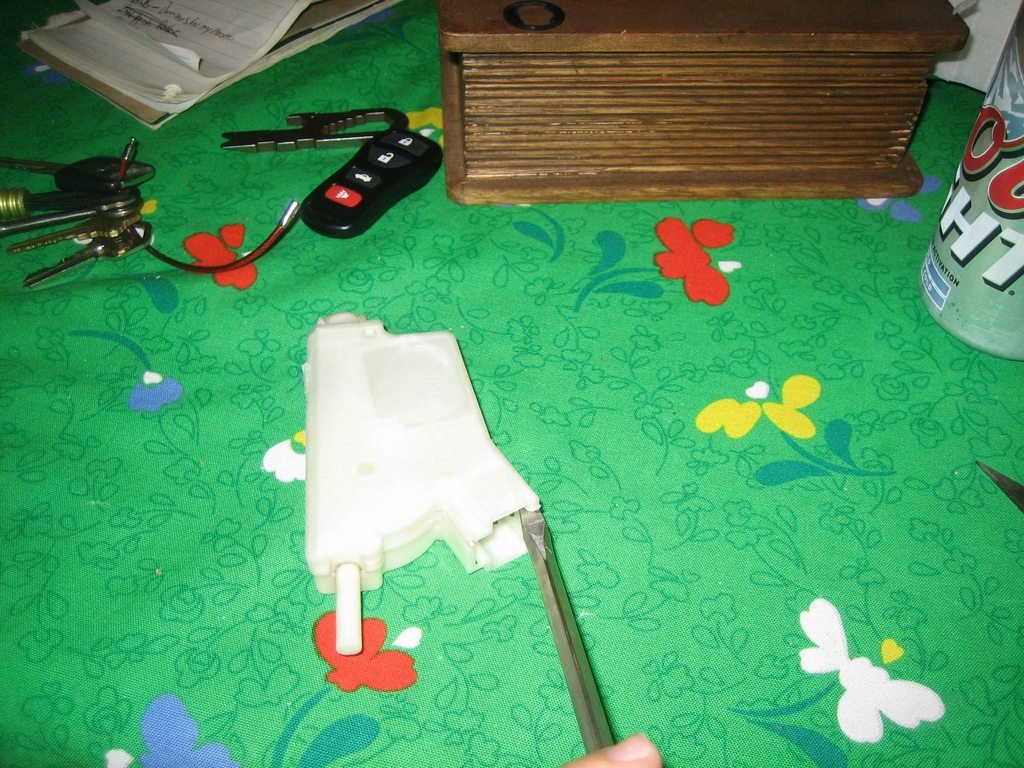
Photo 5 - Also used my little pry tool
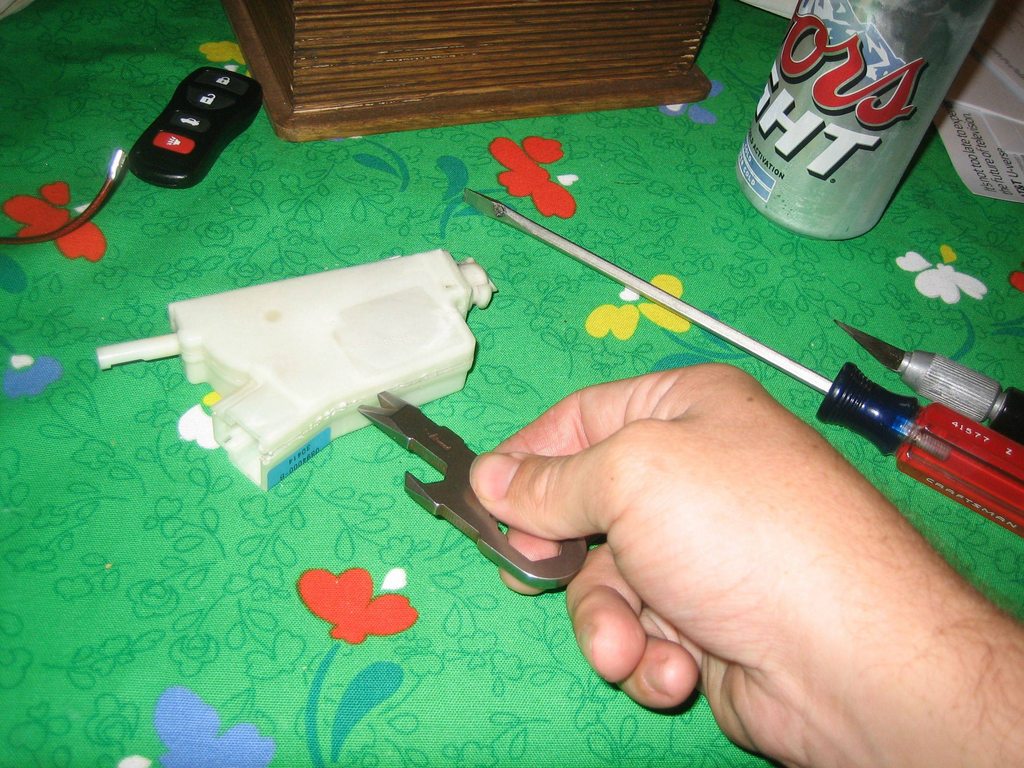
Photo 6 - After getting it started, I was able pull the top off.
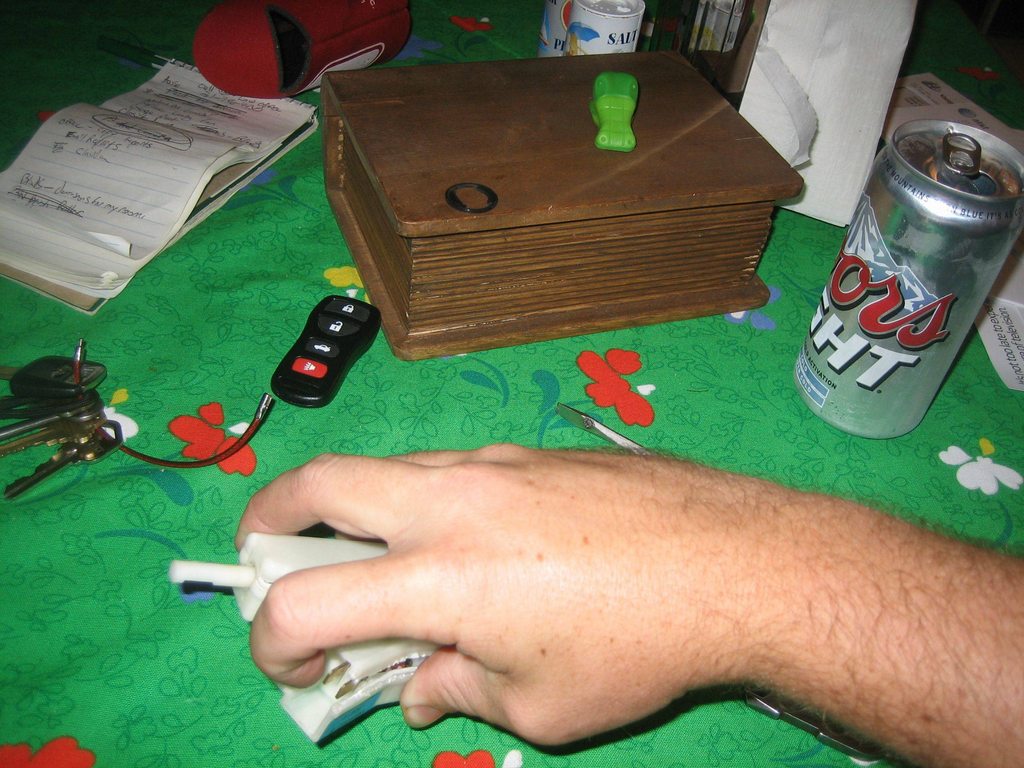
Photo 7 - Victory.

Photo 8 - Shot from above showing the sector gear, worm gear, pin, and motor.

Photo 9 - Here you can see the little reddish brown deal. Use an ohmmeter and make sure it is reading 0 ohms.

Photo 10 - I found it tough to get the motor out...
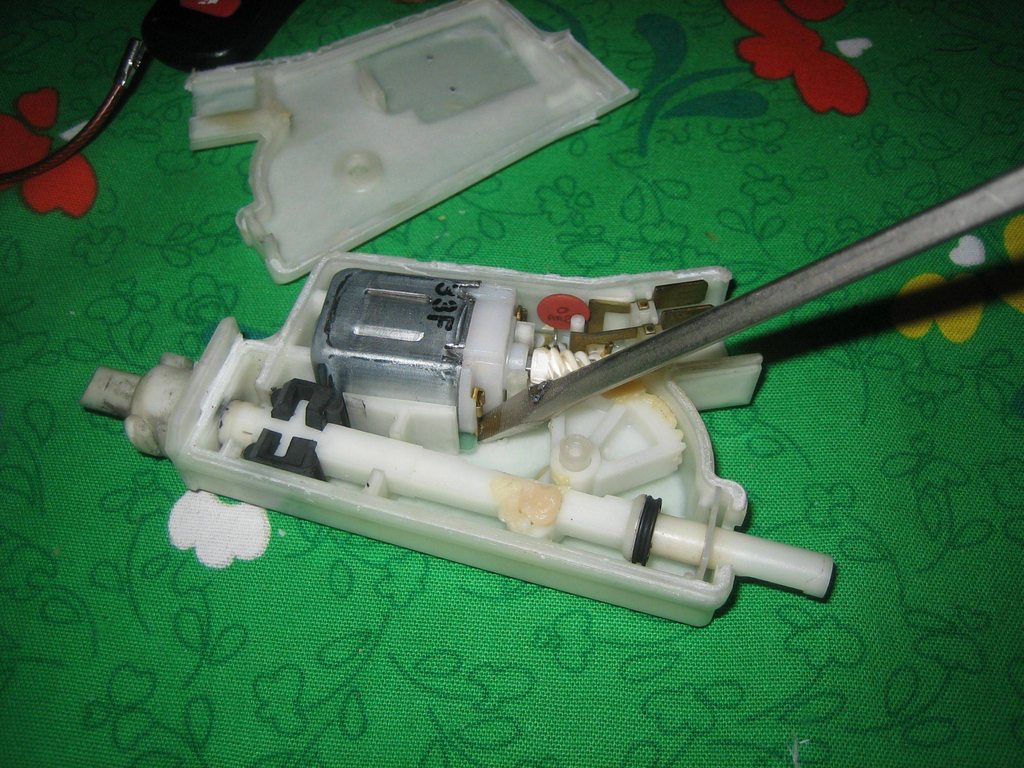
Photo 11 - If you pry next to the little tab, you can get one of the sides to work up. Hard to 'splain... just copy the picture.

Photo 12 - The pry tool and flat head worked as a team to get the other side worked up and off.
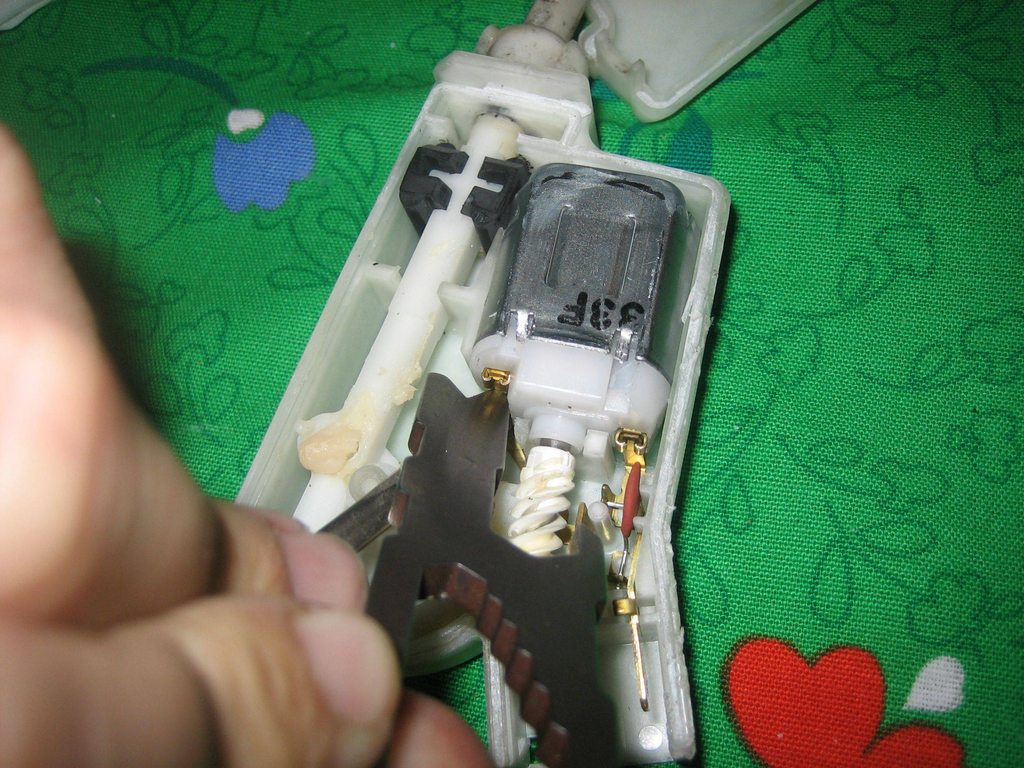
Photo 13 - And this is how it comes off.
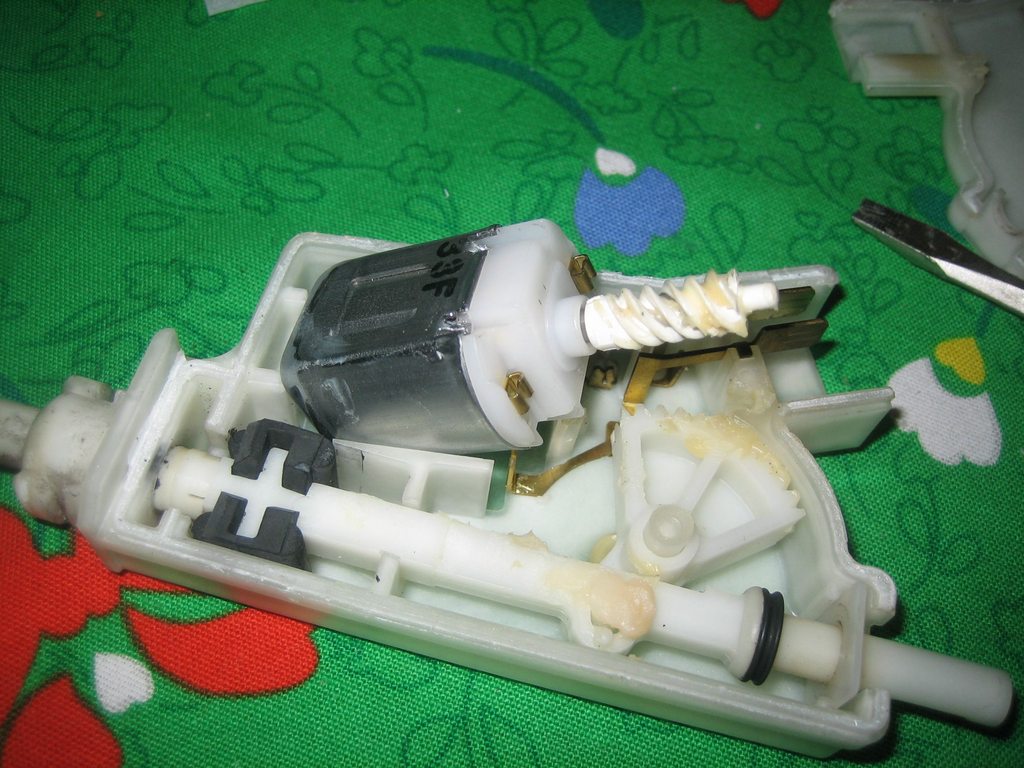
Photo 14 - Careful to not lose the worm gear. It is not actually attached to the motor.

Photo 15 - Pry the four little metal tab jobbies up and you will be able to lift the plastic off of the housing. Lift the plastic slowly so you don't damage the brushes.

Photo 16 - The two metal jobbies in the middle are called the brushes. You gotta clean these honkies off. Use a tissue, maybe some rubbing alcohol, AND BE CAREFUL.
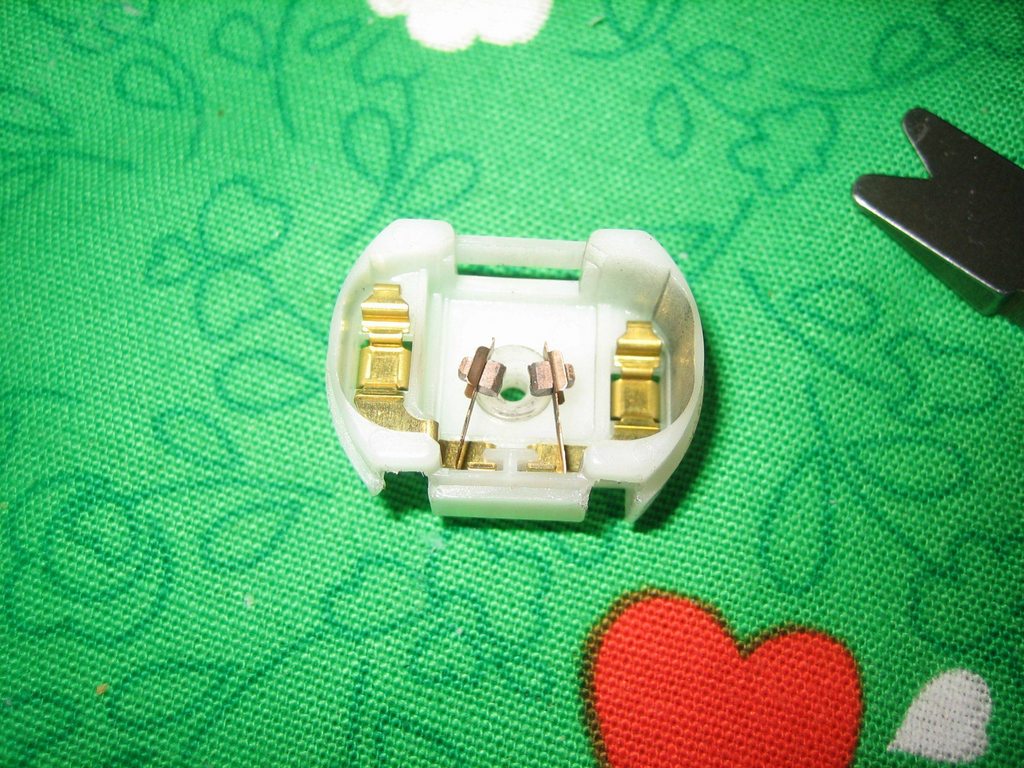
Photo 17 - My little plastic washer stayed on the shaft of the motor.

Photo 18 - You are able to easily pull the inner coil out of the housing.

Photo 19 - You can see the plastic washer easier has been taken all the way off so that I can clean all the crud off of the coil. I used a tissue and some elbow grease (you can pick some up at the grocery store next to the raw meat).
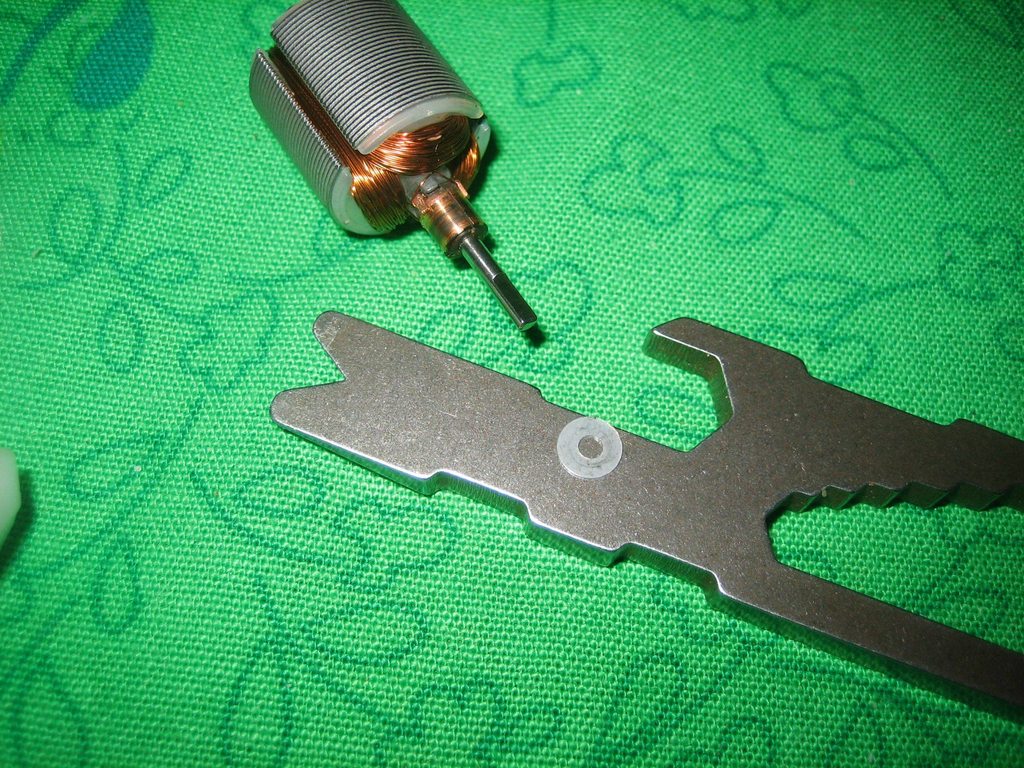
Photo 20 - I used my Xacto knife to set the washer in place behind the brushes.

Photo 21 - There is an opening that will let you access the brushes as you are putting the shaft back through to the white plastic housing.
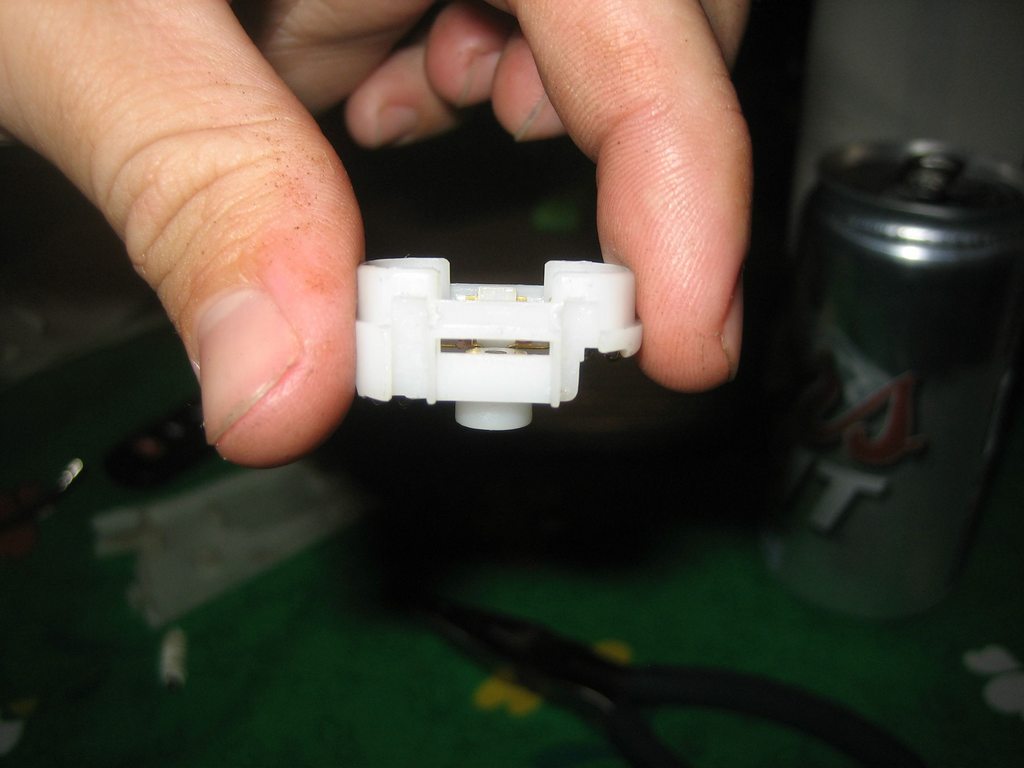
Photo 22 - NICELY place the shaft through the plastic washer and into the white plastic housing. Use an Xacto knife to pull the brushes to the side to that it seats completely without bending the thin metal holding the brushes.
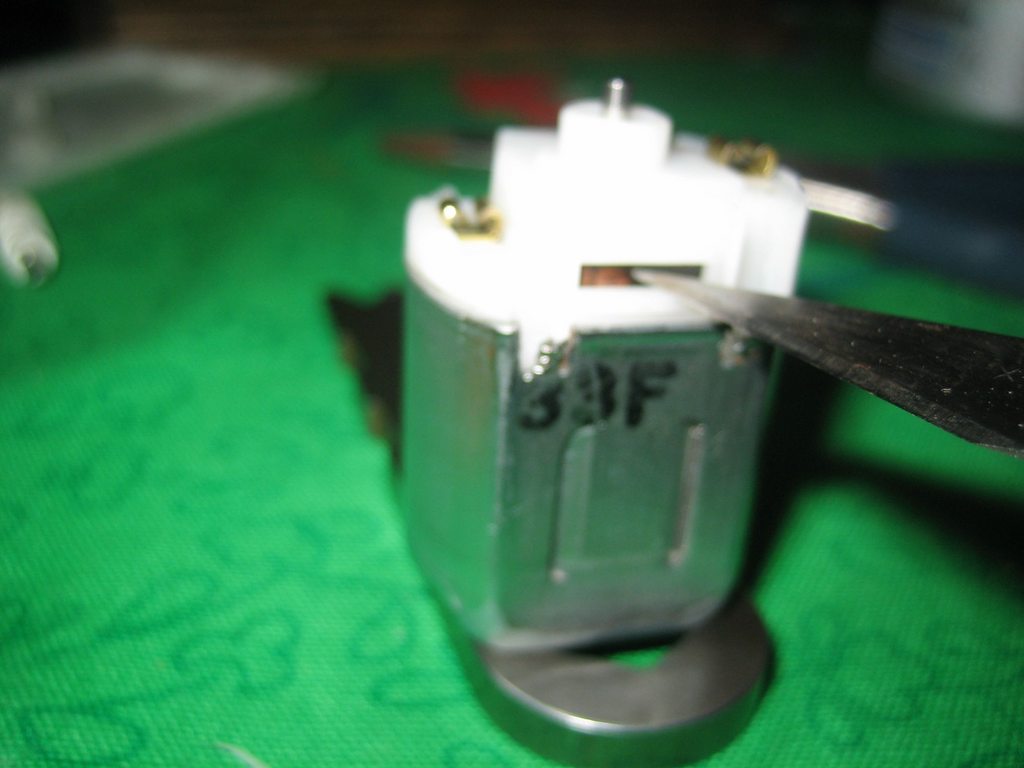
Photo 23 - Put the worm gear back on (it is keyed so that it only goes on one way)

Photo 24 - Line the motor up with the connections
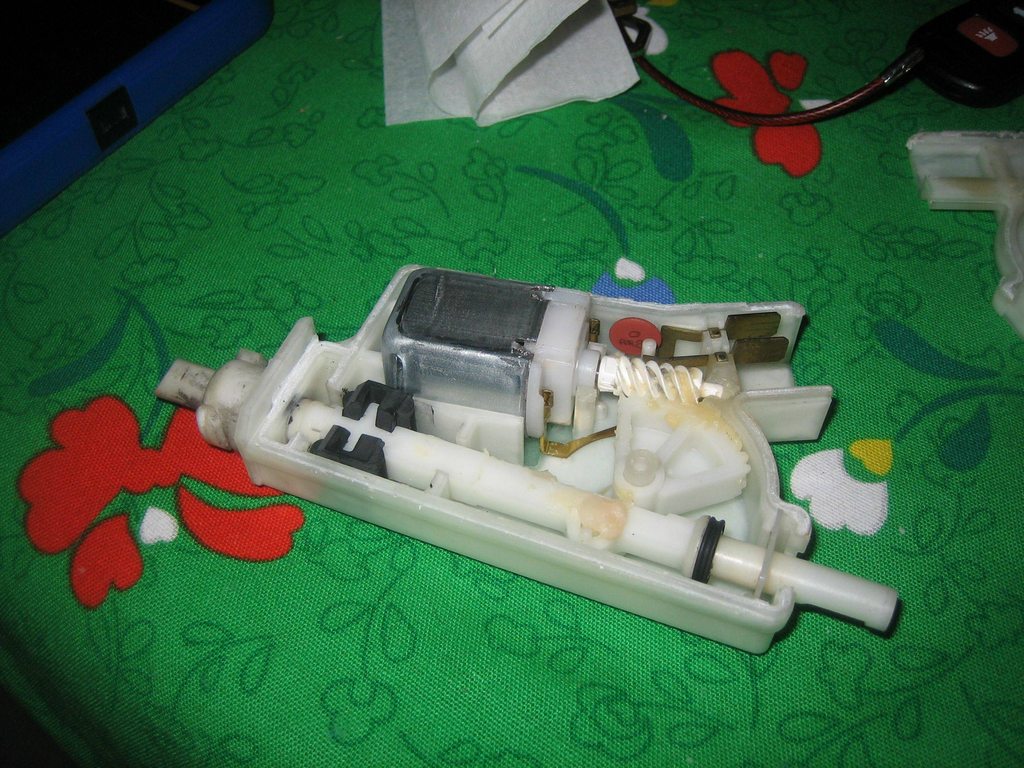
Photo 25 - Push that beast back on.
Now hold the shell together and go test it out on your car (MAKE SURE YOU HOLD THE SHELL TOGETHER WHEN YOU DO THIS). You are testing to make sure that it completely works. If you are still having issues, you can try recleaning and repositioning the brushes... but chances are you done gone messed it up and you need to go find a new actuator.
If everything works, seal the shell with whatever adhesive you desire... be it super glue, epoxy, duct tape, rubber bands, or chewing gum. Just remember that this little guy will hopefully be lasting a long time, and you might need to clean it again. Also, you want to ensure that it does not come open and become stuck in the locked position because your twine couldn't keep the shell together. So I guess what I am saying is seal it tight, but not so tight that you have to break it completely to get it apart again.

Registered User
Joined: Mar 2012
Posts: 4
Likes: 1
From: San Diego area
Hey Scott28! Thanks for putting pix to my "fix it" narrative! Good work. As the saying goes, "a picture is worth a thousand words".
Just a note - the most likely reason for problems with this thing is the black coating on the brushes and the commutator (copper area of the armature - which you termed the coil). It doesn't take much crud to have bad contact and a flaky or inoperable actuator.
Your addition of testing before gluing is a good one - providing that the housing is held tightly together.
Ed
Link to my original post: https://g35driver.com/forums/body-in...replacing.html

Registered User
Joined: Aug 2021
Posts: 6
Likes: 2
Infiniti G35 Sedan
Fuel Door Actuator Replacement
I need to replace the Fuel Door Actuator on my 2003 Infiniti G35, which is easily accessible through the trunk. Would anyone know how to remove the black retaining nut on the inside of the filler area? Thank you much for your assistance.


Thread
Thread Starter
Forum
Replies
Last Post
jthomas_50
Body, Interior, Exterior & Lighting (DIY)
32
May 11, 2016 09:49 PM
thescreensavers
Body, Interior, Exterior & Lighting (DIY)
10
Dec 6, 2013 07:50 PM
G.Ride
Body, Interior, Exterior & Lighting (DIY)
24
Jul 8, 2012 02:11 AM
Beebo
Body, Interior, Exterior & Lighting (DIY)
29
Aug 8, 2011 12:18 PM