
DIY - Painting Your Headlights


Joined: Jun 2003
Posts: 14,505
Likes: 451
From: NorCal
DIY - Painting Your Headlights
I decided to do this thread to help more than just a few individuals via PM. I don't think there is a complete DIY on blacking out / color changing your headlights so I thought I'd give it a whirl.
Feel free to add your experiences/additions/recommendations. They are more than welcome
Disclaimer -
As with most DIYs, proceeding to use this DIY is done at your own risk and I am not responsible for the outcome (good or bad ). Always proceed with caution when modifying anything on your car
This applys to both Sedans (03-06) and Coupes (03-07) and even 2nd gen sedans. IIRC, doing the 2nd gen is very similar do doing the 1st gen
Tools you'll need:
Flathead screwdriver
Philipshead screwdriver
10mm socket
Rachet & extention
Sandpaper - 400, 600 & 1500 grit
A note before proceeding with the work:
Removing the headlights (applys to both Sedan and Coupe):
https://g35driver.com/forums/lightin...ple-steps.html
A few tips on removing the headlights:
Now that you have the headlights out, let's get them ready for baking:
You are now ready to start cookin!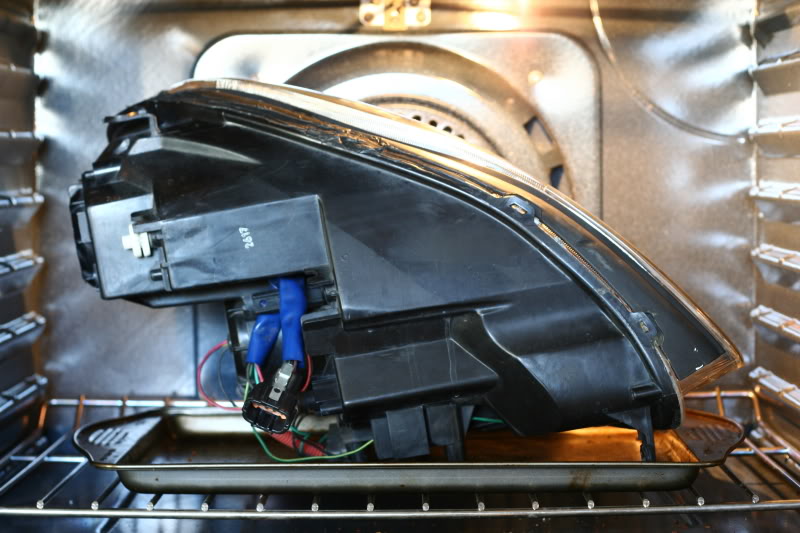
Taking apart the lense assembly:

More tips before proceeding:
Let the sanding begin:
We're done sanding...time for some painting: (THIN COATS)
Final finishing coats: (THIN COATS)
Put it back together:
Put your lights back on your car!
You are done! Congrats!
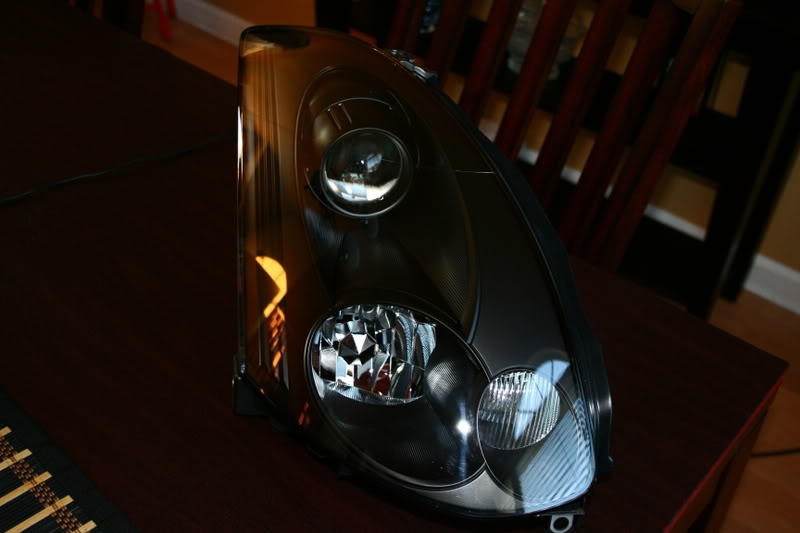
Sample finished product
Feel free to add your experiences/additions/recommendations. They are more than welcome
Disclaimer -
As with most DIYs, proceeding to use this DIY is done at your own risk and I am not responsible for the outcome (good or bad
). Always proceed with caution when modifying anything on your carThis applys to both Sedans (03-06) and Coupes (03-07) and even 2nd gen sedans. IIRC, doing the 2nd gen is very similar do doing the 1st gen
Tools you'll need:
Flathead screwdriver
Philipshead screwdriver
10mm socket
Rachet & extention
Sandpaper - 400, 600 & 1500 grit
A note before proceeding with the work:
- I've never needed to use any additional adhesive. Reusing/reheating the OEM adhesive has always sealed up the headlights just like before. Not one has shown any signs of condensation. However, for comfort sake, if you do wish to add some, I recommend to purchase the OEM butyl rubber http://www.mynismo.com/products/?id=5577&rsku=0
Removing the headlights (applys to both Sedan and Coupe):
https://g35driver.com/forums/lightin...ple-steps.html
A few tips on removing the headlights:
- Disconnecting the headlight from the wiring harness. Once you get all the bolts off to remove the headlight (4 bolts), to make it easier to unplug the headlight from the wiring harness, I take a flat head screwdriver and pry the plug/wiring harness off the back of the headlight. There is no need to re-attatch afterwards which will also make it alot easier when putting the headlights back in. Once you pull the headlight forward a bit this will make more sense
- Protecting the fenders. I always (highly recommended) apply masking tape just above where the bumper meets the fender. When you drop the bumper forward, the side marker brackets have a tendancy to scratch the fenders. Don't chance it TAPE UP THE FENDER!
Now that you have the headlights out, let's get them ready for baking:
- UPDATE - Originally suggested to remove the bulbs but there really is no need too. The temp never gets hot enough to cause damage to the bulbs. Just be sure the wires/harness don't touch any part of the oven itself.
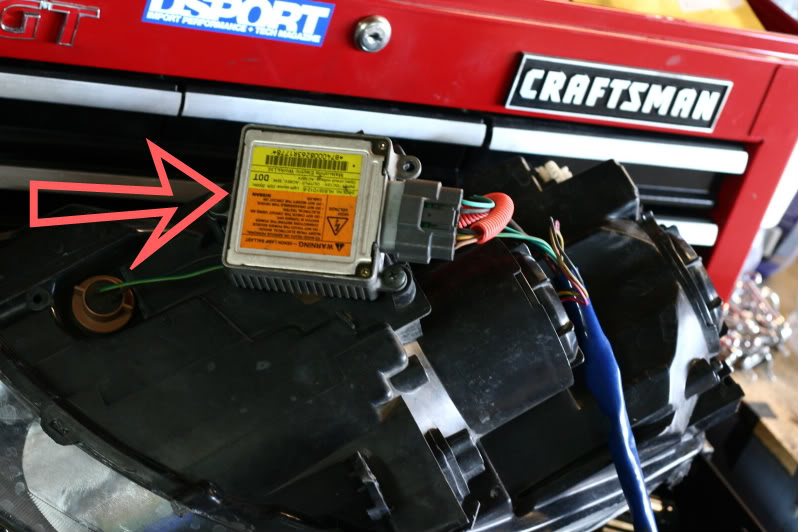
- Unscrew and unplug the HID ballast (this is a must). This is a square alluminum box on the underside of the headlight (see pic below). If you don't see one, you don't have HID headlights, instead they are Halogen. This is the only difference between the two types of headlights
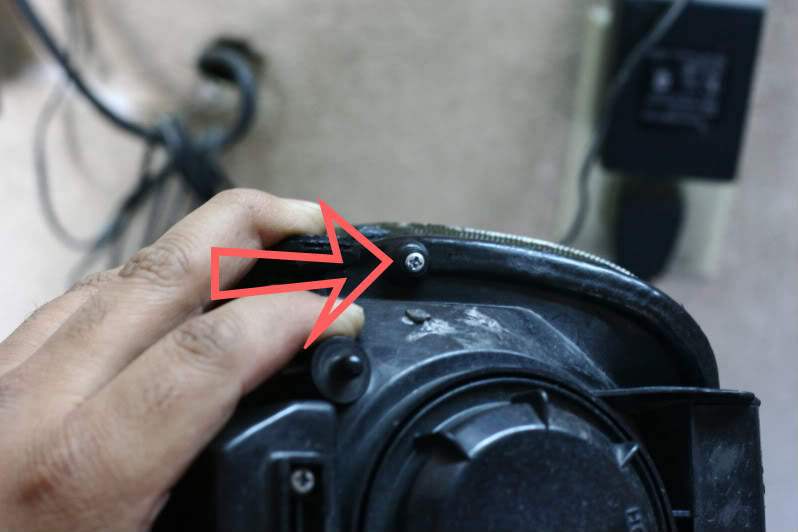
- Remove 3 screws from the back of the headlight, around the edge (see pic below). These 3 screws help hold the lense assembly onto the base
You are now ready to start cookin!
- Pre-heat the oven to 200 degrees on BAKE (NOT BROIL!). Once the oven temp is ready, place the headlight (one at a time even if you have double ovens, just do one) on a bare cookie sheet. Make sure the wires are not touching the grilles in the oven. You can tuck them inside the headlight. Set a timer for 7 minutes
- Once the 7 minutes are up, get some gloves and remove the headlight from the oven. Get the small flat head screwdriver. You will notice around the sides of the headlights are tabs. Place the screwdriver behind each tab and gently pry each tab. Just gently though..it will be very pliable from being in the oven. Once you did the gentle pry aound the each tab (I think its a total of 4 to 5) you can now pull the lense assembly off of the headlight base
Taking apart the lense assembly:
- There are two screws on inside of the lense, towards the bottom (RED arrows in pic below). Take them out, those are holding the bezel onto the lense. Once you have the bezels out, you will need to remove the turn signal bezel from the main bezel...there is only one screw holding it in place (GREEN arrow in pic below)
More tips before proceeding:
- Put the base and reflectors (attatched to the base) aside, as well as the lense. Becareful not to drop the lenses. Put them inside the house so no accidents happen
- Do not sand the inside of the turn signal lense (shiny stuff on the inside) as this is used to reflect light. Mask it off and just do the outside. Also mask off the orange turn signal lense so you don't accidentally scratch it
- This DIY does not cover clearing out the orange turn signal lenses. I will say it takes a dremel and a steady hand to complete that portion
Let the sanding begin:
- The idea here is to get rid of the shine and rough it up so the paint/primer will stick. Get the 400 grit sandpaper out and start sanding. When you get to the grooved/textured part of the bezel, sand in the same direction as the grooves/lines. It typically takes me about 30 to 45 minutes per bezel depending on how many beers I've had at this point

- Once you are done sanding, you will need to take the bezels and wash off all the dust. I use a microfiber towel and bucket of car wash soaped water. Scrub down, hose off, let dry. (I speed it up by using my air compressor..yeah, I cheat cause I can
 )
)
We're done sanding...time for some painting: (THIN COATS)
- Don't worry about getting every little section with the first two coats. It will all get covered eventually as you will need to do like 4 to 5 coats. I've been using Duplicolor Sandable Primer
- Wait about 20min between each coat..or longer if its cold outside. Just before the last coat, take a look at the pieces and see if there is any lint or slight imperfections. If there is, take 600 grit and lightly sand those areas down. Dont sand to early as the primer needs to be completely dry or you will ruin the base with the sanding and have to sand completely down and re-apply. Once you've done the once over and sanded with 600 grit if needed, apply the final coat of primer (thin coat)
Final finishing coats: (THIN COATS)
- Again, thin coats. The paint typically takes a little longer to dry so be patient and do THIN COATS! (Can you see a theme here? ). Use the finishing paint of your choice/color (high temp paint is not required). I like using Duplicolor Bump Coating.
- I typically apply about 4 to 5 thin coats of the finishing paint of your choice
- Before the final coat of the finishing paint, take the 1500 grit and sand any areas like you did before with the 600 grit. This step might not be required if you have a clean area you are spraying. Same rule applies, do not sand too early or you could ruin the coats you've just applied. It's best to get the bezels sit overnight to dry completely. Especially during the cold months.
Put it back together:
- Once the bezels are all pretty and dry, reassemble them and put it back into the lense. Becareful, you don't want to ding the freshly painted bezel if you can help it. I typically give it a good 3 hours or even overnight before I put the bezels back in
- Don't forget the two screws to hold the bezel in the lense or the one to hold the turn signal bezel onto the main bezel
- Place/set the lense assembly onto the headlight base (you won't be able to set it all the way down, this is fine for now)
- Preheat the oven to 200 on BAKE (NOT BROIL!). Once the oven temp is ready, place the headlight into the oven, again, using a cookie sheet for it to rest on
- This time around you will only need to leave the headlight in the oven for 5 minutes. Once you remove the headlight from the oven, it will snap into place. Replace the 3 screws to secure the lense back onto the base
- Finally, put all the bulbs and ballast (if HIDs) back into/onto the headlight and reattatch the bulb wiring harness
Put your lights back on your car!
You are done! Congrats!
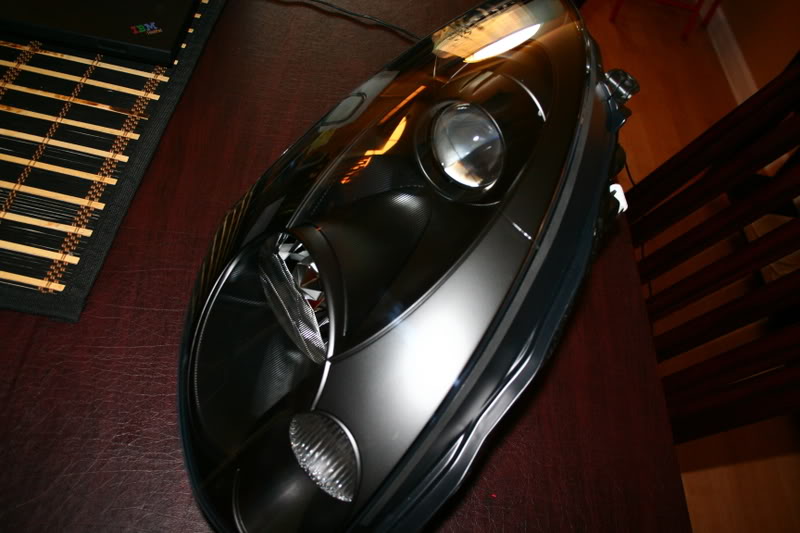
Sample finished product
Last edited by G35Papa; Aug 1, 2011 at 06:38 PM.

Used it on my headlights. Great write-up. Love the new look!
Also, if you paint the headlights, you should also paint your grill. Definitely completes the look.
https://g35driver.com/forums/g35-sed...rille-diy.html
^ Another great write-up by G35Papa.
Also, if you paint the headlights, you should also paint your grill. Definitely completes the look.
https://g35driver.com/forums/g35-sed...rille-diy.html
^ Another great write-up by G35Papa.


Joined: Jun 2003
Posts: 14,505
Likes: 451
From: NorCal
Trending Topics
I started working on mine yesterday using Papa's directions. Everything so far went extremely smooth. Next step for me is to start sanding. 
man, I had to grow a pair to actually put my headlights in the oven. My wife is like WTF are you doing? She went and got me the fire extingisher. lol...
man, I had to grow a pair to actually put my headlights in the oven. My wife is like WTF are you doing? She went and got me the fire extingisher. lol...
I started working on mine yesterday using Papa's directions. Everything so far went extremely smooth. Next step for me is to start sanding.
man, I had to grow a pair to actually put my headlights in the oven. My wife is like WTF are you doing? She went and got me the fire extingisher. lol...
man, I had to grow a pair to actually put my headlights in the oven. My wife is like WTF are you doing? She went and got me the fire extingisher. lol...

Joined: Jun 2003
Posts: 14,505
Likes: 451
From: NorCal
^LOL
I cracked up when I read that. Evertime I have my friends over now to work on cars my wifes asks "do you need to oven to bake headlights?"
I added some vanity pics to the bottom of the DIY for viewing pleasure
I cracked up when I read that. Evertime I have my friends over now to work on cars my wifes asks "do you need to oven to bake headlights?"
I added some vanity pics to the bottom of the DIY for viewing pleasure
Papa (Chris) is the man. I'm proud to say my lights are a result of his labor. Although he did almost all the work, it is definitely an interesting hands-on project. However, I think I sanded off my fingerprints that day... haha.
Great DIY.
Great DIY.

Registered User
Joined: Oct 2008
Posts: 1,813
Likes: 1
From: NW LA
Thanks Chris for posting this up. I used your DIY (with the grille too) and you saw mine. Came out excellent. Wish I woulda paid more attn to the "careful with reinstalling the bumper" advice. Boooooo scratch. 
The instructions are excellent. Great thread!
The instructions are excellent. Great thread!