
New Mods - JDM Rear Tails & CF Battery/Brake Covers
#16
 03-25-2009 | 03:35 AM

Registered User
Joined: Sep 2008
Posts: 2,568
Likes: 55

Besides, you're fickle and you'll probably change them in a month or so

#17
03-25-2009 | 03:50 AM
Thread Starter
|
Registered User
Joined: Nov 2008
Posts: 2,588
Likes: 24
From: SoCal

You know me well already.. I'm definitely fickle and also very ****, so if I don't think something is absolutely perfect, then it won't take me long to change it. I'll let you know in a month or so how I like the new tail lights... They will either grow on me, or I'll get rid of them and go back to the stockers... either way, I'll be happy!

#18
03-25-2009 | 04:28 AM


#22
03-25-2009 | 11:16 AM
Registered User
Joined: Sep 2008
Posts: 2,568
Likes: 55
 . Besides, it's not like RIck can get these in anytime soon

#25
03-25-2009 | 01:00 PM

Thanks! I know what you mean... Years ago, when I had my Eclipse GSX and E36 M3, everyone was trying to get rid of the amber lights and turn signals, since all of the cars had them... now the amber seems to be the in thing, since all of the manufacturer's have switched to all red tails in the US... Seems everyone wants wht they can't have. All I know is that my tails are fairly unique right now, but as soon as everyone starts switching to the JDM tail lights, them I'll probably switch back. LOL
Ahhh, you're good, at least you got options now.
But seriously, it looks good. Not breaking your ***** here, but what would be really cool is if you can get some night shots of what they look like with the lights on
 (I just wanna see them in action)
#27
03-25-2009 | 02:06 PM
Thread Starter
|
Registered User
Joined: Nov 2008
Posts: 2,588
Likes: 24
From: SoCal
I'll take some night shots (with and without the brakes on) soon and post them here, so everyone can see them "in action". Rick says they are quite a bit brighter than the US OEM tails at night, so we will see.
#28
03-25-2009 | 02:19 PM

Looks awesome, I'm still thinking about the JDM tails don't know if i like them, but if they are a lot brighter that would be really cool, I don't know I always thought it's safer if the turn signal is a different from the brake lights. But a uniform all red taillights seems pretty nice.
The CF covers go really well your your engine cover.
The CF covers go really well your your engine cover.
#29
03-25-2009 | 02:29 PM
Thread Starter
|
Registered User
Joined: Nov 2008
Posts: 2,588
Likes: 24
From: SoCal
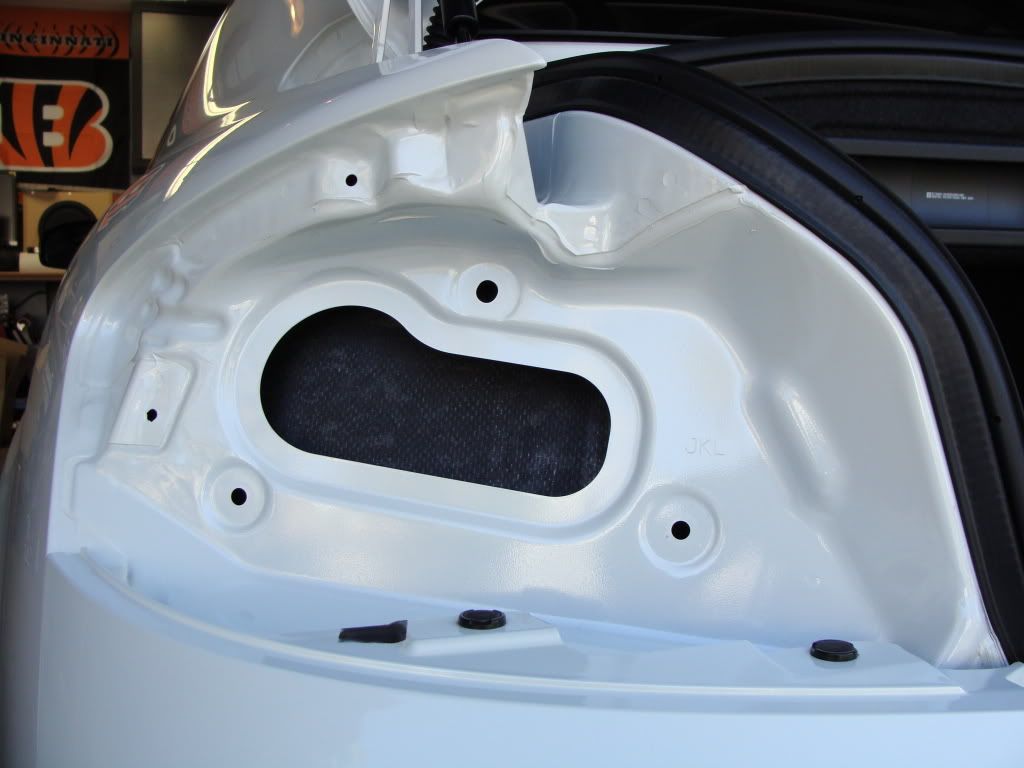
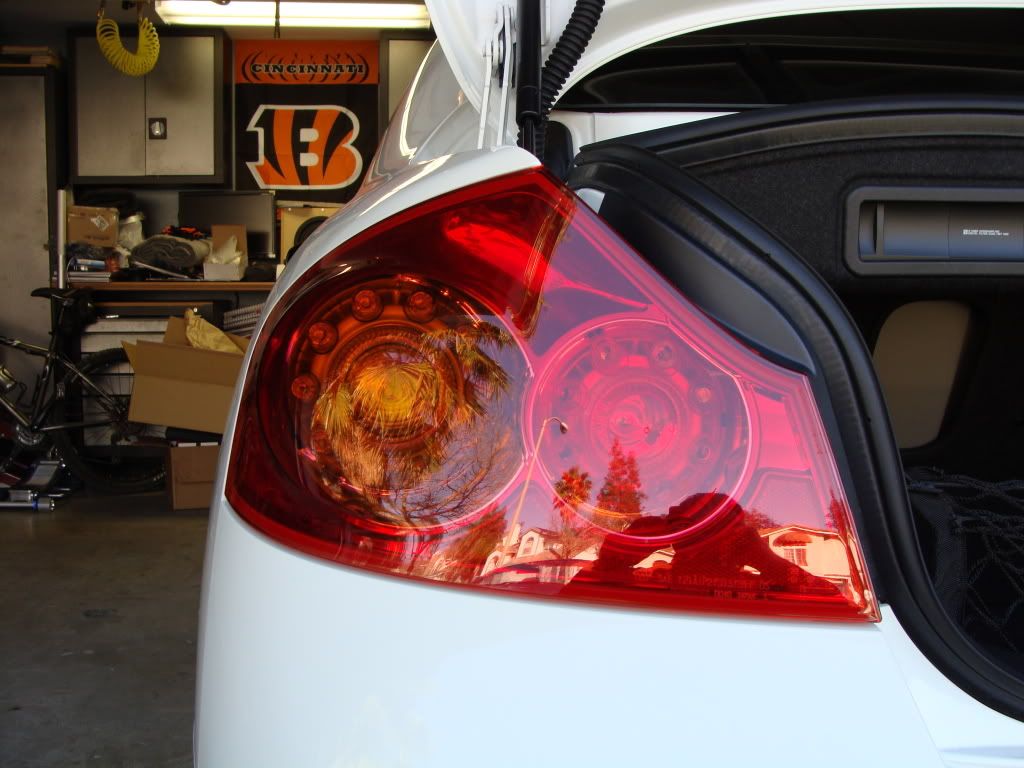
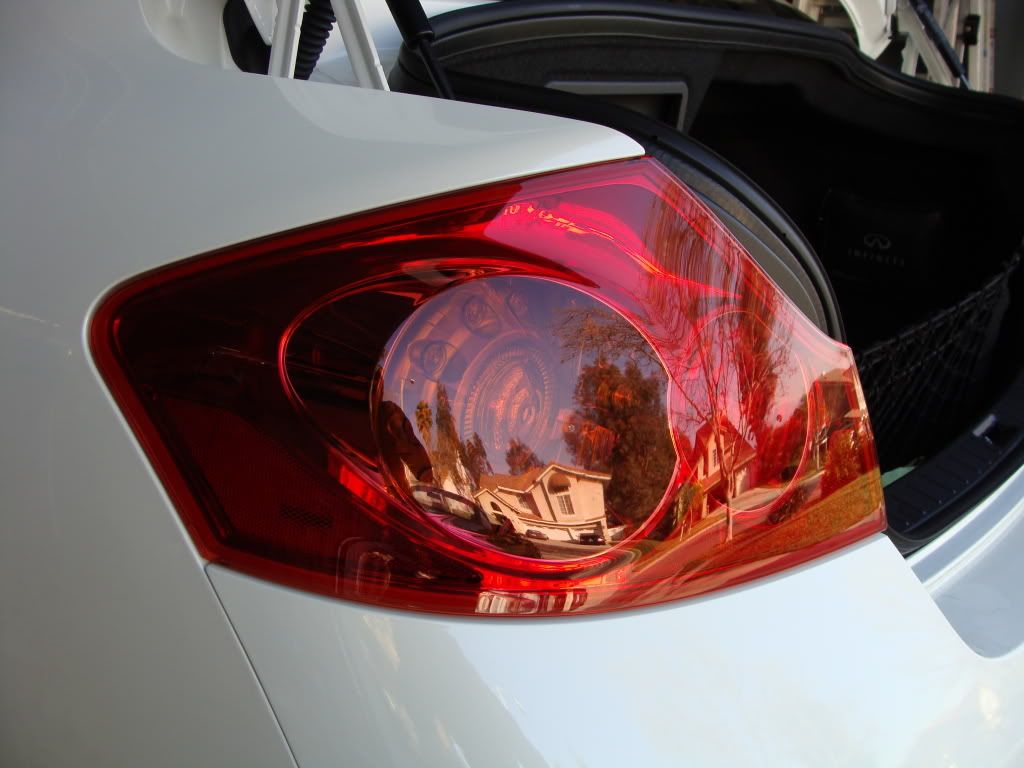
Here are some pics of the install. It's actually a straight swap, so it's a very straight forward install. Only takesabout 10 minutes a light and all you really need is a flat blade screw driver and a 8 mm box wrench or socket to do the job.
I'll try and do a full DIY on this and post it later, but here's the jist of it.
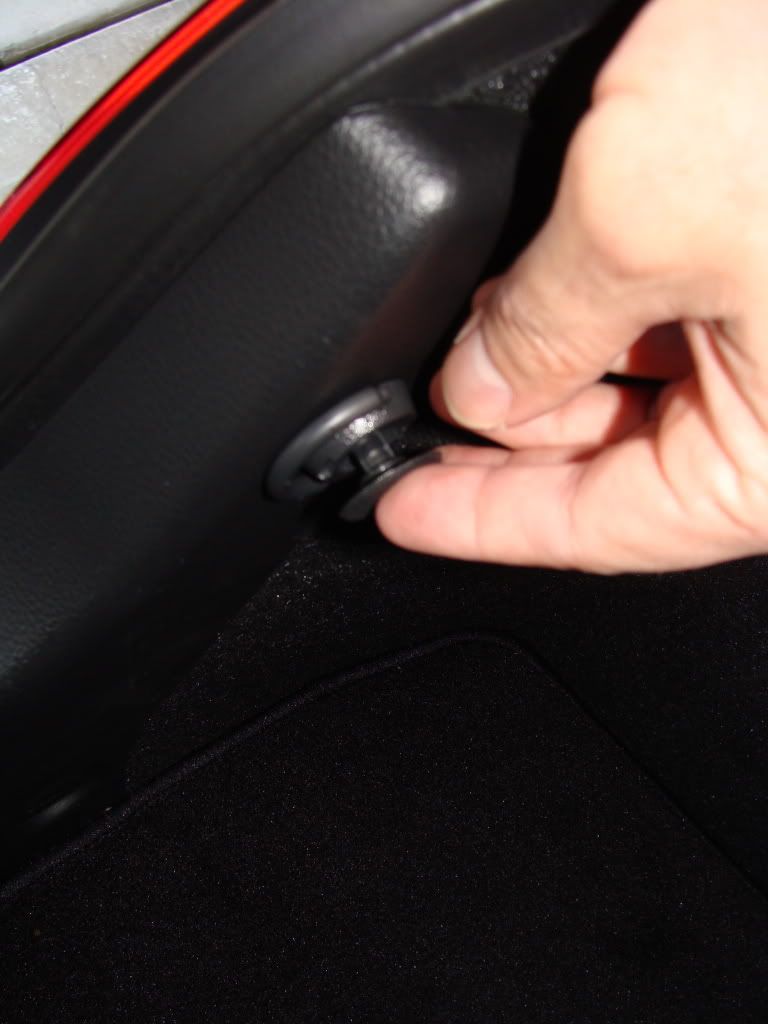
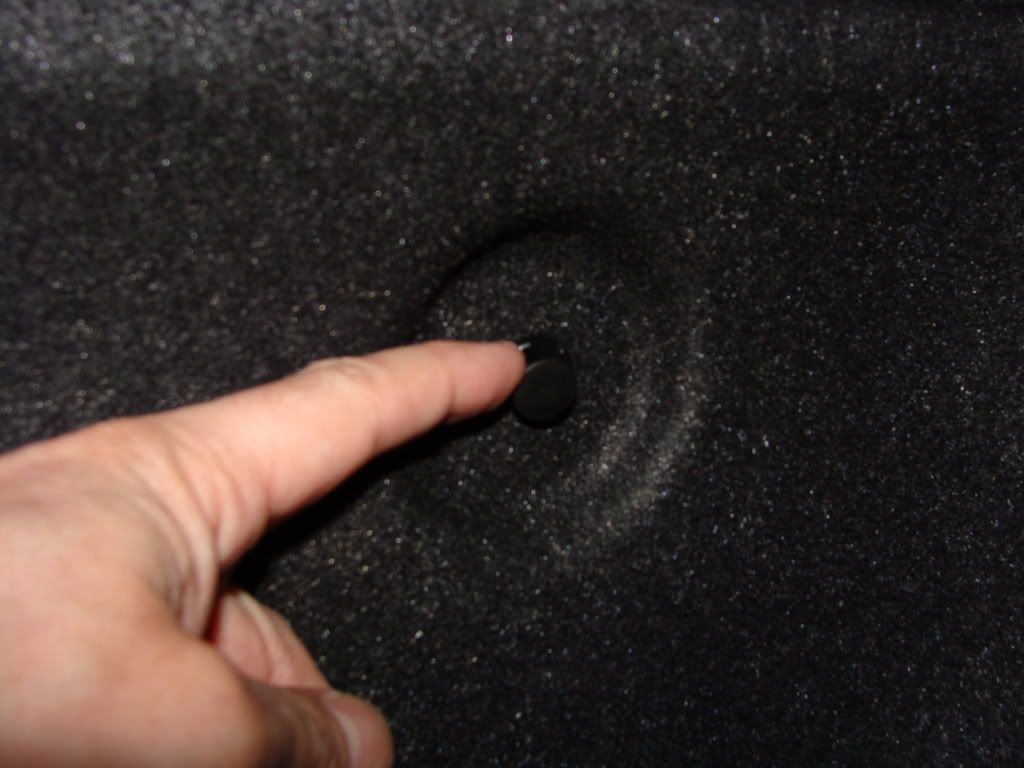
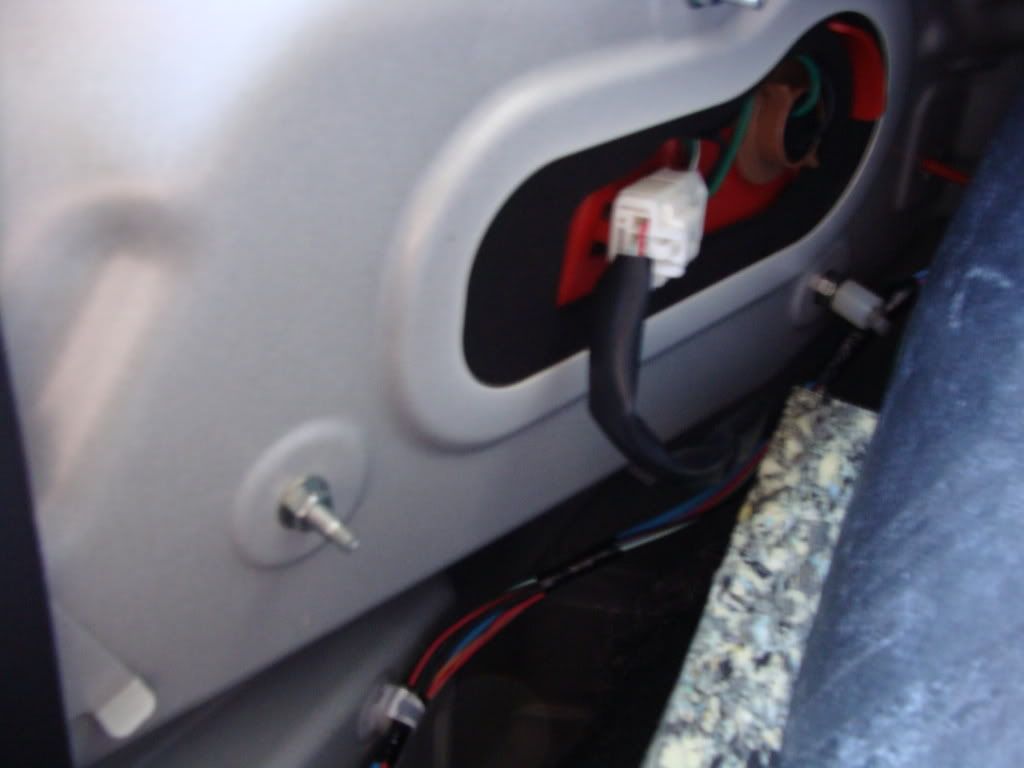
You first need to partially remove the inner trunk liner that is behind the rear tail lights, so you can access the connector and nuts that hold the lights on. To do this, first remove the snap fasteners that the factory cargo net connects to. These are very easy to remove, just insert a flat blade screwdriver into the slot and twist. The center part of the fastener should pop out, which releases the fastener, then you can pull it out completely. Repeat this step for all 4 fasteners (2 on each side). You can fully remove this rear plastic trunk liner piece now if you like, just simply lift up gently and it will snap off the remaining clips... however, I was able to leave this piece on a just pulled the liner out from underneath it on either side to gain access to the backs of the tail lights.

In order to get enough access you will also need to remove the 2 snap fasteners that are holding on the trunk liner on either side of the trunk. These are removed in the same manner as the other fasteners, simply using a flat blade screwdriver. Remove all 4 of these fasteners (2 on each side)
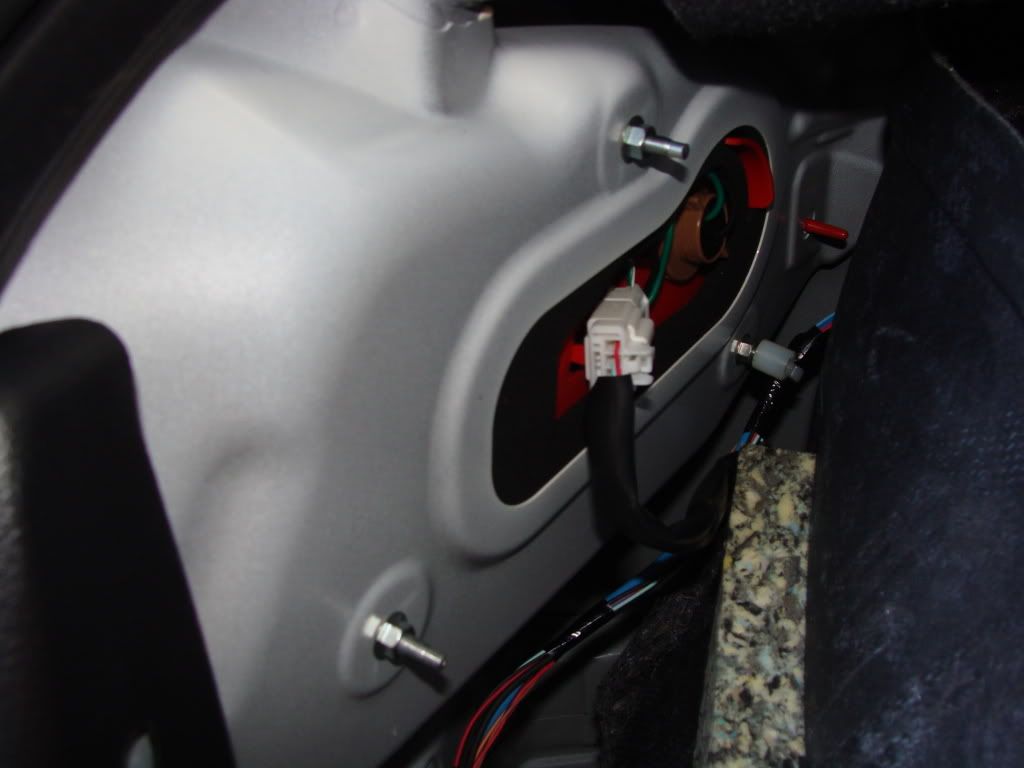
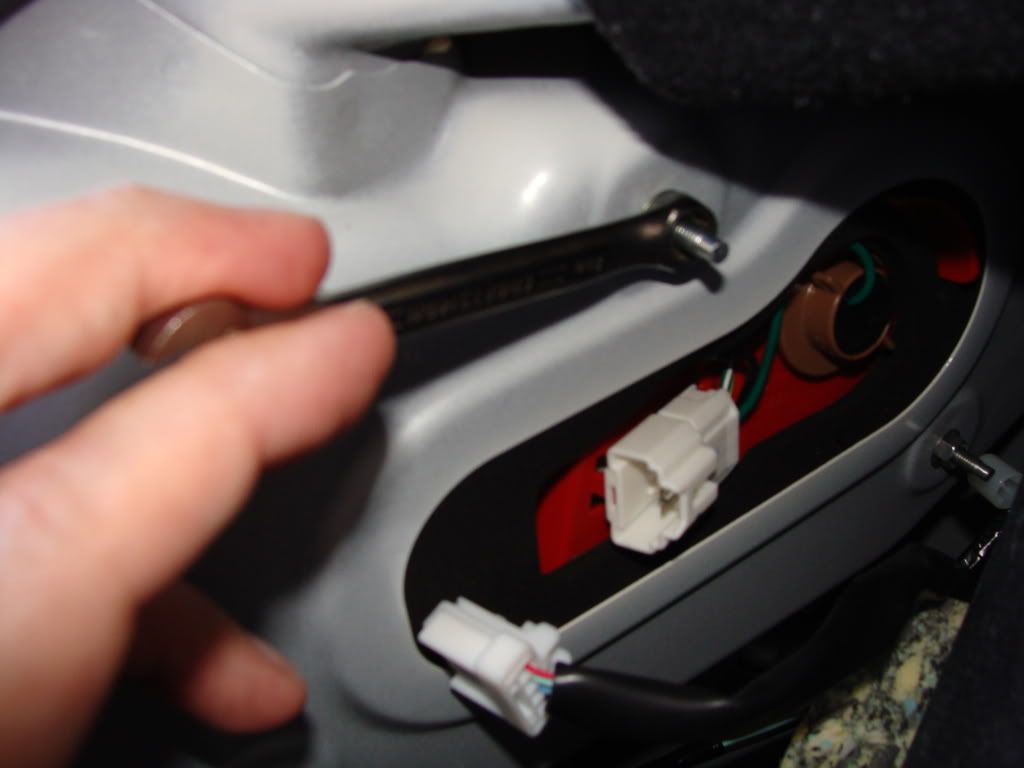
Now you will have access to the back of each of the tail lights. Here you will see the three 8 mm nuts holding on each tail light, as well as, the electrical connector for each tail light.
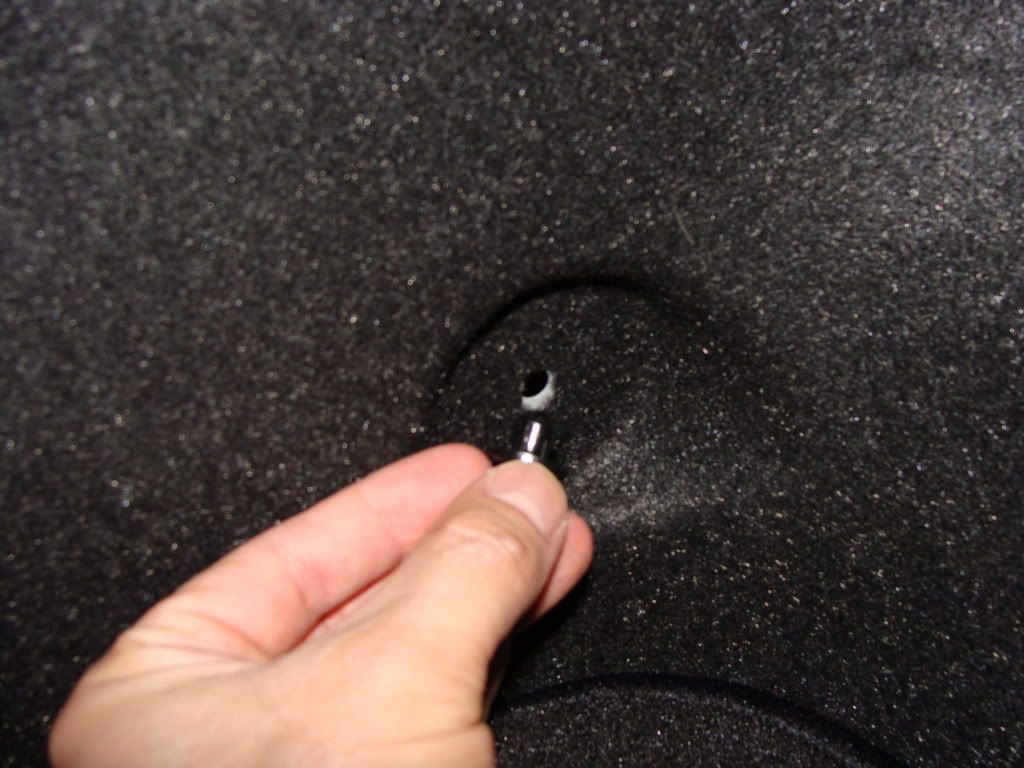
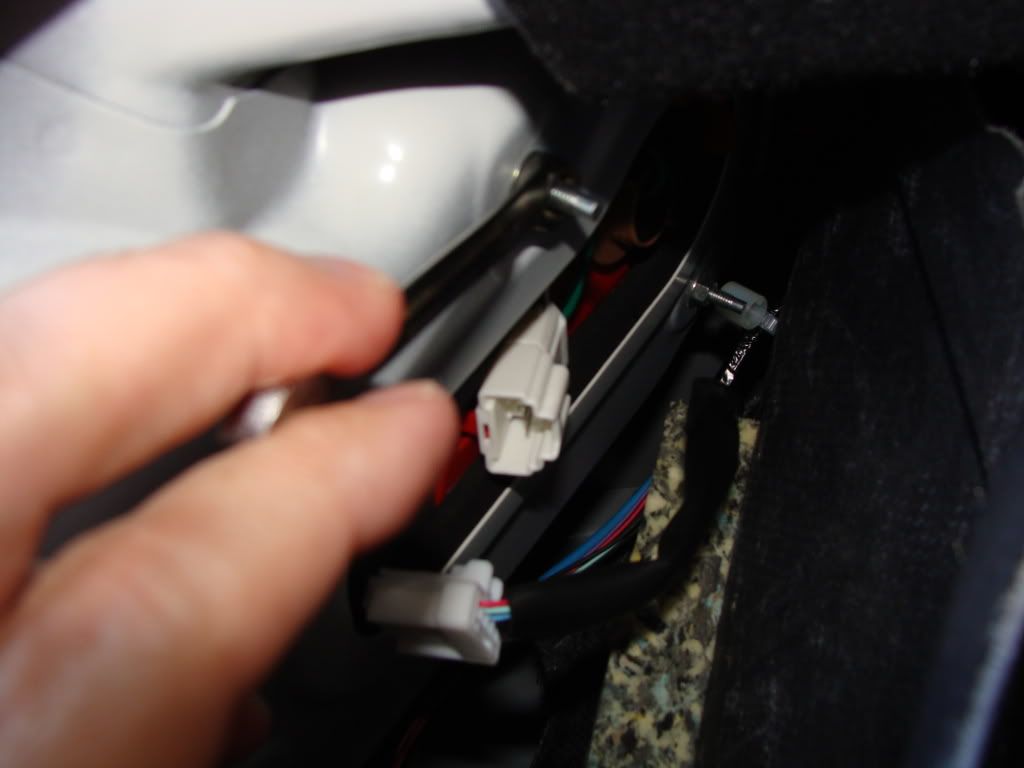
First you have to remove the plastic wire harness clip that is on the farthest most bolt. Just use a flat blade screwdriver to pry this off the bolt.. It may be a little stuborn at first, but once you get the blade underneath it, it should pop right off.
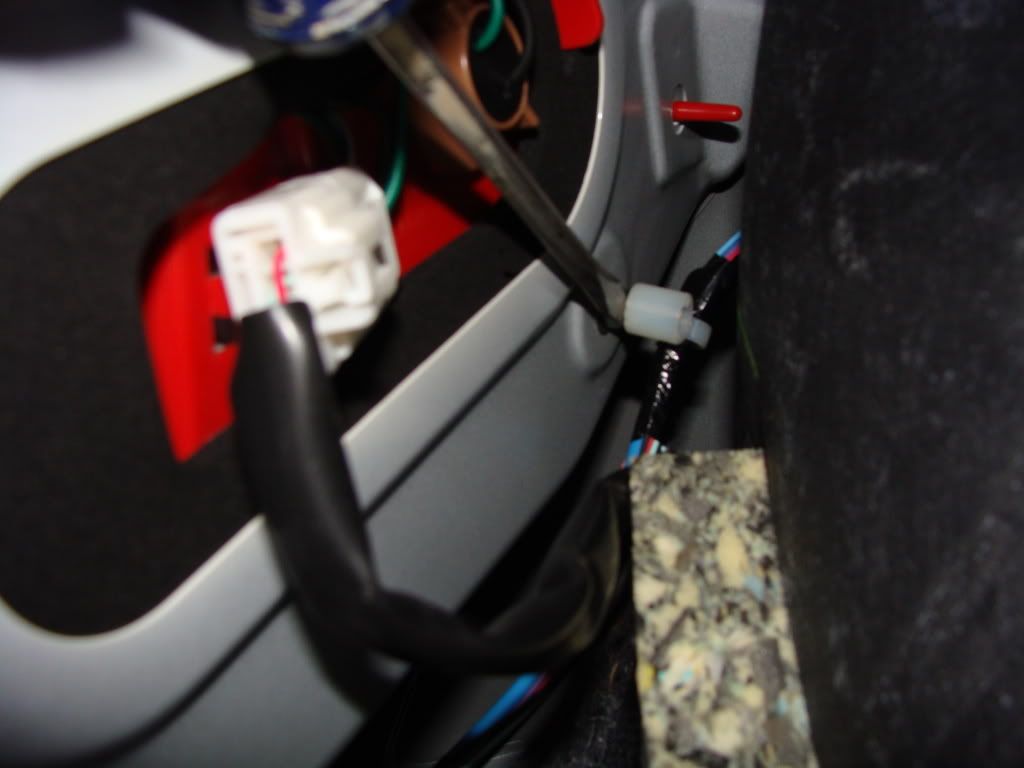
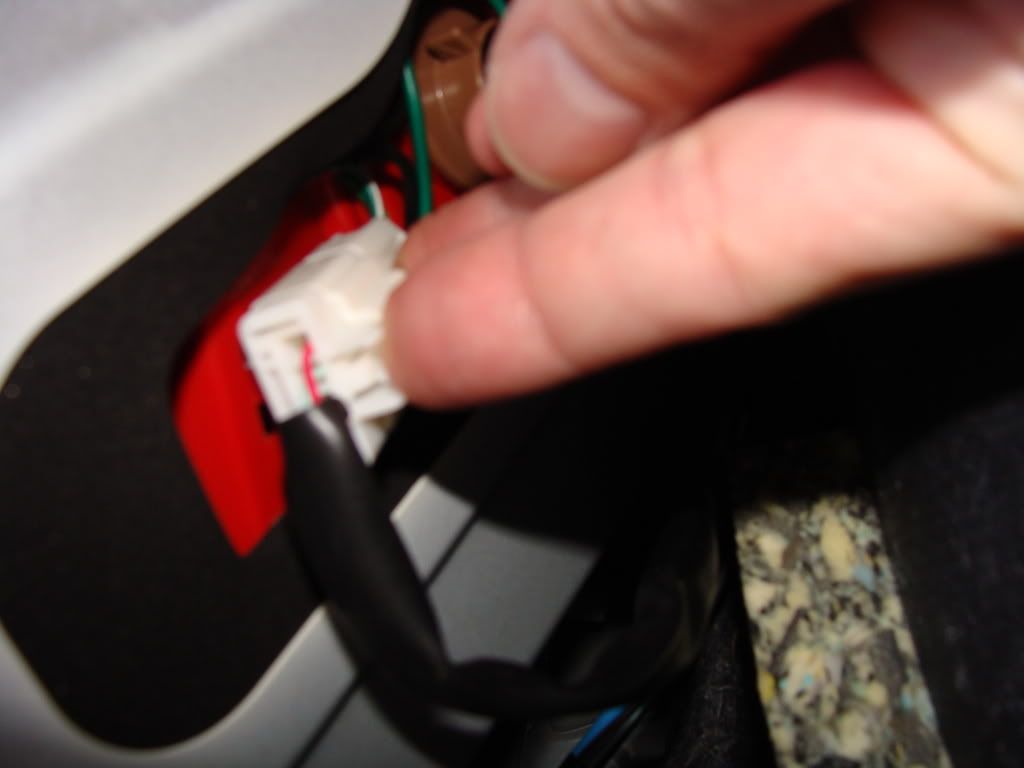
Next, unplug the eletrical connector from the factory tail light. It's easiest to first pop it loose using a flat blade screwdriver, then once loose, you can easily pull it right off.
Now, you just simply remove all three of the 8 mm nuts using a wrench. Just be careful not to let any of them drop into the abyss of the trunk behind the liner. If you do, it will be VERY hard to retrieve them. Trust me, I know, because I dropped my wrench down there and had to use a magnetic retrieval tool to get it out. LOL
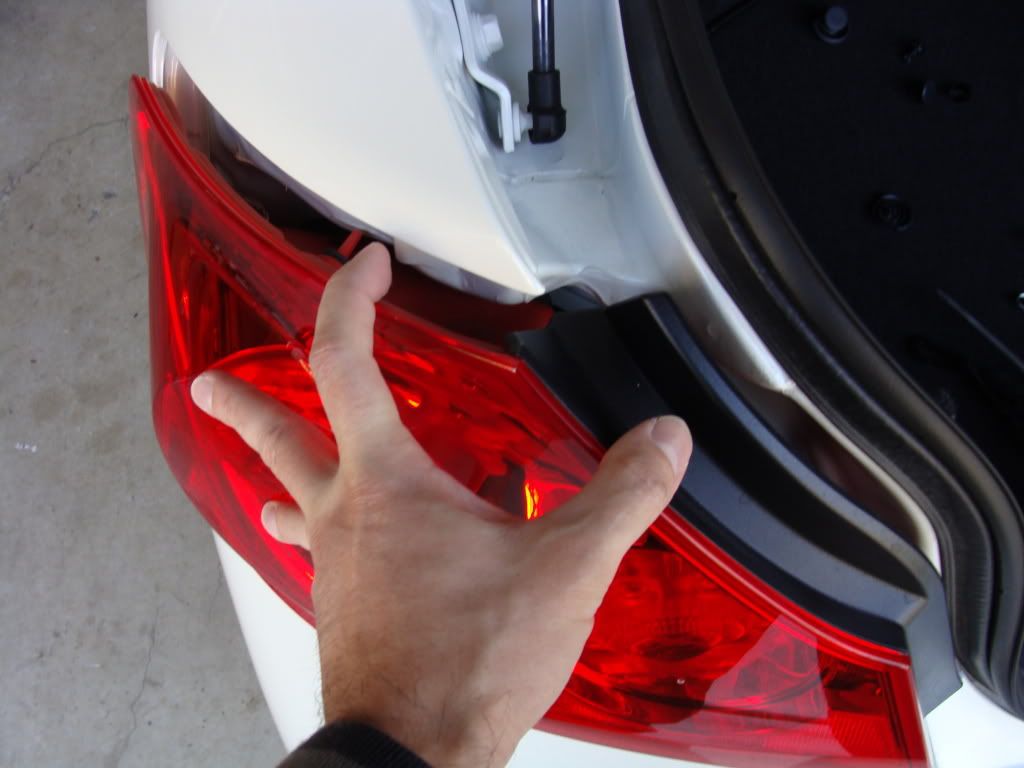
Once all of the nuts are removed, then just press on the back of the light assembly from inside the trunk while keeping your other hand on the light assembly from the outside. It takes a little bit of pressure to get the gasket to pop loose, but once it is loose it will fall into your hand and you can fully remove it from there. Once removed, I took this opportunity to clean and wax the area behind the light assemblies before reinstalling the new JDM tail lights.
Reassembly is simply the reverse of this procedure. Just take note that there is a little bit of play in the bolt holes, so you can actually center the tail light, so the gaps around the light are even from the outside of the car before tightening the nuts down. Tighten each nut a little bit at a time (rather than one at a time), so the light assembly is pulled in evenly. These nuts don't require much torque to tighten them, since they have a petty thick gasket on them... Once the gasket is fully compressed it will become much harder to turn the nut, this is when you stop tightening and I even backed the nut off a 1/4 - 1/2 turn after reaching this point. Be very careful not to over tighten these, as the studs in the tail lights are very small and are not made of a very solid metal. Oh yeah, and don't forget to plug the new light back in...
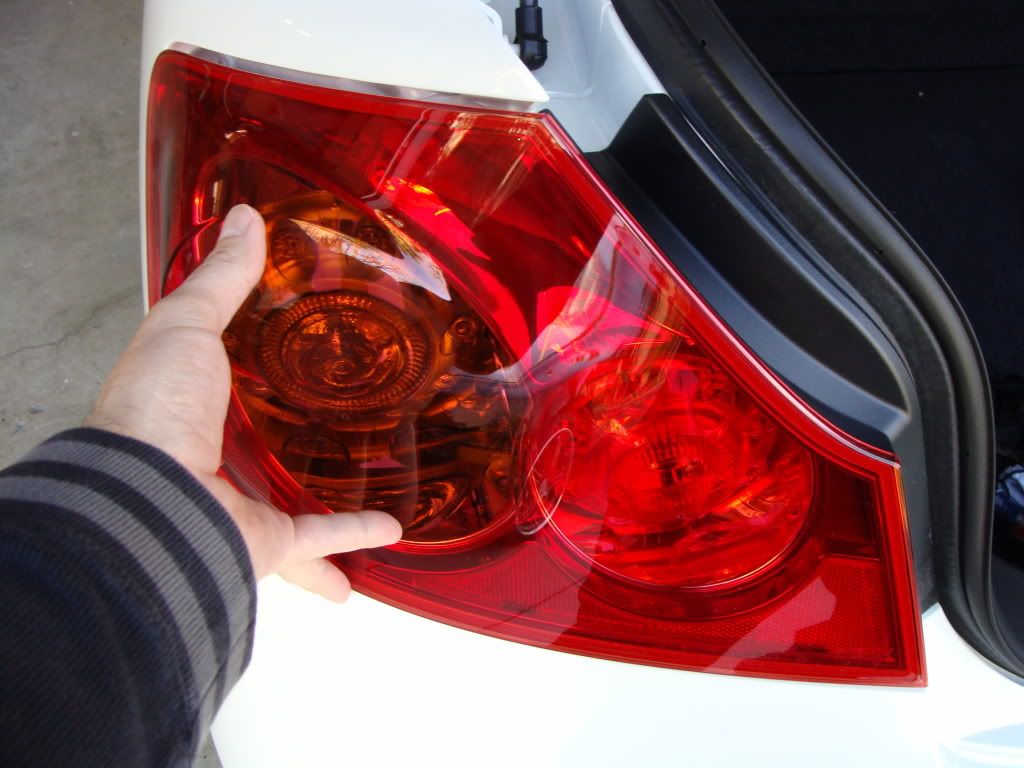
Once the new tail lights are intalled, make sure all of the gaps around the outside of the lights are even and that both lights are actually working before you reinstall the trunk liner.
I'll try and do a full DIY on this and post it later, but here's the jist of it.
You first need to partially remove the inner trunk liner that is behind the rear tail lights, so you can access the connector and nuts that hold the lights on. To do this, first remove the snap fasteners that the factory cargo net connects to. These are very easy to remove, just insert a flat blade screwdriver into the slot and twist. The center part of the fastener should pop out, which releases the fastener, then you can pull it out completely. Repeat this step for all 4 fasteners (2 on each side). You can fully remove this rear plastic trunk liner piece now if you like, just simply lift up gently and it will snap off the remaining clips... however, I was able to leave this piece on a just pulled the liner out from underneath it on either side to gain access to the backs of the tail lights.
In order to get enough access you will also need to remove the 2 snap fasteners that are holding on the trunk liner on either side of the trunk. These are removed in the same manner as the other fasteners, simply using a flat blade screwdriver. Remove all 4 of these fasteners (2 on each side)
Now you will have access to the back of each of the tail lights. Here you will see the three 8 mm nuts holding on each tail light, as well as, the electrical connector for each tail light.
First you have to remove the plastic wire harness clip that is on the farthest most bolt. Just use a flat blade screwdriver to pry this off the bolt.. It may be a little stuborn at first, but once you get the blade underneath it, it should pop right off.
Next, unplug the eletrical connector from the factory tail light. It's easiest to first pop it loose using a flat blade screwdriver, then once loose, you can easily pull it right off.
Now, you just simply remove all three of the 8 mm nuts using a wrench. Just be careful not to let any of them drop into the abyss of the trunk behind the liner. If you do, it will be VERY hard to retrieve them. Trust me, I know, because I dropped my wrench down there and had to use a magnetic retrieval tool to get it out. LOL
Once all of the nuts are removed, then just press on the back of the light assembly from inside the trunk while keeping your other hand on the light assembly from the outside. It takes a little bit of pressure to get the gasket to pop loose, but once it is loose it will fall into your hand and you can fully remove it from there. Once removed, I took this opportunity to clean and wax the area behind the light assemblies before reinstalling the new JDM tail lights.
Reassembly is simply the reverse of this procedure. Just take note that there is a little bit of play in the bolt holes, so you can actually center the tail light, so the gaps around the light are even from the outside of the car before tightening the nuts down. Tighten each nut a little bit at a time (rather than one at a time), so the light assembly is pulled in evenly. These nuts don't require much torque to tighten them, since they have a petty thick gasket on them... Once the gasket is fully compressed it will become much harder to turn the nut, this is when you stop tightening and I even backed the nut off a 1/4 - 1/2 turn after reaching this point. Be very careful not to over tighten these, as the studs in the tail lights are very small and are not made of a very solid metal. Oh yeah, and don't forget to plug the new light back in...
Once the new tail lights are intalled, make sure all of the gaps around the outside of the lights are even and that both lights are actually working before you reinstall the trunk liner.
Last edited by 2GoRNot2G; 03-25-2009 at 03:02 PM.
