
Flex + EDFC Install tips


Thread Starter
|
Registered User
Joined: Jul 2004
Posts: 57
Likes: 0
From: Vancouver, BC
Flex + EDFC Install tips
So I was asked to post some tips on installing Tein Flex + EDFC, here they are. I installed the EDFC in the ashtray so my wires were run there, if you're putting it somewhere else run the wires appropriately.
EDFC Motor Assembly
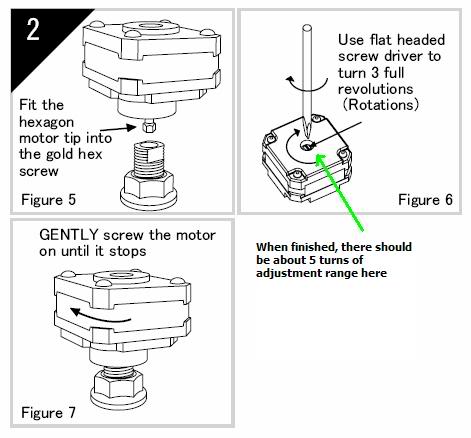
Be real careful with this one, if they aren't put on right there won't be enough adjustment range, so I think the motor might burn out. When I first did it, 2 motors had 5 1/2 turns of adjustment, but the other two only had 3 turns so I had to take those ones apart. I think there should be around 5 turns on each one. If the threadlock sets up on you, it's real hard to get the motors off, especially the rears.
Once you've replaced the adjustment hex screw per the instruction, put the motors on. I used a screwdriver to keep the adjustment screw from turning while turning the motor. Once the motor is on, turn the screw from lock to lock to see how much range there is. On a couple of motors I had to unscrew them a bit to get a consistent range on all shocks.
I would probably check with Tein to see if having a different range on the shocks is a bad thing. I just assumed it must be bad.
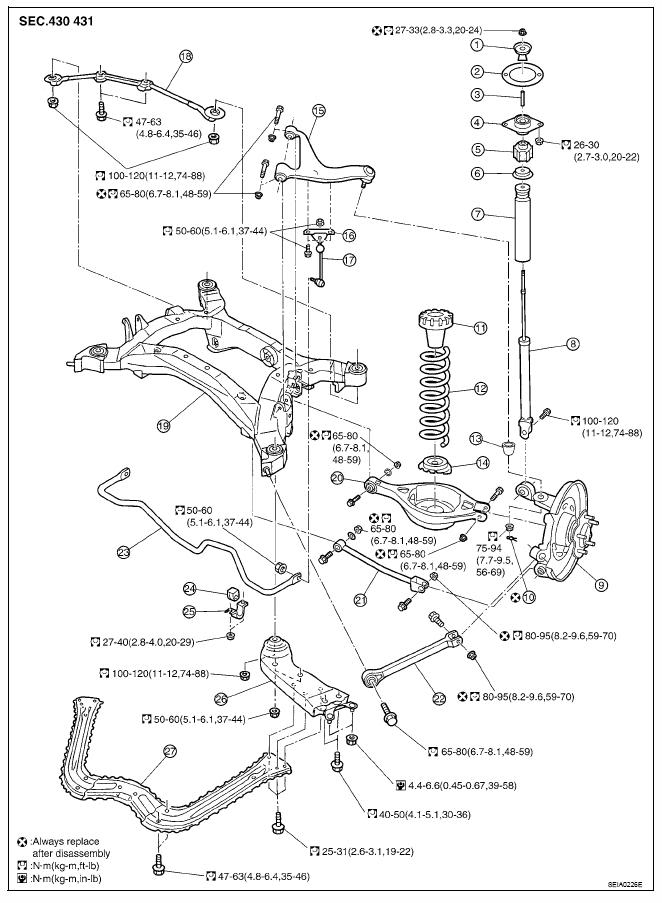
Front Shock Install
Not a too big problem, 3 nuts on the top of the shock, 1 bolt on the bottom. You will need to pull the cotter pin and castle nut off the lower ball joint and disconnect the sway bar to lower the control arm far enough to get the shock out. Do not hammer the top of the ball joint bolt to get it out, just use a jack to lift the wheel hub and rotor assembly up and the ball joint will come apart. It is a taper fit so you shouldn't need a pickle fork or anything to get it apart. Use a 6 sided 10mm socket to tighten the top shock nuts back on, there isn't much room to get in some spots on the drivers side so I used a 3/8 drive and extension. A 1/2 inch drive extension wouldn't fit, and a 12 sided socket started to slip on the nut.
The EDFC wires are pretty crappy. On the passenger side, I ran them through the battery compartment then through the big grommet that is under the windshield trim. Remove those push-rivets that hold the battery cover, then pop the windshield trim off. You'll see the big grommet there, cut it VERY carefully (there's all kinds of wires in there), then run the EDFC wire through. Use some vaseline to lube it up if it's hard to get through. You'll need to remove the glove box, then reach way up into the dash to grab the wire.
The drivers side is really hard. I ran the wire around the master cylinder, and down to the big grommet on the firewall. Again cut it carefully, attach a nice long zip tie to the end of the EDFC wire to help fish it through. I spent a 1/2 hour and chewed up my finger trying to get this one through, but it's the only way I could see. Once the wires are through the firewall, run them through the dash to the ashtray.
Rear shock and spring install
Really easy, 2 nuts at the top, one bolt on the bottom. Just make sure when you attach the rubber isolator on the bottom of the spring that it is correctly oriented in the spring bucket - it's not flat so the end of the spring fits in the lowest part of the bucket. Also, you have to push the control arm down pretty hard to pull the shock out, and it will make a loud pop like something broke, but it doesn't break.
Running the EDFC wire is not as hard as I thought it would be. Fold the rear seats down, remove the two push pins on the parcel shelf as well as the covers for the child seat anchor points. You can then lift up the parcel tray enough to get to the wires. Have someone poke a screwdriver or something up the hole in the shock tower and you'll see the insulation move.
You will need to enlarge that hole up in the shock tower with a drill. I think I used a 1/2 inch bit, but just test it by drilling a small hole in a block of wood and make sure you can fit the EDFC connector through it. You will need some wire armour or some kind of grommet so the wires don't chafe against the hole. Have someone push the wires throuh the hole and pull them through as much as you can. I ran the wires down under the rear seat which just pops out when you lift it up, then under the little bit of carpet to the center console. There are 2 screws with covers that pop off on each side of the rear console, take those out and you'll be able to get to the wires, then run them up the side of the console to the ashtray area.
EDFC Motor Assembly
Be real careful with this one, if they aren't put on right there won't be enough adjustment range, so I think the motor might burn out. When I first did it, 2 motors had 5 1/2 turns of adjustment, but the other two only had 3 turns so I had to take those ones apart. I think there should be around 5 turns on each one. If the threadlock sets up on you, it's real hard to get the motors off, especially the rears.
Once you've replaced the adjustment hex screw per the instruction, put the motors on. I used a screwdriver to keep the adjustment screw from turning while turning the motor. Once the motor is on, turn the screw from lock to lock to see how much range there is. On a couple of motors I had to unscrew them a bit to get a consistent range on all shocks.
I would probably check with Tein to see if having a different range on the shocks is a bad thing. I just assumed it must be bad.
Front Shock Install
Not a too big problem, 3 nuts on the top of the shock, 1 bolt on the bottom. You will need to pull the cotter pin and castle nut off the lower ball joint and disconnect the sway bar to lower the control arm far enough to get the shock out. Do not hammer the top of the ball joint bolt to get it out, just use a jack to lift the wheel hub and rotor assembly up and the ball joint will come apart. It is a taper fit so you shouldn't need a pickle fork or anything to get it apart. Use a 6 sided 10mm socket to tighten the top shock nuts back on, there isn't much room to get in some spots on the drivers side so I used a 3/8 drive and extension. A 1/2 inch drive extension wouldn't fit, and a 12 sided socket started to slip on the nut.
The EDFC wires are pretty crappy. On the passenger side, I ran them through the battery compartment then through the big grommet that is under the windshield trim. Remove those push-rivets that hold the battery cover, then pop the windshield trim off. You'll see the big grommet there, cut it VERY carefully (there's all kinds of wires in there), then run the EDFC wire through. Use some vaseline to lube it up if it's hard to get through. You'll need to remove the glove box, then reach way up into the dash to grab the wire.
The drivers side is really hard. I ran the wire around the master cylinder, and down to the big grommet on the firewall. Again cut it carefully, attach a nice long zip tie to the end of the EDFC wire to help fish it through. I spent a 1/2 hour and chewed up my finger trying to get this one through, but it's the only way I could see. Once the wires are through the firewall, run them through the dash to the ashtray.
Rear shock and spring install
Really easy, 2 nuts at the top, one bolt on the bottom. Just make sure when you attach the rubber isolator on the bottom of the spring that it is correctly oriented in the spring bucket - it's not flat so the end of the spring fits in the lowest part of the bucket. Also, you have to push the control arm down pretty hard to pull the shock out, and it will make a loud pop like something broke, but it doesn't break.
Running the EDFC wire is not as hard as I thought it would be. Fold the rear seats down, remove the two push pins on the parcel shelf as well as the covers for the child seat anchor points. You can then lift up the parcel tray enough to get to the wires. Have someone poke a screwdriver or something up the hole in the shock tower and you'll see the insulation move.
You will need to enlarge that hole up in the shock tower with a drill. I think I used a 1/2 inch bit, but just test it by drilling a small hole in a block of wood and make sure you can fit the EDFC connector through it. You will need some wire armour or some kind of grommet so the wires don't chafe against the hole. Have someone push the wires throuh the hole and pull them through as much as you can. I ran the wires down under the rear seat which just pops out when you lift it up, then under the little bit of carpet to the center console. There are 2 screws with covers that pop off on each side of the rear console, take those out and you'll be able to get to the wires, then run them up the side of the console to the ashtray area.

Thread Starter
|
Registered User
Joined: Jul 2004
Posts: 57
Likes: 0
From: Vancouver, BC
Flex Install Instructions:
http://www.tein.com/ti/inst/6p26u.pdf
CS Install Instructions:
http://www.tein.com/ti/inst/rp24u.pdf
EDFC Install Instructions:
http://www.tein.com/ti/inst/edfcu.pdf
and
http://www.tein.com/edfcinstall.html
http://www.tein.com/ti/inst/6p26u.pdf
CS Install Instructions:
http://www.tein.com/ti/inst/rp24u.pdf
EDFC Install Instructions:
http://www.tein.com/ti/inst/edfcu.pdf
and
http://www.tein.com/edfcinstall.html


Thread
Thread Starter
Forum
Replies
Last Post
Z1Motorsports
Suspension-Vendor
56
May 31, 2020 01:56 PM
poktanG35
Engine - Exhaust
23
Oct 26, 2015 03:32 AM
04G35NYC
2nd Gen (V36) Sedan
4
Sep 13, 2015 02:56 PM