
DIY: Upgrade your ugly FOB to a nicer Infiniti Smartkey
#1
 03-29-2008 | 05:34 PM

Thread Starter
|
Registered User
Joined: Jul 2007
Posts: 40
Likes: 6
DIY: Upgrade your ugly FOB to a nicer Infiniti Smartkey
Ok, since I have been using a lot of great DIY tips from this forum, it is my turn to do a DIY thread.
First of all, this DIY basically just modify the remote board so it can be put inside the nicer Infiniti/Nissan smartkey remote casing. It is a little gettho, but it works.
Ok here is what you need:
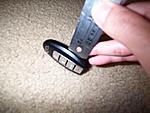
-Nissan/Infiniti Smartkey fob. I got mine used of eBay for $23 including shipping. Make sure you buy the one with 4 buttons, instead of the 3 buttons from FX
-Solder and steady hand
-Electric wire
-Tape
-Double sided tape
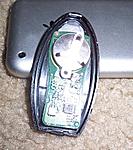
1.Open both the old FOB and the smartkey fob carefully. I had a hard time opening the smartkey for the first time, but after the third time, it gets easier. Just try not to break anything. (including your nails like I did)
2.Take the old FOB board learn it and trace the board connection. Here is how I did mine.
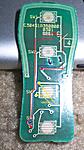
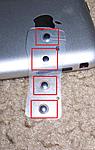
3.Mark the position of the smartkey FOB switch to the old board. Precision is very important.
4.Tape the board so it will create an isolator, except for the panic button location. Since the panic button remain at the same place, you have to peal the tape using box cutter carefully. Dont scratch the board.
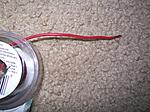
5.Pull a few copper from inside a wire. Try to get it from a thicker electric wire so you have a thicker copper wire that is easier to shape. Mine is from a 16 gauge automotive wire that you can get it in walmart.
6.Cut the plastic switch (I don�t know what to call this) into 4 sections.
First of all, this DIY basically just modify the remote board so it can be put inside the nicer Infiniti/Nissan smartkey remote casing. It is a little gettho, but it works.
Ok here is what you need:
-Nissan/Infiniti Smartkey fob. I got mine used of eBay for $23 including shipping. Make sure you buy the one with 4 buttons, instead of the 3 buttons from FX
-Solder and steady hand
-Electric wire
-Tape
-Double sided tape
1.Open both the old FOB and the smartkey fob carefully. I had a hard time opening the smartkey for the first time, but after the third time, it gets easier. Just try not to break anything. (including your nails like I did)

2.Take the old FOB board learn it and trace the board connection. Here is how I did mine.

3.Mark the position of the smartkey FOB switch to the old board. Precision is very important.
4.Tape the board so it will create an isolator, except for the panic button location. Since the panic button remain at the same place, you have to peal the tape using box cutter carefully. Dont scratch the board.

5.Pull a few copper from inside a wire. Try to get it from a thicker electric wire so you have a thicker copper wire that is easier to shape. Mine is from a 16 gauge automotive wire that you can get it in walmart.

6.Cut the plastic switch (I don�t know what to call this) into 4 sections.

The following 2 users liked this post by parklife:
MPG35fiend (05-16-2012),
TunerMax (06-22-2013)

#3
03-29-2008 | 05:41 PM
Thread Starter
|
Registered User
Joined: Jul 2007
Posts: 40
Likes: 6
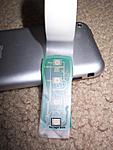
7.This is the hardest part. Soldering.
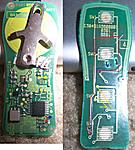
Make sure you layer it with tape to prevent the copper to move around.
The panic button remains in the same place. No need for soldering.
8.Solder the metal battery holder from the old FOB
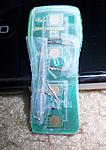
9.Put the plastic switch on top of the copper and tape it on the side. Don�t tape the black stuff. Again, precision is important if you want the button to work and have a solid button. It takes me about 5 times to adjust it until I have the solid button feeling.

10.Put a small double sided tape on the casing so it will hold the board in place while you put them together.
11.Put the battery in. Make sure you put the (-) and (+) side correctly

Make sure you layer it with tape to prevent the copper to move around.
The panic button remains in the same place. No need for soldering.

8.Solder the metal battery holder from the old FOB

9.Put the plastic switch on top of the copper and tape it on the side. Don�t tape the black stuff. Again, precision is important if you want the button to work and have a solid button. It takes me about 5 times to adjust it until I have the solid button feeling.

10.Put a small double sided tape on the casing so it will hold the board in place while you put them together.
11.Put the battery in. Make sure you put the (-) and (+) side correctly

The following 2 users liked this post by parklife:
MPG35fiend (05-16-2012),
TunerMax (06-22-2013)
#4
03-29-2008 | 05:41 PM
Thread Starter
|
Registered User
Joined: Jul 2007
Posts: 40
Likes: 6
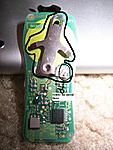
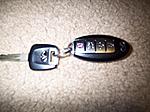
12.Put everything back together. Try it and make sure you have a solid button feeling. You are done!
That it�s how I did mine. If you have a better way to do it, please let me know. I am not an electrical engineer so I am not responsible if something goes wrong.
Feedback is a must!

That it�s how I did mine. If you have a better way to do it, please let me know. I am not an electrical engineer so I am not responsible if something goes wrong.
Feedback is a must!
The following 2 users liked this post by parklife:
MPG35fiend (05-16-2012),
TunerMax (06-22-2013)

The following users liked this post:
whalder214 (10-27-2011)

#7
03-29-2008 | 05:56 PM

Registered User
iTrader: (3)
Joined: May 2007
Posts: 4,383
Likes: 27
From: pinellas county FLA, queens N.Y.
awesome .. wow dude great write up .. great job as well ..
im going to do this asap!!!!
ebay and radioshack here i come ...
woohoooooo
subscribed
im going to do this asap!!!!
ebay and radioshack here i come ...
woohoooooo
subscribed
Trending Topics
#9
03-29-2008 | 06:19 PM
Thread Starter
|
Registered User
Joined: Jul 2007
Posts: 40
Likes: 6
Originally Posted by Strtsk8r321
PM sent (Did you buy the key fob with the spare key or without?)
#11
03-29-2008 | 06:40 PM

Originally Posted by MIA BlazinVQ
wow! thats really nice. where do you live, I'd pay you to do this for me!
I already screwed up my backup key fob trying to do the flip key thing.
#12
03-29-2008 | 06:46 PM

Originally Posted by lowrider
Yep, the old OEM remote is a POS. It looks like those that got the new OEM remote to work are either unwilling or unable to share with us. In most threads the IP or those that achieved success in their endeavors are anxious to share. I really don't know what the deal is here. Come on guys, if you got the new remote to program, tell us how.
 :icon4: :icon21:
Lou
:icon4: :icon21: Lou
Thanks so much for the great write-up. Since the skill set needed for doing this mod lie way out of the range my abilities. I guess I'm doomed to use the old POS fob

Lou
Last edited by lowrider; 03-29-2008 at 06:49 PM.

#15
03-29-2008 | 07:36 PM
Thread Starter
|
Registered User
Joined: Jul 2007
Posts: 40
Likes: 6
Originally Posted by Strtsk8r321
BTW hows the reception. Is it the same or worse?