Pirates coilovers
#46
 04-23-2011, 09:51 PM


I have had them for a month now. The ride is good compared to my previous set-up of Tokico HP's and G/Z, full Z and Tanabe NF210's. I need to play with them a bit to get them adjusted properly.
The only issues I have had so far have been Wheel to shock collar clearance in the rear, but that might have been due to the wheels I was running (19x10 +42) Although my old wheels did rub (19x9.5 +40), but that was just the tire on one side under hard cornering.
The other issue is a slight clunk sound at low speeds when I turn the wheel. I believe that is due to front spring twisting a little when I turn??? I was going to play with the pre-load to see if that solves that issue.
On a side note. Does anyone know if you get more height adjustment (up) by setting the rear up like a true coil-over instead of OEM set-up?
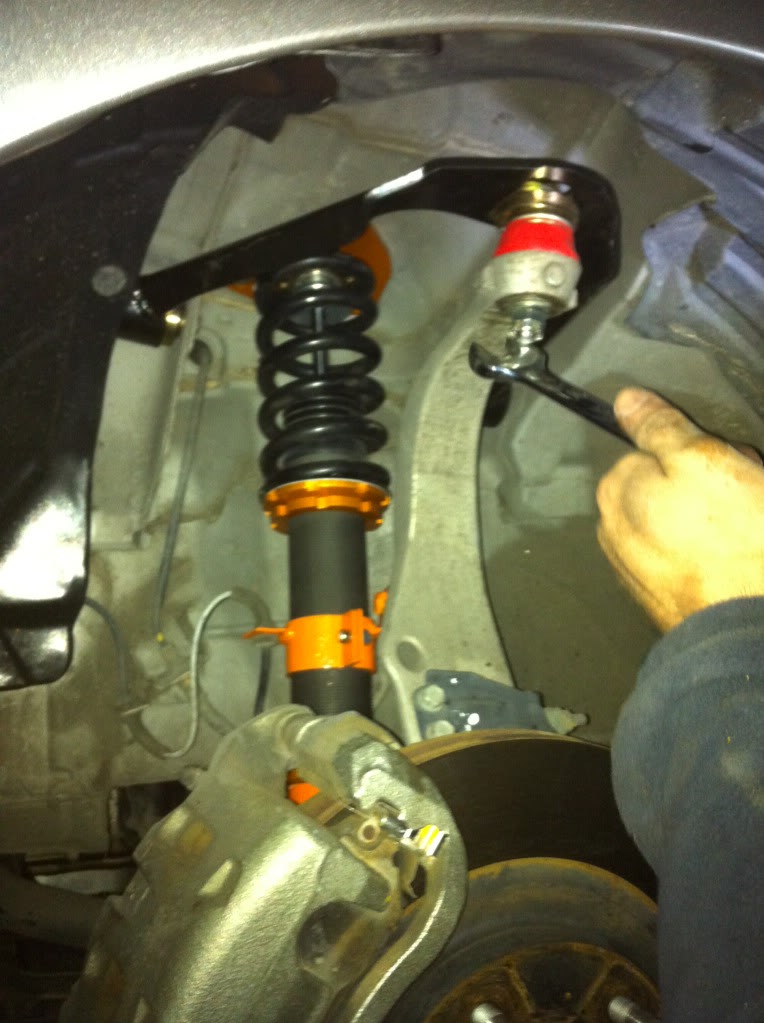
Here is a pic of my car. The front I have plenty of room to raise the car, or lower it more. The rear is as high as I can go.
The only issues I have had so far have been Wheel to shock collar clearance in the rear, but that might have been due to the wheels I was running (19x10 +42) Although my old wheels did rub (19x9.5 +40), but that was just the tire on one side under hard cornering.
The other issue is a slight clunk sound at low speeds when I turn the wheel. I believe that is due to front spring twisting a little when I turn??? I was going to play with the pre-load to see if that solves that issue.
On a side note. Does anyone know if you get more height adjustment (up) by setting the rear up like a true coil-over instead of OEM set-up?
Here is a pic of my car. The front I have plenty of room to raise the car, or lower it more. The rear is as high as I can go.
#47
04-23-2011, 10:11 PM
Ahoy maties, another pirate pledges to the truth.
Makes me proud to see stckg354asec got the booty and save some dabloons.
By decree of the biggest USA distributor of MDU, they can only fly the red color proudly at 2x +, a princely price. (Must be a great paint job).
They rule Cali by the way and exclude competing MDU parts.
"Red means MDU". It is an exclusive color, I can't blame MDU distributors for keepin' a tight ship with us pirates rolling the byways of 48 rebellious states.
Racingfirst painted mine be yellow-gold, yours it appear orange paint was used. Seems the paiint shop can do what they want as long as it is not " red".
I got the impression from Q/A with the supplier he gets the MDU bare metal parts with box, decals, etc and sends the shocks to a paint shop for about 2 days painting to avoid violating MDU policy. The color is really not important the mechanical guts are and racingfirst offers a value line product as does MDU.
Update, the sedans drop is still the same as reported, I have 9/18 fronts valve setting (perfect) and have change the rear valves to 6/18 (stiffer & better that 9/18 as original).
Still rubbing on the rear fenders flanges but only fun-run the sedan to charge the battery right now.
I still have camber kits, fender roll, wheels and tires to do next month.
#48
04-23-2011, 10:26 PM
Stiffness of shock damper & instruction:
Full clockwise is stiff. Like any valve these function by turning the valve stem down to close the oil flow. This is position 1.
Full counter clockwise is soft. This is position 18. The valve stem is raised opening the oil flow across the seat.
Example is 9/18 is 50% stiff I find for my fronts at 2" drop is perfect.
6/18, my rears, are 67% stiff. OK for my rears for now until the remaining mods are done.
I felt different handling moving just from 8 to 6. Havn't played with it more yet.
So, to get my rear shock to 6 I turn the thumb screw clockwise (one stop or click at a time) until it locks, the valve is now closed. I slowly turn the thumb screw counter clockwise slowly 6 clicks
#49
04-23-2011, 10:36 PM
Ahoy maties, another pirate pledges to the truth.
Makes me proud to see stckg354asec got the booty and save some dabloons.
By decree of the biggest USA distributor of MDU, they can only fly the red color proudly at 2x +, a princely price. (Must be a great paint job).
They rule Cali by the way and exclude competing MDU parts.
"Red means MDU". It is an exclusive color, I can't blame MDU distributors for keepin' a tight ship with us pirates rolling the byways of 48 rebellious states.
Racingfirst painted mine be yellow-gold, yours it appear orange paint was used. Seems the paiint shop can do what they want as long as it is not " red".
I got the impression from Q/A with the supplier he gets the MDU bare metal parts with box, decals, etc and sends the shocks to a paint shop for about 2 days painting to avoid violating MDU policy. The color is really not important the mechanical guts are and racingfirst offers a value line product as does MDU.
Update, the sedans drop is still the same as reported, I have 9/18 fronts valve setting (perfect) and have change the rear valves to 6/18 (stiffer & better that 9/18 as original).
Still rubbing on the rear fenders flanges but only fun-run the sedan to charge the battery right now.
I still have camber kits, fender roll, wheels and tires to do next month.
Makes me proud to see stckg354asec got the booty and save some dabloons.
By decree of the biggest USA distributor of MDU, they can only fly the red color proudly at 2x +, a princely price. (Must be a great paint job).
They rule Cali by the way and exclude competing MDU parts.
"Red means MDU". It is an exclusive color, I can't blame MDU distributors for keepin' a tight ship with us pirates rolling the byways of 48 rebellious states.
Racingfirst painted mine be yellow-gold, yours it appear orange paint was used. Seems the paiint shop can do what they want as long as it is not " red".
I got the impression from Q/A with the supplier he gets the MDU bare metal parts with box, decals, etc and sends the shocks to a paint shop for about 2 days painting to avoid violating MDU policy. The color is really not important the mechanical guts are and racingfirst offers a value line product as does MDU.
Update, the sedans drop is still the same as reported, I have 9/18 fronts valve setting (perfect) and have change the rear valves to 6/18 (stiffer & better that 9/18 as original).
Still rubbing on the rear fenders flanges but only fun-run the sedan to charge the battery right now.
I still have camber kits, fender roll, wheels and tires to do next month.
Also adjusted 8 front and rear currently
#50
04-23-2011, 10:53 PM
#52
04-23-2011, 11:04 PM
They were out of stock and looking at 3+ weeks before they could ship more. After a week of waiting he sent me a message saying that he didnt want me to wait that long and that he would pull a set from an order that was shipping to California. Worked for me, the red matches the Ichba camber kit I have.
#53
04-24-2011, 02:38 AM

#55
04-24-2011, 09:57 AM
Spring pre-load and instruction:
For operational stability of the shock and spring during re-bound the spring needs to be "tightened" or locked on the shock tube. When the spring "rebounds" or pops up after a bump in the road compresses the spring there MUST be NO "PLAY" or rattle or thump will be felt.
Aye maties, fer us pirates, our spring length is 200mm (7 7/8") long; flat to flat. (bare uninstalled black spring)
We need to adjust or pre-load the spring when slipping it on the threaded shock tube to 190mm (7 1/2") long (shorter) by compressing the spring with top aluminum collar and the spanner wrench.
The flats of each spring when on the its shock is compressed between aluminum pillow mount at top of the shock rod and the ring/collar at the bottom on the shock body.
Measure it with a tape measure or ruler.
The spring coil type is linear. Front springs at 200mm long are 559 lb/linear inch total.
The front the pre-load is equivalent to 210 - 235 lbs until the weight of the car is lowered on to the installed shock. Then it adds another 700 - 750 lbs at each shock.
The rears spring, same length as front, is rated 391 lb/in of linear compression. Softer spring but is still compressed 10mm or 190mm installed on shock tube or 5% or 150 - 165 lbs in it's case. It also gets static loaded with approximately 1/4 of the "sprung weight" of the sedan when the jacks are lowered.
Aye, Aye, hopin this err helps ya do the task well,
Last edited by toro12; 04-24-2011 at 11:25 AM.
#56
04-24-2011, 01:33 PM
Awesome ^ Thank you.
Thats what I thought but just wanted to make sure.
I was reading a few other threads and most people were running -0- or very close to -0- Pre-load.
I will be playing with Pre-load and dampening of the shocks/strust this up and coming week.
New tires will be in on tuesday so I plan to dial everything in.
#57
04-24-2011, 05:59 PM
Think of 5% pre-load as you would "torque wrenching" a bolt in other locking fastener cases. These suspension springs in static and dynamic condition first act as "lock washers" do to tension the assembly.
You CAN' T bet the bank on zero torque, why buy a torque wrench and knowing zero will let any threaded tensioned fastener loosen over time. That is foolish. Some even minimal pre-load on the spring is required if not 5%.
Zero torque (preload) is not gonna "lock" the spring against the ring collar. The ring collar will loosen under dynamic driving conditions over time and temperature creep.
Less than zero is a free spinning ring collar that some builder/posters have complained of.
Those builders with zero should have other reasons than "street" daily driving and need the extra 5% for a short time; like a racetrack heat, I suppose.

#59
04-26-2011, 10:57 AM

Registered User
 Okay so one side on. I still have to put the spacers that came with the camber kit and my brakes and 10mm wheel spacer on but for ride height I just take out the top 3 small allens and I can sping the whole shaft and adjust the bottom height without even messing with the top coils which would affect the spring right. Is this correct or do I just adjust height with the double collars on the front?
#60
04-26-2011, 01:05 PM
Ride height adjustment:
For 1st installation of ride height I recommend you do the following:
Your stock fender to slab height should have been measured before you started to have reference. If not it is around 28" for a 03 - 06 sedan.
Leave the installed pillow mounts bolted tight to the car body.
Only turn the female thread steel clevis tube at the bottom of the shock to set ride height.
The clevis can't be connected to the hub spindle mount, it remains loose and free to rotate. You'll have space to turn the clevis tube up the male threaded shock body to LOWER the ride height where you want it. You may need to bend/move some things, you figure it out.
Be methodical and measure but also count the turns that you make to get each shock on each side of the car equal. When the ride height is on your target drop then use the spanner wrench to torque the LOWER aluminum ring collar against the top of the clevis tube. I use a cheater bar while torquing over the spanner to be certain of the ring tension of the assembly.
I also wipe a small amount of anti-seize compound just on the black shock body threads that get torqued and wipe excess off after assembly is tightened.
Then you mount the clevis tube and thru bolt to the hub spindle, mount the brake tubing and speed sensors, wheel, etc, Drop the jacks all around and measure the fender height to the slab to see if you are on drop height target and balance to the opposite side shock.
If not on target or uneven then, measure both sides to see what adjustments of distance you need to make and disassemble, reassemble accordingly.
Tip: For starters to get close to your target drop. Take the OEM shock on the floor and lay the coilover beside it. The Z coilover at maximum height is already 1" SHORTER that OEM, that is 1" drop.
Turn the clevis tube up the shock body the added distance that you want and you will be close. Be methodical and measure carefully.
While you have it temporarily laid out go ahead and mount the brake hose pinch collar arrange so it points where and at same height as the OEM is located.
Take that rough loose assembly over to you car to be installed.
Last edited by toro12; 04-26-2011 at 04:24 PM.
The following users liked this post:
SuperTrooper699 (06-28-2012)