
DIY: Kinetix front adj A arm install
#1
 04-27-2012, 09:22 PM


DIY: Kinetix front adj A arm install
I have seen a lot of questions across the web on how to install and adjust kinetix A- arms for g35 and 350z. Since I could not find any DIY’s on this I decided to do one and take a bunch of pictures

these are the tools I used to do this

it took me less than an hour to do this, very simple and adjustment is very very easy.
1. Take off your tires

2. Your going to want to remove the 3 nuts holding your coilovers to your body. This is so you can remove the bolts that hold the OEM A-arms to the frame. You wouldn’t have room to do so with the shocks in place.

3. Next you need to remove the cotter pin holding the nut onto the spindle of the OEM A arm.

4. Remove the nut holding the spindle to the rest of the suspension. I used an impact wrench which worked wonders on this.


5. From here you need to remove the bolts holding the A-arm to the frame, I used an impact wrench which worked great other than it got jammed up in there because of its size. HOLD ON TO THESE BOLTS


6. Now you can remove the A-arm, and put the new one in. It’s a tight fit. Hammer time. Then use your OEM bolts to secure to frame. My kinetix a arms came with stickers labeling side and direction. if yours didnt then they angle backwards with the spindle attachment to the front of the bend.


7. now you need to screw your spindle into the A arms, set both sides even as this is your camber adjustment. Tighten locking nut.
8. Now to reattach the spindle, it goes. A –arm, cone shaped adapter, suspension link, big nut. You are going to have to use 2 larch wrenches, 1 Ľ and 1 1/8 I believe. I braced my wrench on the frame that was stopping the spindle from spinning, this was quite tricky to get out. I didn’t see a better way.


9. Now line up your shock tower bolts and resecure them.
ADJUSTING
to adjust camber on these you need to remove the nut from the spindle, then remove the spindle from the linkage. Now loosen the locking nut that attaches the spindle to the A arm, now the spindle is free to rotate and come in or out of the A arm.
IN= neg camber
OUT= pos camber
each spin of the spindle is apx .3 camber.
these are the tools I used to do this
it took me less than an hour to do this, very simple and adjustment is very very easy.
1. Take off your tires
2. Your going to want to remove the 3 nuts holding your coilovers to your body. This is so you can remove the bolts that hold the OEM A-arms to the frame. You wouldn’t have room to do so with the shocks in place.
3. Next you need to remove the cotter pin holding the nut onto the spindle of the OEM A arm.
4. Remove the nut holding the spindle to the rest of the suspension. I used an impact wrench which worked wonders on this.
5. From here you need to remove the bolts holding the A-arm to the frame, I used an impact wrench which worked great other than it got jammed up in there because of its size. HOLD ON TO THESE BOLTS
6. Now you can remove the A-arm, and put the new one in. It’s a tight fit. Hammer time. Then use your OEM bolts to secure to frame. My kinetix a arms came with stickers labeling side and direction. if yours didnt then they angle backwards with the spindle attachment to the front of the bend.
7. now you need to screw your spindle into the A arms, set both sides even as this is your camber adjustment. Tighten locking nut.
8. Now to reattach the spindle, it goes. A –arm, cone shaped adapter, suspension link, big nut. You are going to have to use 2 larch wrenches, 1 Ľ and 1 1/8 I believe. I braced my wrench on the frame that was stopping the spindle from spinning, this was quite tricky to get out. I didn’t see a better way.
9. Now line up your shock tower bolts and resecure them.
ADJUSTING
to adjust camber on these you need to remove the nut from the spindle, then remove the spindle from the linkage. Now loosen the locking nut that attaches the spindle to the A arm, now the spindle is free to rotate and come in or out of the A arm.
IN= neg camber
OUT= pos camber
each spin of the spindle is apx .3 camber.

#3
04-30-2012, 01:54 PM
#5
05-01-2012, 03:51 AM

I have these installed on my sedan they are great. Mine came with the older heim joint. And work just fine will upgrade to the sealed black ones eventually. And I agree with eodg35. They feel strong and dont make a lot of noise.
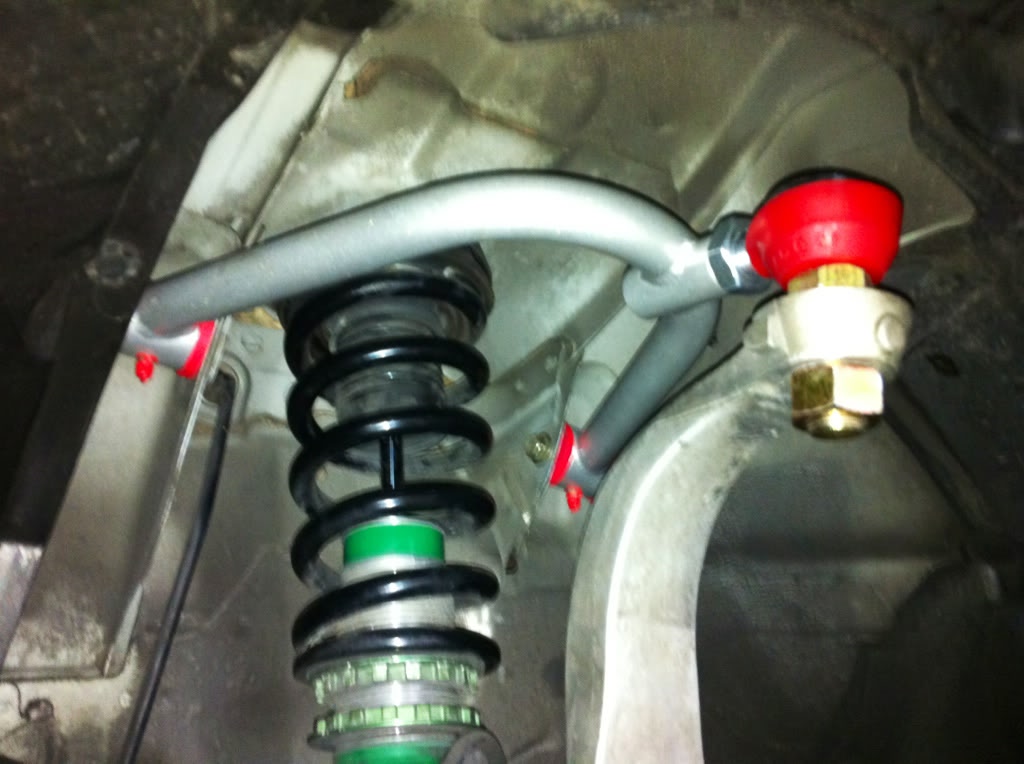
Who did you Order from?? I ask because it looks like your missin the lock nut that goes between the heim and the a-arm. I was missing mine too. Kinetix sent me them in the mail overnight.
Who did you Order from?? I ask because it looks like your missin the lock nut that goes between the heim and the a-arm. I was missing mine too. Kinetix sent me them in the mail overnight.
#7
05-01-2012, 11:25 AM
Trending Topics
#8
05-02-2012, 05:15 AM
#9
05-02-2012, 01:41 PM
#11
05-02-2012, 02:29 PM
Yeah with this kit u just torque the large nut down and it stays in place some have used locktite but that is a pain when u want to adjust it. Some track applications have used the thinner nut an had a cotter pin hole drilled in the threads. But I haven't seen mine come loses at all and I've driven roughly 2000~ miles.
#12
05-07-2012, 02:29 PM

I have had the Kinetix arms for about a year. Good customer service - they sent me the redesigned full-boot ball joints after mine (the same ones the OP has, with the red boot) failed after a few months. OP, you might want to request these from Kinetix as the exposed ball joint will wear out in a matter of months (I went through two sets of ball joints from two different generations of a-arms.)
These work fine and are plenty sturdy, but the adjustment system is a double edged sword. On the positive side, you can adjust them yourself with the knowledge that each turn equals approximately .3 of camber change. On the negative side, good luck getting an alignment shop to go the effort to properly adjust them. If the shop is willing to work on them, they may charge extra for the effort required to adjust these.
These work fine and are plenty sturdy, but the adjustment system is a double edged sword. On the positive side, you can adjust them yourself with the knowledge that each turn equals approximately .3 of camber change. On the negative side, good luck getting an alignment shop to go the effort to properly adjust them. If the shop is willing to work on them, they may charge extra for the effort required to adjust these.
#13
05-07-2012, 02:34 PM
Yeah with this kit u just torque the large nut down and it stays in place some have used locktite but that is a pain when u want to adjust it. Some track applications have used the thinner nut an had a cotter pin hole drilled in the threads. But I haven't seen mine come loses at all and I've driven roughly 2000~ miles.
#14
05-07-2012, 03:25 PM
MMy ball joint boot is black, is that the new one? Theres another post with the red boot in here.
Make sure you grease the buushings, mine are squeeking because i havent greased them yet. Its probably not good for them to be barely greased.
I simply talked to the tech doing my adjustment, i have lifetime through firestone, juust explained to him how to do it.
Make sure you grease the buushings, mine are squeeking because i havent greased them yet. Its probably not good for them to be barely greased.
I simply talked to the tech doing my adjustment, i have lifetime through firestone, juust explained to him how to do it.
#15
05-07-2012, 05:54 PM