
Mobile-Detailing in the GTA
#136
 06-24-2006, 10:31 AM


Originally Posted by whatacar
Hey Kevin,
I won a Mr. Clean spotless rinse at our school draw. I wonder if I should use it or save it to give away. Those big MF ( that's micro fiber not mother f*****g, although both would be appropriate descriptions ) towels work great. Also, last time I washed the car some of the dirt spot outlines didn't come off. Didn't I use enough soap?
Well, gotta go wash it again before 11, watering restrictions out here.
Thanks
Sam
I won a Mr. Clean spotless rinse at our school draw. I wonder if I should use it or save it to give away. Those big MF ( that's micro fiber not mother f*****g, although both would be appropriate descriptions
) towels work great. Also, last time I washed the car some of the dirt spot outlines didn't come off. Didn't I use enough soap?Well, gotta go wash it again before 11, watering restrictions out here.
Thanks
Sam
Glad to hear you like your 'MF'-towels

As to the residue, I'd say not enough soap, but what do you say about it, Kevin?
C.
#137
06-24-2006, 12:46 PM
Last time you washed the car did you use the Mr. Clean thing, or regular automotive soap + wash mitt, etc..?
You only want to use as much soap as is recommended or you may strip your wax. If you notice you're not getting all the dirt off add a bit more or try pre-soaking with some soap and water in a spray bottle (or an APC like simple green auto cut 2:1).
On the Mr Clean thing; the system is ok if only for the filter. The soap they provide does have a lot of detergents so it can take off wax, but you can substitue regular soap into the system.
#138
06-24-2006, 12:59 PM
Originally Posted by picus112
Last time you washed the car did you use the Mr. Clean thing, or regular automotive soap + wash mitt, etc..?
I used soap + wash mit, that Lambs wool mitt I got from you feels great. Sooooo smooth.
You only want to use as much soap as is recommended or you may strip your wax. If you notice you're not getting all the dirt off add a bit more or try pre-soaking with some soap and water in a spray bottle (or an APC like simple green auto cut 2:1).
I think I used more soap than required , thought that was a good thing. I guess I'll have to wait for a cloudy day and give it a wash then Natty Blue it, eh? I don't need to strip the wax off do I?
On the Mr Clean thing; the system is ok if only for the filter. The soap they provide does have a lot of detergents so it can take off wax, but you can substitue regular soap into the system.
I used soap + wash mit, that Lambs wool mitt I got from you feels great. Sooooo smooth.
You only want to use as much soap as is recommended or you may strip your wax. If you notice you're not getting all the dirt off add a bit more or try pre-soaking with some soap and water in a spray bottle (or an APC like simple green auto cut 2:1).
I think I used more soap than required
, thought that was a good thing. I guess I'll have to wait for a cloudy day and give it a wash then Natty Blue it, eh? I don't need to strip the wax off do I?On the Mr Clean thing; the system is ok if only for the filter. The soap they provide does have a lot of detergents so it can take off wax, but you can substitue regular soap into the system.
She'll like it
, points for me.Thanks Kevin.
#139
06-25-2006, 02:05 PM

#140
06-25-2006, 03:45 PM

Deane, this is what Kevin recommended that I get. I ordered it and am just waiting for it to arrive. I have a pretty bad case of spider webbing going on and am hoping to get rid of it. If I can do half the job Kevin does, I will be a happy camper.
http://www.eshine.ca/proddetail.php?prod=49&cat=50
http://www.eshine.ca/proddetail.php?prod=51&cat=50
http://www.eshine.ca/proddetail.php?prod=49&cat=50
http://www.eshine.ca/proddetail.php?prod=51&cat=50
#141
06-25-2006, 04:12 PM
Originally Posted by canuck
Deane, this is what Kevin recommended that I get. I ordered it and am just waiting for it to arrive. I have a pretty bad case of spider webbing going on and am hoping to get rid of it. If I can do half the job Kevin does, I will be a happy camper.
http://www.eshine.ca/proddetail.php?prod=49&cat=50
http://www.eshine.ca/proddetail.php?prod=51&cat=50
http://www.eshine.ca/proddetail.php?prod=49&cat=50
http://www.eshine.ca/proddetail.php?prod=51&cat=50
Thanks Shane. So it was the #2 and #2.5. I also need to know about wax etc since I have nothing at all now. I sent Kevin a PM asking for help.

I plan to buy a PC somewhere and the buffing accessory thingies.

Total novice.
")
#142
06-25-2006, 05:46 PM

Join Date: May 2005
Location: Toronto
Posts: 1,361
Likes: 0
Received 0 Likes
on
0 Posts
Just a thought here I detailed my car with meguire polish and it works just as good. THe key to succcess here with the porter cable is not the polish but the pad that you use and the pressure. Here is a pic of my car after just the polish
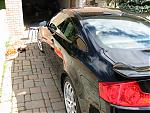
Kevin if you see this I need to know what goes on first sealant or wax
_ I got the menzerna FMJ sealant and natty's blue putty
thanks
Kevin if you see this I need to know what goes on first sealant or wax
_ I got the menzerna FMJ sealant and natty's blue putty
thanks
#143
06-25-2006, 09:14 PM
Sealant first then wax. You can then re-wax anytime, but can not re-seal until you strip it all, so just re-apply Nattys every 4-6 weeks, and re-apply FMJ every 4-6 months (after stripping it all).
I am going to write up a little "hey, how should I maintain my car so it looks shiney and people say "OOOO" all the time" kinda deal within the next two days, look for it here (and Deane I will PM you with it + some additonal "how to deal with red" info).
FWIW, my process on the Ferrari was:
Menzerna Intensive Polish/orange pad via PC
Menzerna FPII/white pad via PC
Zaino Z2pro buffed off with Menzerna HGAS
Pinnacle Souveran paste wax
You could sub in Poorboys 2.5 and 1 (or 2) for the IP/FPII (same pads), and any sealant/wax in the place of Z2/Souveran. I'll mention some options in my big long how to post.
Last edited by Picus; 06-25-2006 at 09:17 PM.
#144
06-26-2006, 07:32 AM
#145
06-27-2006, 01:11 PM
I've taken the liberty of transferring these writeups to DIY/FAQ for everyone to access.
TNX to Picus (Kevin) for his time and expertise.
Colin.
------------------
OK, here it is, the "how does Kevin maintain his own car" post, I will try to keep it relatively short and easy to understand. I will also link autopia a lot (since they have great how to's).
First, this post assumes you have a PC; but not that you know how to use it.
The first thing you want to do is evaluate your paints condition. The best way to do this is to put it in full direct sun and take a look at it. If you see swirls and scratches you need to *compound*. Compounding is the process of removing paint to level off scratches and leave the paint smooth. If the paint is already smooth (no swirls or scratches), then you don't need to compound, however a light polish may still help. This guide will assume you need a moderate level compounding. Swirls like this:
http://gtaindetail.com/pics/575M062006/photo2.jpg
http://gtaindetail.com/pics/04g35c042506/photo2.jpg
...are what I am talking about. Most people would look at those cars and either say "it's clean" or "those are just light swirls", they aren't - there about 5-6/10 on the picus "swirl scale", meaning you will need at least two polishing steps via a PC to get rid of them. So, where to start?
First, wash and clay the car. Now I am going to skip these for now; I will cover wash and clay in my "how do I maintain my car" section.
OK, so the car has been washed and clayed, time to polish.
First, always start with a less aggressive combination of pad and polish than you think you'll need. I am going to continue this by refering to Menzerna polishing, however for reference Menzerna polishes are generally interchangale with poorboys or optimum in the following ways:
Menzerna PG = Poorboys SSR3 = Optiumum OHC
Menzerna IP = SSR2.5 = Optimum Compound
Menzerna FPII = SSR1/2 = Optimum Polish
Also, I use lake county pads, so I will refer to them as yellow, orange, white, and grey. They stack up like this:
Yellow = heavy vut
Orange = light cut
White = polishing (or very light cut)
grey = finishing
So let's start with a fairly mild combo, say, FPII (or SSR1 or 2) on a white pad. Put a couple dabs of the product on the pad (which is on the PC), then dab the pad on to the paint in a small area with the PC off; so put the PC on the paint and make sure it's set to speed 2-3, turn it on. It will be spinning slowly, apply no pressure at this point and move it over the area you intend to cover. A 2x2 foot area is normally ideal. At this point you're just spreading the product, not polishing. When the product is spead (only takes 10-15 seconds), turn the PC to speed 5 or 6 and apply pressure. How much? Just enough so that the PC does not bog at all (so the pad still spins freely), but if you apply any more it will bog. I hope that make sense. Now, most important; MOVE THE PC *SLOWLY* over the intended area. I can not stress how important SLOWLY is, I mean 1/2 inch per second *max*, it is a slow process. MOve in overlapping passes like you're cutting your lawn.
How do you know when to stop? All polishing "flash", that's the term for when all the abrasives in them have broken down. Most polishes do one of two things when flashed; they either turn clear or start to dust. Turning clear is obvious, so is dust (dust literally forms and starts to come out of the pad), when you see the polish go clear or dust, you're done. Turn the PC off and wipe away the reside then evaluate.
Now, this first pass is kind of a test to see what combo you'll need. If you have achieved no results, or very little, you need to move up in abrasion (or you're doing something wrong). On most cases you will need a stronger combo to remove even moderate swirls, so lets try something stronger.
Try IP (ssr2.5) on an orange pad, same process. Now, this should remove up to moderate swirls (5/10) with ease. If you're still seeing no results you're moving too fast or not applying enough pressure. You will notice as you use a more abrasive pad you will be able to apply more pressure before the PC bogs due to the density of the pad.
Repeat the combo that works over the entire car. Do small areas, work slowly, take breaks, wipe away residue thoroughly. Other tips:
Switch pads as they get gummed up/saturated. Why? They become less effective and residue begins to become harder to remove. This is why I recommend two or even threeof each pad. If you run out, wash one (soap and water), dry it by putting it on the PC, putting the PC in a bucket/recycle bin etc, and spin it up to speed 6; the water will flyout into the bucket.
Some more important notes: As you start to use more aggressive combos you may notice *hazing*. Hazing is basically millions of smaller less deep scratches caused by the abrasives in more aggressive compounds. By removing more paint they leave the surface rugged; this is why we follow up with a finishing polish on a less aggressive pad. That's why you'll often see me list my process like this:
Meznerna IP, orange pad
Menzerna FPII, white pad.
IP on an orange (or ssr2.5/OHC) can leave hazing, so it is important to follow up with a less aggressive combo. If you notice the hazing is persisting even after the less aggressive combo, try polishing a little differently; often times I will use a grey pad instead of a white (even less aggressive), and will only polish at speed 4 with little to no pressure.
Here is a good "how to" on autopia:
http://www.autopia-carcare.com/inf-pc7424.html
It's less detailed and assumes the reader is a total novice; that's fine. I know you guys aren't dumb so I may not explain everything in detail. If you have questions let me know.
OK, so I am done polishing, what now? First, wipedown the car with isa:water. What's that? It's rubbing alcohol (store bought, 70%) mixed with water in a spray bottle 50:50, spray one squirt on a panel and wipe off. This helps remove any leftover polish residue. You *do not* want polish residue left on the car because if you seal or wax over it you'll be left with a gross oily stain that is hard to remove. It also effects the durabilty of your LSP (for future reference, LSP = last step product, so a sealant or wax).
When you're done this it's time to seal/wax. Which you pick is up to you. *Generally* sealants last longer than waxes, some people prefer the look of waxes. I think there is a right product for each car, no best. It's a personal decision. Remember, prep is 95%; the sealant/wax is for protection and some added aesthetic, but proper clay and polish is what makes a car look good. So spend time prepping rather than worrying overly about the best wax.
Here is my car after an isa wipedown, no LSP.
http://rockpaperpixels.com/pics/car1.jpg
See what I mean? It's all about prep, not wax/sealant. Those are for protection.
So pick your sealant and wax and apply as directed. Now, I normally apply liquids with the PC on a grey pad. Why? I find it applies them more uniformly and much faster. You will use more product this way. I just do it on speed 1. Paste waxes I apply by hand. Each sealant/wax requires you to buff it off differently, some require you let them haze, some require you wipe them off wet; use as directed.
#146
06-27-2006, 01:26 PM
OK, so maintenance. Now this is even more important that polishing. Why? Proper maintenance means less polishing is required over the life of the car. You want to wash and seal/wax in ways that DO NOT scratch the car, thus eliminating the need for polishing. So, the most important part of car care: how do I wash?
I wash in two ways, either the regular bucket + hose way, or with a rinseless wash. I will go over both.
First, bucket and hose. OK, products I use:
One or two buckets, both with grit guards. You can get them at CT (red, $15.99)
At *least* 2 sheepskin wash mitts. Why 2 or more? you'll see.
A good automotive soap. What's good? Most are; Meguiars deep crystal is cheap, locally available, and good. JUST DONT USE TOO MUCH OR IT WILL STRIP WAX. Use the quantity directed, don't just pour a bunch in the bucket. Remember, as nice as suds are, too many = too much detergent.
2-3 good microfiber drying towels.
5+ good microfiber clothes.
A good all purpose cleaner and/or bug remover. I like poorboys apc 2:1 with water or bug squash 3:1 with water.
A wheel cleaner and sealant
So, so let's start:
First, the wheels. I only use a wheel cleaner if there is a significant amount of brake dust. What wheel cleaners do I like? The best, imo, locally available are Eagle One All Wheel & Tire Cleaner (caustic), or for less acidic/caustic, their aluminum wheel cleaner. A lot of you have P21S cleaner; use it when needed, it's great stuff.
Put the car in the shade. This is important. If you're using two buckets, fill one with soap and water and the other with just water.
If the wheels are dirty go to step 1, if not, step 3:
1) Hose wheels off (make sure they are not hot). Spray wheel cleaner on wheels and let dwell. Agitate with a brush (a wheel brush, not a tooth brush or a carpet bursh) or an old wash mitt, or an old mf cloth. Something soft basically.
2) Hose off, if there is still dust repeat. Go to step 4
3) Wash with soap and water (the automotive soap) and an old mitt.
4) If you washed with your bucket water, dump it out and re-pour it. Wheel dust in the water = don't put it on the paint, EVER.
5) Soak one mitt in first bucket with soap. Not all of them.
6) Rinse the car. If it's very dirty/buggy, apply liberal amounts of diluted APC/bug remover to effected areas and let sit.
7) Get the mit and start washing. Use almost nopressure, start at the top and move down. So roof, front and rear window, side windows, upper side panels and fenders, hood, rear deck lid, trunk, lower side panels and fenders, and finally rockers. Why? The lower part of the car is almost always dirtier, you don't want to use the mitt on them then move it to the cleaner areas. Now, don't do this all at once. Do it like this:
8) Wash roof and front and rear window. Put the mitt in the clean water bucket and thoroughly rinse it out. Put it back in the soapy bucket and wash the side windows and upper side panels (doors, fenders), then back into the water only bucket, rinse... see the pattern? Dirt gets rinsed out. As the mitt gets more and more dirty put it aside and USE A NEW ONE. I use 3 per wash almost always. One for roof, windows, upper side panels, one for hood, read decklid and trunk, and one for lower side panels and rockers.
9) if its hot, rinse the car often; keep it wet at all times.
9.5) Put the hose over the roof and let the water flow freely over the car. This will "sheet" water off and make for about 80% less water on the car to dry.
10) Now dry. How to dry? Take one towel and spread it on the roof then slowly move it the same way you washed (top to bottom), DO NOT worry about getting the car dry at this point, you want to remove most of the water but leave it damp.
11) get towel two and finish any areas you missed, then re-dry the entire car to clean up the dampness left behind by towe one. You will be amazed how much easier this makes drying.
12) Now, if your waxing or sealing, do it.
13) Dress trim while wax/sealant is hazing, also dress wheel wells, tires, dry wheels, polish chrome, and clean door jambs.
14) If you're using a spray wax/sealant for maintenance (highly recommended) then go from step 11 to this step and spray seal/wax, then do #13.
My wife just called and I have to pick her up, more in a bit.
#147
06-27-2006, 01:53 PM
#148
06-27-2006, 03:37 PM
Join Date: May 2005
Location: Toronto
Posts: 1,361
Likes: 0
Received 0 Likes
on
0 Posts
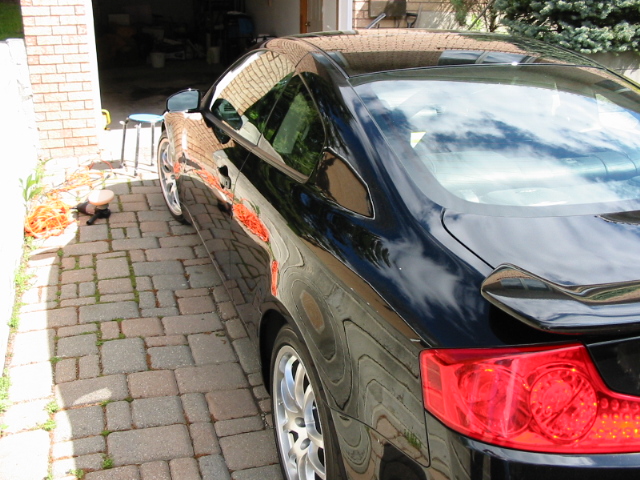
As kevin mention if you are using the polish get the alcohol mixture and start spraying the car to get rid of the residue. I could not belive how nice it looked. The pic I posed was just with the polish and the rinse with alcohol mixture. You can see the shine it gives off and then you apply the sealant and wax to keep it looking like that hehehe.
Kevin I learned so much from you on behalf of everyone here we thank you. You should see my friends after they saw what i did to my car. Now they want me to detail the car for them.
Kevin I learned so much from you on behalf of everyone here we thank you. You should see my friends after they saw what i did to my car. Now they want me to detail the car for them.
#149
06-27-2006, 04:47 PM
Originally Posted by inTgr8r
Great post Kevin....TONS of great info. 
We really appreciate your input here!!
I think we should get Colin to parse this out into the DIY section for all to use.
We really appreciate your input here!!
I think we should get Colin to parse this out into the DIY section for all to use.
Please find the posts here in a new DIY thread entitled:
Detailing and Caring for your ride
......and there's still a copy of each post here too.

TNX Kevin, the info is invaluable, and we hope you don't mind sharing with everyone.
Colin.
Last edited by Msedanman; 06-27-2006 at 05:02 PM.
#150
06-27-2006, 04:50 PM