When you click on links to various merchants on this site and make a purchase, this can result in this site earning a commission. Affiliate programs and affiliations include, but are not limited to, the eBay Partner Network.
My water pump decided to peace out of this joint yesterday afternoon. Came out to a puddle under the car and, as luck would have it, it's coming out of the weep hole from the back of the rear cover (it nearly gushes out once you shut the car off). At first i thought it was leaking out of that bolt lol I'll rent a pressure tester today to confirm 100%, but i see no other place it would originate from. For how amazing this HR engine is, the engineers at Nissan/Infiniti sure gave it to us with no lube by getting rid of those inspections windows DE has. Dafuq you were thinking?!
I'm trying to come up with a couple of paths to take:
A. Tear into it and replace the chains, guides, tensioners, gaskets, etc. while i'm there. Might as well do the oil pump also, right.
B. Just swap the pump and enjoy this thing for however much she has left.
C. Swap a fresh engine in
I don't really like path A because the parts alone would probably run around $700, if not more (esp if i get the oem pump). I also don't like it because everything else in the car will still have 245k miles on it. She leaks oil (VCs and possibly upper pan) and P/S (new rack), so she ain't pretty. I driver her hard every day, so she don't owe me anything at this point. Got her 3.5 years ago at a steal of a price and engine/trans swap was already on my mind then. Worst repair so far has been chasing a fuel pump issue that veered off into swapping both cats.
I do like plan B because it buys me some time on starting to locate that perfect engine and possibly trans in the near future. If doing plan B, I would inspect the main tensioner and guide, as well as those gallery gaskets and replace those if needed, along with the front crank seal and possibly the crank sprocket if the chain needs to come off. I doubt the main chain is stretched, but who knows. She drives perfectly fine.
Plan C is not very convenient right now, as i need this car as my daily. I should have time later this year to pop it in if needed.
It's not a fun repair, and i won't be doing it twice on this engine lol What do you all think is the best course of action given the current state of this engine?
So, here's a thought. You can actually get about 20k-40k more miles out of that water pump if you JB weld the hole shut... Don't use a ton inside the hole, use a paperclip so you feel how deep it is, put a little up inside the hole then slather it around the outside.
This will DEFINITELY give you the time to find another engine.
I'm notorious for doing crap like this btw, lots of folks over the years have come to me for the "band aid job just to buy them time". Cut the squealers off your brake pads, JB weld the weep hole, etc... sometimes you just need the band-aid fix when the rest of the chassis might not be worth the investment to do it right.
cleric, me and you chased that fuel pump issue i had back in the beginning of the year, so you best believe this "shutting the hole" thought had crossed my mind momentarily as well lol this right here is why i love internet car forums!
where would that coolant go, tho? if the front seal is also compromised or damn near it, it'd start mixing with oil, right? so far, the oil is nice and clean (i just changed it a few weeks back) and so is the coolant, so i guess the front seal is still holding up.
i was reading the forums last night like a mad man and there was a guy who claimed to have "fixed" the leak by switching to nissan blue fluid at whatever % dilution. Mysterious Coolant Leak? - G35Driver - Infiniti G35 & G37 Forum Discussion
right now this thing has the green stuff in it, and i added about half a gallon of distilled water into it last night. highly doubt switching over to blue stuff will do anything, but might be worth a shot at $20 a pop.
There are o-rings that keep the water separated from the oil, it drains out the weep hole once the bearing material has worn thin enough for the water to seep through.
as luck would have it, jb weld idea failed pretty spectacularly. the water started coming out of the top of the hole. yellow is what i plugged. red is where it found a new way out...i guess nissan foreseen this ghetto fix and doubled down on their defenses. if only the gave us those inspection windows on HR, but nah...
so off to take this pos i went. bent my big pry bar in the process of taking the crank pulley off... then slid a wrench inside the pulley and it came off with some persuasion aka floor jack handle on the breaker bar. soaked the bolt and behind the crank pulley in liquid wrench, and the pulley slid off with my hands fairly easily.
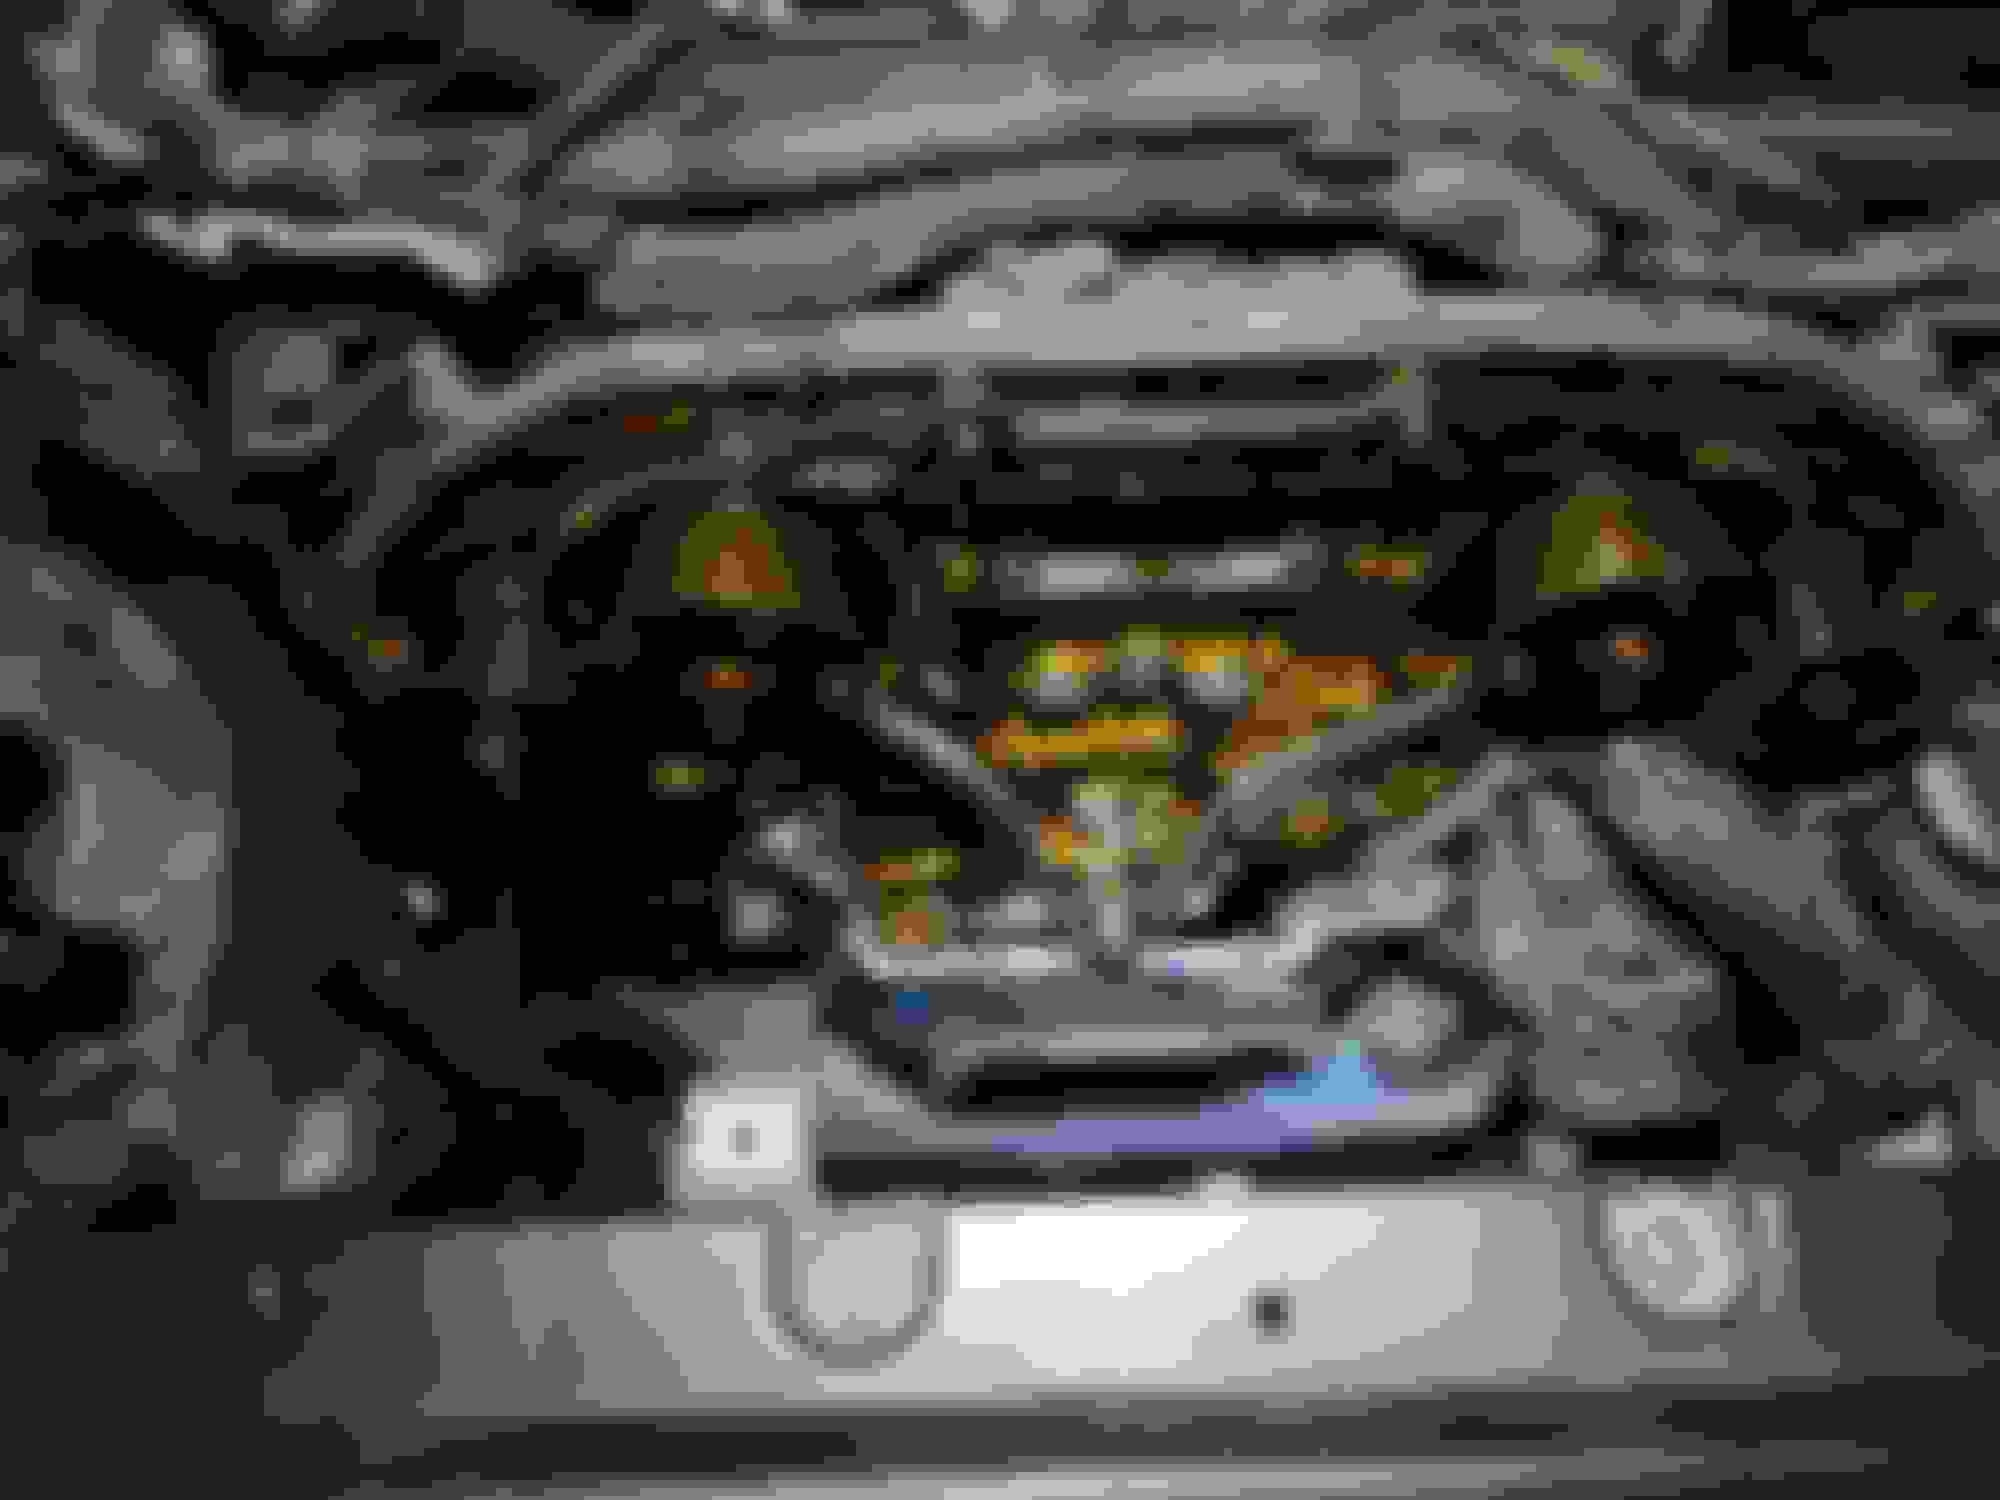
some hours and a broken oil pressure switch later, the front cover was finally off. used the fsm to make sure i know what bolt goes off where. not sure why people draw diagrams (if one already has fsm drawings), as most of the bolts are the same size and length of 10mm and the rest are 14mm. it's gonna be fun putting this thing back on, tho.
i'll post some pics of what i could see at night. the tensioner looks fairly extended (counted 6 marks on it). i'll check the chain tomorrow for any cracking and/or stretching. does this indicate a stretched chain, tho?
the oil gallery gasket looks a bit suspect. not sure if it's starting to blow out or not. let me know, please. i'll take better quality pictures tomorrow.
to change the pump, fsm calls for loosening the tensioner and dropping it down, then rotating the crank counterclockwise until you have slack on the WP side. they don't talk about anything timing related in that section. my plan was to mark everything up (none of the marks align right now) how it currently sits and then go from there. my fear is once i take the tensioner off, it will skip something on the cams side. i'd love to avoid retiming this thing, if possible. any tips on this?
my pump (aisin) came with two identical black seals. looks like all the other pumps have them color coded. i will take another look to confirm tomorrow, but wondering if anyone had experience with these pumps before. no instructions either, of course.
Last edited by 99zx2turd; Sep 20, 2022 at 11:24 PM.
Galley gasket is 100% blown out. I'm surprised you weren't throwing P0011 and P0021.
To keep tension on the timing chain just tie a small rope around it and yank it over the other direction and tie it off. Then it definitely cannot move.
Some people use a big zip tie and tie the chain back to itself above the crank pulley but it doesn't leave any slack to actually replace stuff imo.
My go-to method has always been to just make my own match marks on the crank and both intake cams using a paint pen. Just spray some brake cleaner on it to get the oil off, wipe it down, paint pen (a sharpie works sorta but ruins the sharpie). Then you can be really aggressive with stuff and not worry about slipping a tooth because you have new marks to check when you're done. Remove your paint with acetone (fingernail polish remover) when you're done so it doesn't cause confusion in the future.
If you don't have a paint pen just take any paint, aerosol or whatever, spray it on cardboard and use a screwdriver to dab into it then draw a line on the stuff.
I'm surprised you weren't throwing P0011 and P0021.
me too. i am throwing intermittent p0014/p0024, but both vtc covers were replaced at the dealer by PO. i did read this could be timing related. i think the blown gasket and these codes could be related. p0014 is the one that normally comes on first. i can reset it by driving on the highway for an extended period of time and it goes away for a while.
when marking things up, should i line the crank sprocket with the timing mark on the oil pump housing to tdc? also, if the cams do slip after my mark ups, do i have to take the valve covers off to rotate or can i just use the cam sprockets for that?
do you think i need a new chain? i still haven't been able to go look at it. it's only $150 on Z1, and i might just bite that bullet. def getting new tensioner and both guides, as well as crank seal, crank sprocket, thermostat, and both gaskets. getting that nissan rtv as well. any thing else i'm missing? i think i'll just let the oil pump ride till it dies.
on the water pump seals, any idea if they're both the same on this aisin pump?
Setting the engine at TDC1 is definitely something you should always do when messing with timing components. That way if something DOES get F'd up you're already nearly at the correct orientation for cam/crank alignment.
If you're at a bad spot in the rotation it can be INCREDIBLY challenging to get it to TDC1 and the correct valve orientation without pulling the cams off, otherwise they're going to touch piston.
As for actually pulling the valve covers, VQ engine yeah it's probably not needed unless you're doing cam sprockets. Most engines I just grab the sprocket with both hands (use a rag to protect yourself from sharp edges) and turn it by hand but the VQ exhaust cams are recessed so far back into the casting that you can't really get ahold of it. If you just need to turn it a little then use the bolt on the sprocket.
If you're replacing cam sprockets then yes you absolutely MUST pull the valve covers, there's no way to hold the cams from rotating otherwise (well technically yes if you have a gorilla friend to hold that intake sprocket while you torque the sprocket bolts to like 75 ft/lbs) . If you're not replacing cam sprockets, just turn them with the big bolt in the center of the sprocket.
As for whether I think you should replace the chain, nope, keep it the same. Sure I get it you're already this deep into the thing but personally I would just do the galley gaskets, water pump and tensioner rather than dump the extra money for chains, sprockets, etc into a motor that's got less than 50k miles left in it.Just be sure to label your match marks with a piece of tape wrapped around the chain on the left side of the crank sprocket or something else that's EASILY recognized. And big legible paint alignment marks on all 3 sprockets. Take a picture before you tear it apart to reference later.
Now if you were to buy another low mile HR engine to replace that one with instead of putting more effort into this particular engine. Then yeah I would refresh the timing stuff.
I went ahead and purchased a new chain also. Figured I might as well, since it was only $150 extra. I was able to set everything to tdc. the cams looked nice and all the marks lined up where they supposed to (circles on bank1 and ovals on bank2). i made additional marks on the rear cover to align with the indents on the intake cams for when the new chain was to go on. once i took the tensioner off and the guides (as called out in the fsm), the intake cam on bank 1 snapped and rolled about 45 deg backwards. I'm hoping to god this did not cause any valve damage. i'm attaching a picture below with an arrow of how far back it traveled.
do you think i should be fine? i'll use the intake or exhaust cam bolt to rotate it where it's supposed to be. the bank2 cam also moved forward about a tooth, not nearly as much. i was sure not ready for this, as i was under impression being at tdc would stop this scenario from happening...
water pump was shot for sure. the back seal was flat and the pump is making a rubbery noise when the shaft is engaged. it was def past its time. gallery gaskets were also shot and i replaced those today as well.
That cam actuator should be fine, the cam is just under tension from the valves and the sprocket is spring loaded to return to a neutral position. As long as your match marks line up properly on the chain it will be fine. The HR ones aren't nearly as notorious for fracturing the internals, the DE had a minor issue with this though. I suspect yours is fine because the alignment dot and groove are still in position. If it runs too low on oil pressure for too long it slaps that intake cam back and forth and eventually fractures the internals of the sprocket. You weren't throwing codes yet.
Check out this post, it has pictures of what happens.
That intake cam sprocket turns independently from the camshaft itself, it fills a cavity inside with oil pressure to cause the sprocket to turn backwards which forces the camshaft to an advanced position. There is a return spring inside the cam actuator that will return it to a neutral position once the oil pressure inside is reduced (all based on the cam advance solenoids mounted above it and in front of the valve covers. I am surprised though that the cam was still held in the advanced position, usually it's not, 45 degrees advanced over zero is usually where it's at when the engine is at around 5krpm or more.
The exhaust cam uses a magnetic clutch to put friction on the exhaust cams which creates drag and forces them to retard in relation to the normal position, it has a return spring to bring it back to zero position as well which you can see the picture between the front of the sprocket (friction face) and the exhaust cam timing chain sprocket.
thanks, cleric.
had a buddy drop by last night and we timed it out and put the cover back on, but not before my dumbass cracked the upper pan oil switch/sending unit housing. how did that happen you might ask? when i took the old one out (which was super tight in there), i thought it sat flush against the housing since it and everything around it was covered in grime. i got to cranking and noticed it was getting harder to turn and it still had plenty of threads visible. next thing i heard was a pretty loud crack. it was at that moment i knew i ****ed up. i couldn't find the crack at first, but eventually i was able to see a very thin hairline crack at the top of the housing. apparently, pretty common "issue" on these and Zs. i've smothered the inside of the threads in permatex high performance paste i normally use for assembly and sanded the top of the housing and filled it all around in jb weld. if this actually holds (highly doubt), i'll send big bucks to jb weld corporate lol been researching some devcon industrial epoxy products as well, as taking the subframe off/down is the last thing i want to be doing on this car at this point. it does have leaks at the upper pan and my power steering rack needs to be replaced as it's losing fluid around the driver's side below. gotta love (very) high mileage cars
That RTV sealant will probably work for inside the threads, however if it doesn't...
Get in there with a dremel tool and carve down deep into that crack to fill it properly it will hold, the girdle on the VQ takes all the stress, not the upper oil pan. The biggest issue is you cracked along the threads, Personally I would have dremeled up through the threads as well, filled it with the TIG welder, bottom tapped to make new threads. However you might be ok if you use both teflon tape (plumbing tape) as well as teflon paste over the tape. Don't run the tape all the way to the end of the threads though, I would only run it down to about the last 2-3 threads, make sure to wrap the tape so it gets tighter as you screw in or it will try to unravel itself. Then brush teflon paste over the top of the tape, don't use a ton just a thin layer, (using your finger not the brush in the bottle helps) but stir it up good if it's settled and has that oily residue on the top. Don't overtighten it, the teflon is doing the sealing not the compression of the fitting, normally I just go a little tighter than I could do with a bare hand.
Devcon makes good stuff, that's the brand I use for block fill, it's basically just a fancy JB Weld that maintains an extremely small bit of flexibility (it feels rock hard when it's dry but it retains about the same flex as cast aluminum).
Even if you do end up having to replace it removing the front subframe actually isn't bad, on the RWD it's a time consumer but nothing is actually HARD to do, the AWD is much more of a pain in the ***.
I just checked the HR FSM because I figured the pressure switches were a different torque because they're right at the edge of the pan on the HR but it's actually the same 11 ft/lbs on both. Same with the oil temp sensor torqued to 18 ft/lbs on both.
I just checked the HR FSM because I figured the pressure switches were a different torque because they're right at the edge of the pan on the HR but it's actually the same 11 ft/lbs on both. Same with the oil temp sensor torqued to 18 ft/lbs on both.
yeah, i should've used my brain instead of thinking it was flush with the housing...
she started right up Saturday evening, and i have given her the beans ever since. love this car lol so far no oil leaks from the switch. i might go to a jy and pull a spare pan for $25 to have on hand (new one is $400+ and used on ebay are $200 or so). my worry is that it will start leaking in wintertime, and i'll be dreading this repair then lol might also pull a spare rack also. my p/s pump appears to be leaking from the banjo/pressure switch location. need to clean that up and inspect. that whole side of the engine was just covered in grime. might need to replace the hi pressure hose, to be safe. this car can use so many new things lol
it's definitely quieter now. the ecm is still learning, as it appears to be just a tad under-powered, but we'll be fixing that via the gas pedal operation. overall, not a terrible repair, just time-consuming. i think the most time spent was taking everything apart just to get to the front cover. we used nissan branded rtv and this stuff is really good. still have some left over as well. i've fallen in love with permatex anaerobic gasket maker (red stuff) while working on my ford. sealed the tranny, pans, etc. with it before. never leaked a drop. glued two pennies together once. couldn't separate them after. parts do separate super easy also and the stuff leaves only a film behind. highly recommend.
Glad you got it all squared away. The PS banjo fitting might just need to be snugged up a little, 265k on the stock crush washer is a lot and the vibration from age has probably just loosened the fitting a little.
I don't feel great today so I'll let you look up that torque spec in the FSM