
LED project part 3. GAUGES REVEALED (56k haha)


Registered User
iTrader: (3)
Joined: Oct 2010
Posts: 597
Likes: 46
From: Minne(too.much.salt.on.the.roads)sota
Alright, I know this is old, but just FYI in case anyone is wondering.
Yes, you can sand the orangeish film from the back of the gauges and re-film them with a different color and still use the stock bulbs, BUT the stock bulbs aren't actually white, so you wont get very good color. The stock bulbs shine a lot like halogen vs HID headlights, they have a slight yellowish look to them.
However, the needles need to be taken off in order to do this, and thats not easy. I got mine off, and they still work and read accurately, but they are really unresponsive. My RPM's can climb and drop back to idle before the tach even reaches the RPM it revved to... Hopefully they get better over time. If not then I will have to swap them out somehow.

Registered User
iTrader: (3)
Joined: Oct 2010
Posts: 597
Likes: 46
From: Minne(too.much.salt.on.the.roads)sota
Why would the needles coming out screw them up? Unless Infiniti uses a special kind of motor it shouldn't screw them up. It's just a magnet, and the magnet is attached to the sleeve that holds the pin for the needle. All that pin does is slide into the sleeve and has tiny tiny teeth on it to keep it from freely spinning around. The pin coming out shouldnt do anything.
I've done a lot of gauge mods, and have had many pins pull out of the motor themselves, and never had problems. The only time I had an issue was when the sleeve/magnet itself broke.
I've done a lot of gauge mods, and have had many pins pull out of the motor themselves, and never had problems. The only time I had an issue was when the sleeve/magnet itself broke.
That is fine. I have no explaination for it other than the inside of the motor is screwed up if you take out the rod. Every car is not the same so you can't compare. That is the reason why your needles are slow. I never take out the rod that holds the needle, just the needle itself.


Registered User
iTrader: (3)
Joined: Oct 2010
Posts: 597
Likes: 46
From: Minne(too.much.salt.on.the.roads)sota
Another method I found works is to spin the needles all the way around until they stop, you can the with a little bit of pressure continue to spin the needles and lightly pull up on them at the same time. Eventually they will work themselves off the pin. Again, not always easy.
Try using both methods together if you want, just be careful and don't pull the pins out of the motors.
I accidentally pulled the pins and screwed up the motors. I bought a second cluster and swapped the motors from the good cluster to mine (only way to keep the correct mileage). I cut the gauge face away from the new cluster so I could get everything apart WITHOUT having to pull the needles off. Once I got everything apart I then re-soldered the motors off of the new cluster. Once the motors were out I could work on getting the needles off, and it was a lot easier once the motors were out as I could use a needle nose and hold the pin. Once that was done I soldered the motors into my original board and everything is good again.
I did take apart one of the bad motors to try and figure out why you cant pull the pins, and still have no idea why they get screwed up if you pull the pin. I was thinking maybe the magnet was spring loaded, but no, it's just a free floating magnet encased in the plastic. There is no rhyme or reason why the pins coming out should screw them up. It bogles my mind


Registered User
Joined: Dec 2008
Posts: 64
Likes: 0
Nice job AccordFreak. Hey i have a question for you. How do you change out the led's on the seat warmers. I have tried and failed. Is there a DIY on these? I am trying to get the seat warmer switches as well as the park Drive Reverse (for 5AT) lights blue instead of the factoy OJ. All my interior lights are blue minus these and it just looks weird and off. Any help from anyone would be much appreciated.
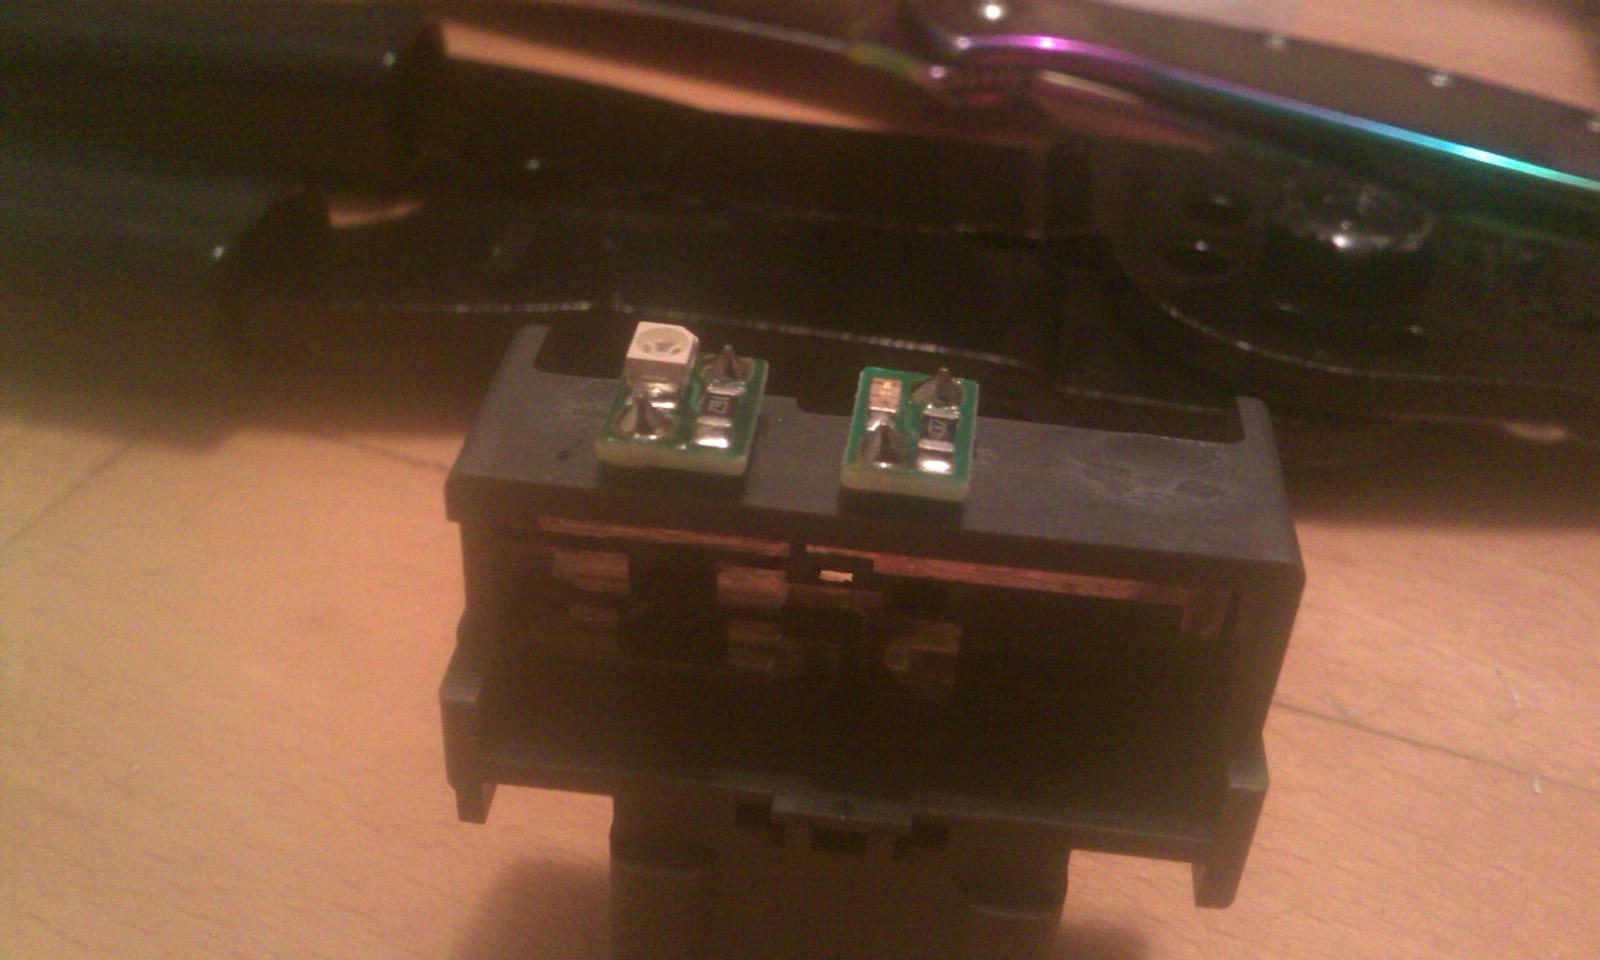
Here is a close up of the seat heater switch led's. One backlight, one indicator.
They look like little 1206's, but you can switch them with any little SMD.
The one in the middle of the switch (on the right in the pic) is the backlight led, and the one on the side (left) is the indicator led.
They look like little 1206's, but you can switch them with any little SMD.
The one in the middle of the switch (on the right in the pic) is the backlight led, and the one on the side (left) is the indicator led.
Registered User
Joined: Dec 2008
Posts: 64
Likes: 0
Thanks Python. Thats an interesting setup, using smd's like that. Did you solder them to the two connectors? How bright are they? Any pics? I think im just gonna do the clock light led swap. I just bought them online but im not sure if im gonna have to add a resistor or not. It doesnt look like ill need a resistor but ill have to wait and see.
I haven't swapped those led's yet. That is exactly how they would look if you open em up.
Just desolder the led's there and solder in your own. There is already a resistor on the pcb with the led's, so you can use the stock one, or swap that one out as well.
Just desolder the led's there and solder in your own. There is already a resistor on the pcb with the led's, so you can use the stock one, or swap that one out as well.
Registered User
Joined: Dec 2008
Posts: 64
Likes: 0
I have an 04 coupe and my seat warmer switches look nothing like that. They look like the ones on the other post (Ill get back on what post later). They have two bulbs one with a mint green rubber cover and one with a black rubber cover. When you remove the complete bulbs you can see that they connect to two brass conneectors. Im assuming a + and - . I took the orange led's off of the covers and installed some that i had around (without resistors) and they failed to light up. Then I saw (SLiderg35 Heater Switch Mod - Pics) post and how he used the the LED's for the clock in the swithces by taking those apart. In that post you can see what im talking about with the green and black coverd bulbs. Great DIY by the way. Anyway, he used those LED's and looks like no resistors were used. I guess he just slipped them in there and bam they lit up. So im gonna give this a shot. Now i have to do the AC/ dual climate lights on the top center which apparently the only way to do is by covering them up with a new tint replacing the factory orange cover. Only hard part i see in this is finding a suitable piece of plastic to cover.