
Goodbye JBF G, hello JBFD3S!!!


Joined: Dec 2008
Posts: 7,968
Likes: 688
From: Willow Springs, CA
Oh damn I didn't even realize that. I think it's because I deleted my Stance Nation affiliated Instagram account. I'll try to repost everything where they should be from my Flickr.

Joined: Dec 2008
Posts: 7,968
Likes: 688
From: Willow Springs, CA
Please excuse the reposted information and photos...if there are any. This is going to be much easier to get this back up to date.
I have been meaning to start a build thread, but I haven't really had the time. So here goes. I'll be posting and backdating previous mods and updates until I am caught up. Then, I hope to update the thread as I go.
First of all, I was heavily involved in the "stance" scene and my previous car was an Infiniti G35 Coupe with 20" Super Concave DPE wheels. Here it is...

Gcoupe by JBFoto., on Flickr
I loved the car. However, I started getting bored with the whole "hard-parking" scene and wanted to move on to something more fun. I contemplated gutting the G and making it a dedicated track car, but that chassis is too heavy and it takes more money than I would ever want to spend to make reliable power to move all that weight around. That being said, I parted all the mods out on the car and sold it.
I spent a couple months shopping around and finally came across my FD. My friends thought the car looked terrible due to what was already done to it. However, I knew I would be tearing it apart and making it my own.
Please excuse the Instagram quality photos since I was using it to document my build that way. Since I have since deleted that account, I will be using my DSLR to document my build
Here it is the day I bought it. 1994 Touring with some terrible gold pearl Toyota white paint.

firstday by JBFoto., on Flickr

frontend by JBFoto., on Flickr

rearend by JBFoto., on Flickr
I already knew that I would be ditching the front and rear bumper for something less "drift" look. Those are both sitting in the back yard now collecting dust.
Of course I wanted to drive the car for a few days before I started the teardown, so I did! Low and behold, I started to find all the problems the previous owner failed(or chose not) to tell me.
I bought the car with an XSPower T66 kit and the turbo was burning oil. I also had a really bad oil pan leak.
Here is how the engine bay looked when I took it home. Notice the meth kit...that wasn't working...another thing the previous owner didn't tell me about.

bay by JBFoto., on Flickr
My initial plans were to clean up the car aesthetically and drive it until I wanted to go with more power. But, as I further inspected things on the car, I knew that I couldn't drive such a piece of ****.
As long as I can find some particular photos posted on facebook, I will post the bullshit I found along the way.
The very first thing I did was remove the Seibon Scoot replica hood and those hideous headlights. I didn't even bother putting them up for sale because I wouldn't want to contribute to uglifying such a beautiful car.

teardown by JBFoto., on Flickr
To be continued....
First of all, I was heavily involved in the "stance" scene and my previous car was an Infiniti G35 Coupe with 20" Super Concave DPE wheels. Here it is...
Gcoupe by JBFoto., on Flickr
I loved the car. However, I started getting bored with the whole "hard-parking" scene and wanted to move on to something more fun. I contemplated gutting the G and making it a dedicated track car, but that chassis is too heavy and it takes more money than I would ever want to spend to make reliable power to move all that weight around. That being said, I parted all the mods out on the car and sold it.
I spent a couple months shopping around and finally came across my FD. My friends thought the car looked terrible due to what was already done to it. However, I knew I would be tearing it apart and making it my own.
Please excuse the Instagram quality photos since I was using it to document my build that way. Since I have since deleted that account, I will be using my DSLR to document my build
Here it is the day I bought it. 1994 Touring with some terrible gold pearl Toyota white paint.
firstday by JBFoto., on Flickr
frontend by JBFoto., on Flickr
rearend by JBFoto., on Flickr
I already knew that I would be ditching the front and rear bumper for something less "drift" look. Those are both sitting in the back yard now collecting dust.
Of course I wanted to drive the car for a few days before I started the teardown, so I did! Low and behold, I started to find all the problems the previous owner failed(or chose not) to tell me.
I bought the car with an XSPower T66 kit and the turbo was burning oil. I also had a really bad oil pan leak.
Here is how the engine bay looked when I took it home. Notice the meth kit...that wasn't working...another thing the previous owner didn't tell me about.
bay by JBFoto., on Flickr
My initial plans were to clean up the car aesthetically and drive it until I wanted to go with more power. But, as I further inspected things on the car, I knew that I couldn't drive such a piece of ****.
As long as I can find some particular photos posted on facebook, I will post the bullshit I found along the way.
The very first thing I did was remove the Seibon Scoot replica hood and those hideous headlights. I didn't even bother putting them up for sale because I wouldn't want to contribute to uglifying such a beautiful car.
teardown by JBFoto., on Flickr
To be continued....

Joined: Dec 2008
Posts: 7,968
Likes: 688
From: Willow Springs, CA
More....
Since the turbo was trash, I decided to upgrade. And that was actually my first purchase for the FD.
I knew that if I pulled the trigger on the turbo first, I would follow through with all of the supporting mods.
So after numerous conversations with Elliot over at Turblown, I ordered his ball bearing TD61 with the 1.06 A/R hot side and anti-surge cold side.
Don't judge my sexy face.

bigturbo by JBFoto., on Flickr
I then picked up a set of OEM headlights from curacosfinest and have since decided to go a different route with lighting.
On to removing the motor. It was surprisingly easy. The day that I had the help to remove the motor, we couldn't get the PPF out for some reason, so we had to leave the transmission in for the time being.

motorpull by JBFoto., on Flickr

motor out by JBFoto., on Flickr
All those silly oil leaks from the turbo and oil pan left such a mess to clean up. Absolutely TERRIBLE.
I knew that if I pulled the trigger on the turbo first, I would follow through with all of the supporting mods.
So after numerous conversations with Elliot over at Turblown, I ordered his ball bearing TD61 with the 1.06 A/R hot side and anti-surge cold side.
Don't judge my sexy face.
bigturbo by JBFoto., on Flickr
I then picked up a set of OEM headlights from curacosfinest and have since decided to go a different route with lighting.
On to removing the motor. It was surprisingly easy. The day that I had the help to remove the motor, we couldn't get the PPF out for some reason, so we had to leave the transmission in for the time being.
motorpull by JBFoto., on Flickr
motor out by JBFoto., on Flickr
All those silly oil leaks from the turbo and oil pan left such a mess to clean up. Absolutely TERRIBLE.
Joined: Dec 2008
Posts: 7,968
Likes: 688
From: Willow Springs, CA
Still MOAR...
I ordered a set of Himini motor mounts since my stock ones were shot. (By the way, good luck when ordering anything from Himini. No communication and they take forever to ship.

himini by JBFoto., on Flickr
I also got a Banzai oil pan brace.
Don't mind the orientation of the pucks. I just hung them there.

oilpan by JBFoto., on Flickr
The difference in turbos.

turbooldturbo by JBFoto., on Flickr
I couldn't pass up the deal I got on a brand new shallow corn Nardi so I picked that up as well.

nardi by JBFoto., on Flickr
Aeromotive 340, Vibrant -6 hose and a plethora of fittings!

hosepump by JBFoto., on Flickr

fittings by JBFoto., on Flickr
Greddy Elbow.

elbow by JBFoto., on Flickr
himini by JBFoto., on Flickr
I also got a Banzai oil pan brace.
Don't mind the orientation of the pucks. I just hung them there.
oilpan by JBFoto., on Flickr
The difference in turbos.
turbooldturbo by JBFoto., on Flickr
I couldn't pass up the deal I got on a brand new shallow corn Nardi so I picked that up as well.
nardi by JBFoto., on Flickr
Aeromotive 340, Vibrant -6 hose and a plethora of fittings!
hosepump by JBFoto., on Flickr
fittings by JBFoto., on Flickr
Greddy Elbow.
elbow by JBFoto., on Flickr
Joined: Dec 2008
Posts: 7,968
Likes: 688
From: Willow Springs, CA
Still going....
I then started working on the interior. Yanked the old carpet and went on the hunt for some black carpet.

dash in by JBFoto., on Flickr

carpet out by JBFoto., on Flickr

interior by JBFoto., on Flickr
I cleaned up the engine bay and painted it matte black. I need to redo it, actually.

engine bay by JBFoto., on Flickr
dash in by JBFoto., on Flickr
carpet out by JBFoto., on Flickr
interior by JBFoto., on Flickr
I cleaned up the engine bay and painted it matte black. I need to redo it, actually.
engine bay by JBFoto., on Flickr
Joined: Dec 2008
Posts: 7,968
Likes: 688
From: Willow Springs, CA
And more...
After a little bit of a wait time, I finally got my Turblown manifold. Elliot does some great work.

turblownmanifold by JBFoto., on Flickr

turbomanifold by JBFoto., on Flickr
I also had a buddy of mine clean up my harness and re-wrap it for me. Turned out great. I would have done it myself...but, I ruined a perfectly good harness when I tried it. lol
(disregard early 90s home carpet)

harness by JBFoto., on Flickr
I also bought a replacement carpet for the car since I hated the tan. Absolutely hated it. The fitment of the new carpet was terrible. I had to do a lot more cutting than the "minimal" cutting the company said it would be.

carpet by JBFoto., on Flickr
Here's a high quality photo...finally. Dash went back in and checked to see if I cut the carpet in the right places.
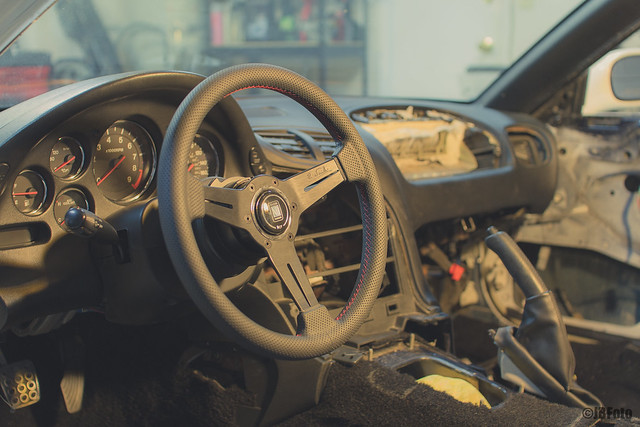
fdinterior by JBFoto., on Flickr
More to come...
turblownmanifold by JBFoto., on Flickr
turbomanifold by JBFoto., on Flickr
I also had a buddy of mine clean up my harness and re-wrap it for me. Turned out great. I would have done it myself...but, I ruined a perfectly good harness when I tried it. lol
(disregard early 90s home carpet)
harness by JBFoto., on Flickr
I also bought a replacement carpet for the car since I hated the tan. Absolutely hated it. The fitment of the new carpet was terrible. I had to do a lot more cutting than the "minimal" cutting the company said it would be.
carpet by JBFoto., on Flickr
Here's a high quality photo...finally. Dash went back in and checked to see if I cut the carpet in the right places.
fdinterior by JBFoto., on Flickr
More to come...