
DIY: Installing Sport paddles


Thread Starter
|
Registered User
Joined: Jul 2007
Posts: 473
Likes: 3
From: Jupiter
DIY: Installing Sport paddles
Thanks to those who have started this project before me, Specifically Turbocad6 (for the original tut), Viguera (original photos ands thread) and Jason at Riverside Infinity for acting so quickly and putting a kit together for us.
I followed turbocad's instruction and it went very smoothly.
Tools I used:
- T-30 tamper-proof bit or wrench
- 10mm socket
- 19mm socket w/ extension
- Socket wrench for the above
- Phillip screwdriver
- 2 additional coarse thread #8 or #6 screws x 1" (match original on trim)
- a small,fine flat head screw driver
- two beers
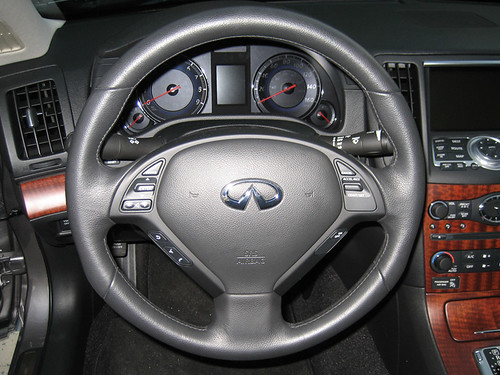
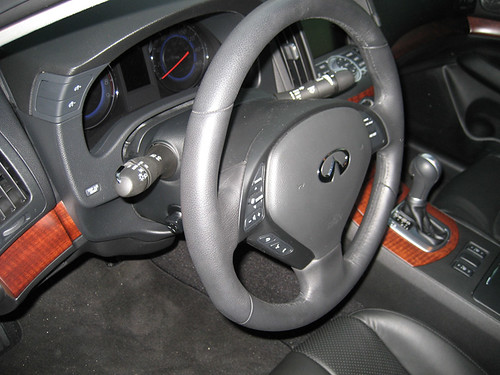
Here are some before pictures(just in case you're not familiar with you own car).

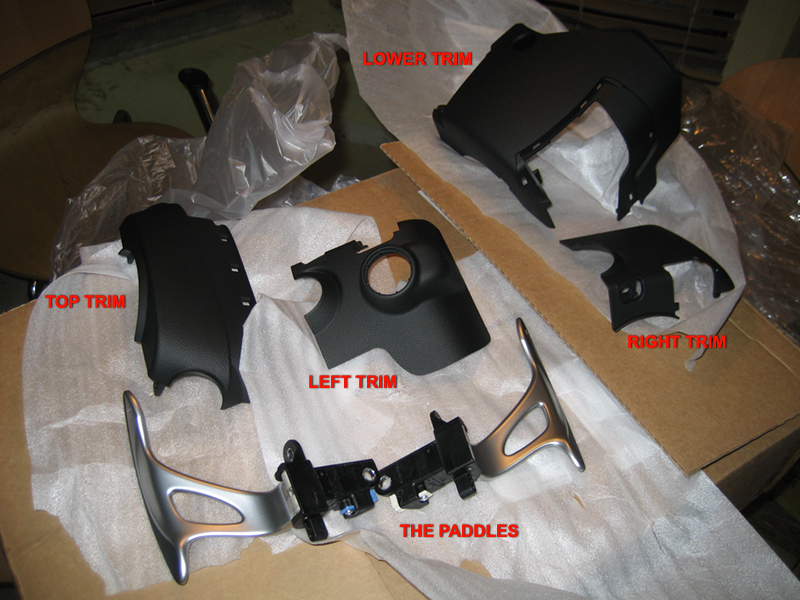
And here are the parts you'll need (sorry, will have to add part numbers later), but here is the hook-up on the parts: https://g35driver.com/forums/showthread.php?p=2523343
Da Boys
Before you start, disconnect your battery!! <--- very important. Drink first beer while waiting for electrical system to discharge. Then center your steering wheel and adjust it so that it is all the way out and up.
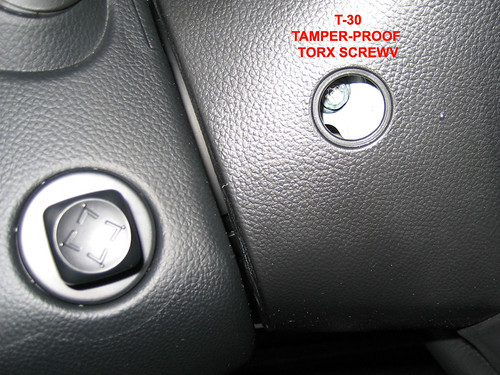
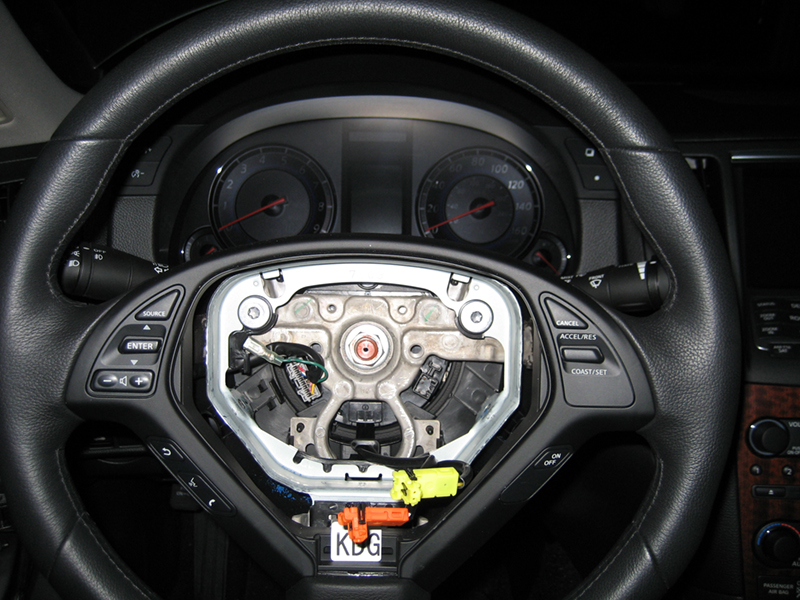
First you must take the Airbag assembly off of the steering wheel by popping the little round covers off each sides of the steering wheel and unscrew the tamper-resistant torx screws with the the T-30 Torx.
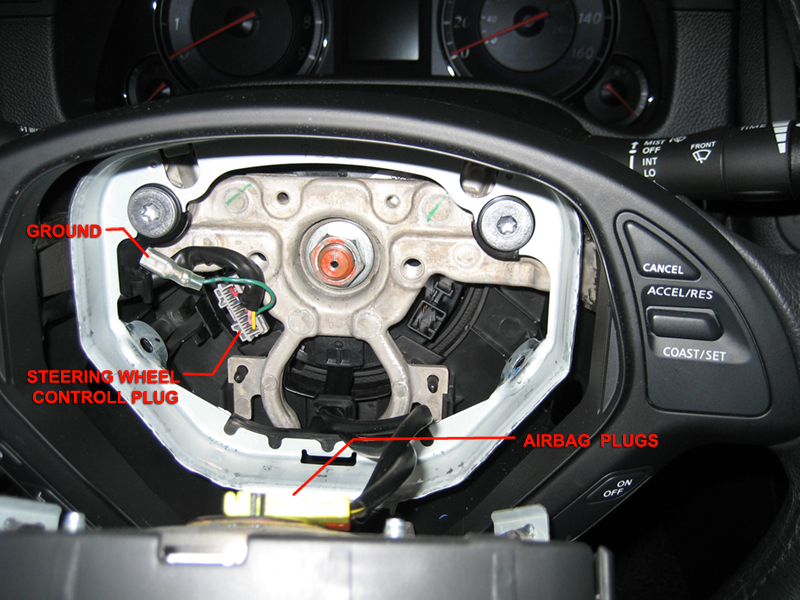
Once removed, gently slide the airbag assembly out of the steering wheel. Do not allow the assembly to hang from it's plugs. Here's what it should look like once you have it out:
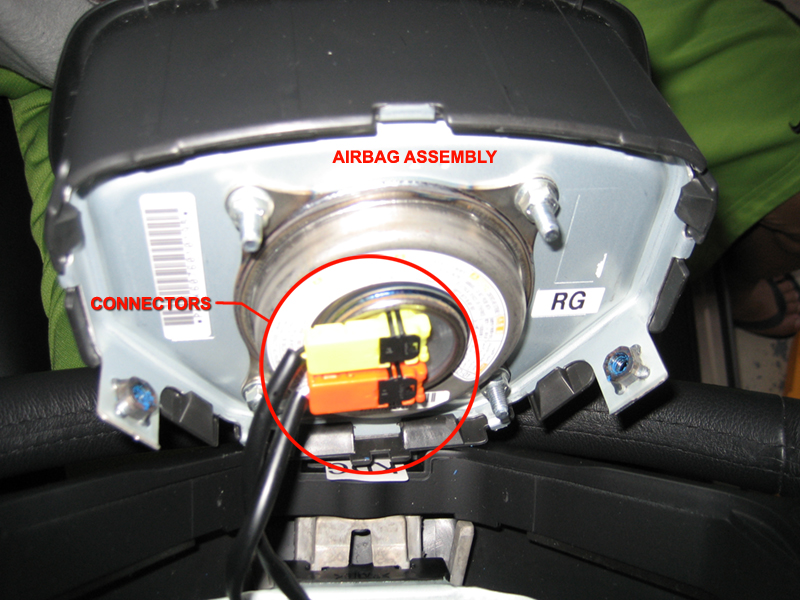
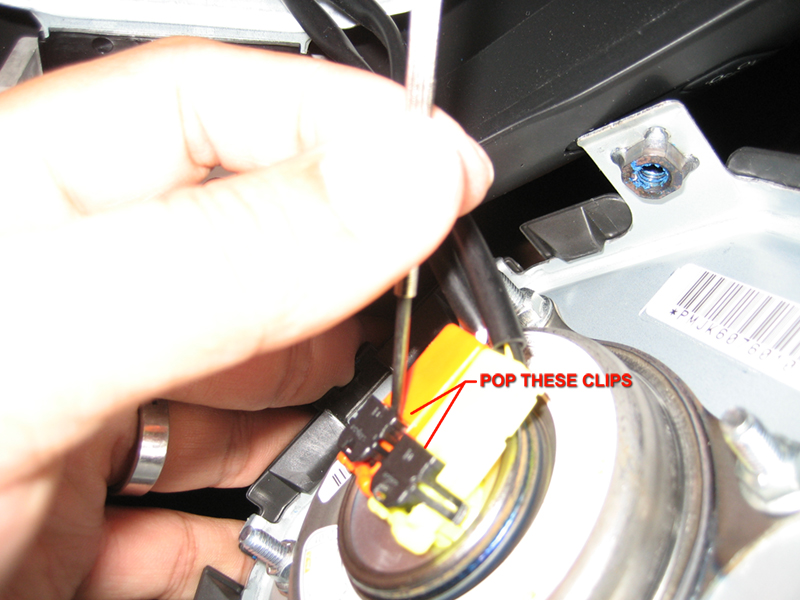
The airbag assembly plugs are yellow and orange. To remove them, I used a small screwdriver and pried up partially as shown (I killed a good 15 mins trying to figue out how to do this). As a precaution, I kept the airbag away from my face just in case as I worked.
Once removed:
Before removing the steering wheel, remove the steering wheel control plug and ground connector.
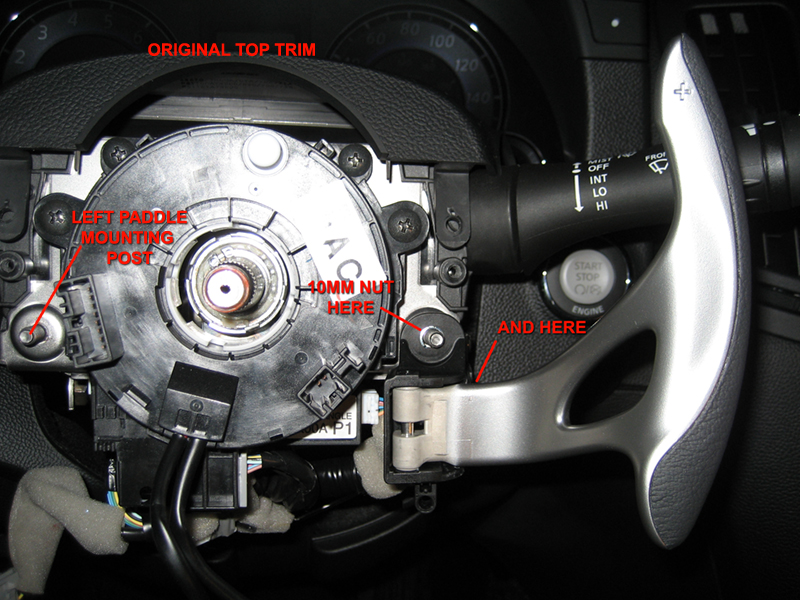
Then using a 19mm socket with an extension, remove the steering wheel nut. You must dislodge the the airbag plugs from its guide before you pull on the wheel. Grab the wheel at 3 and 9 and pull (may have to pull the 9 once then the 3, it then should come straight out); mine came out pretty easily. Once the wheel is off, remove the two screws holding the trim pieces (phillipss screwdriver).
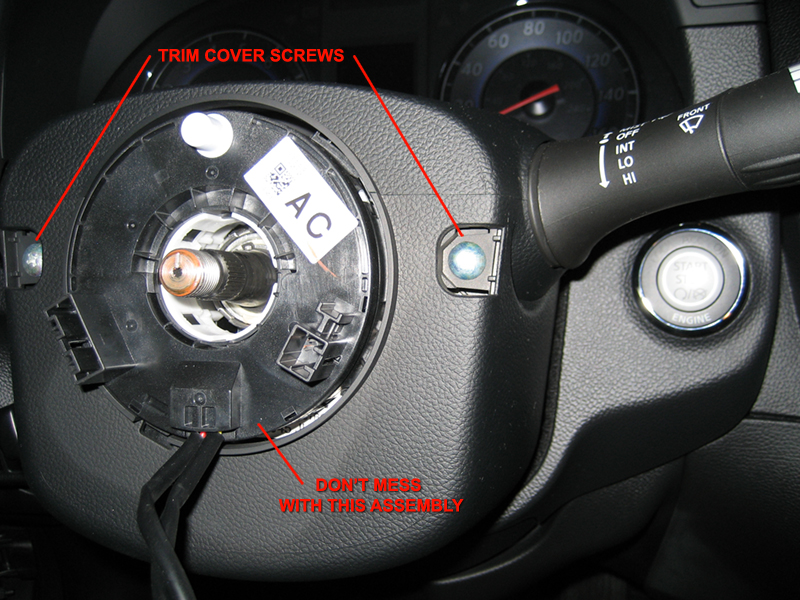
To remove the lower trim, unscrew the one screw located off-centered and slightly to the right at the bottom lower trim to remove it. As you are removing the lower steering column trim piece, be aware that the power steering adjuster is attached to the trim piece. Diconnect the plug by pressing in the tabs around the base and pushing it out from behind. I assume you don't have to worry about this if your have manual steering adjustment.
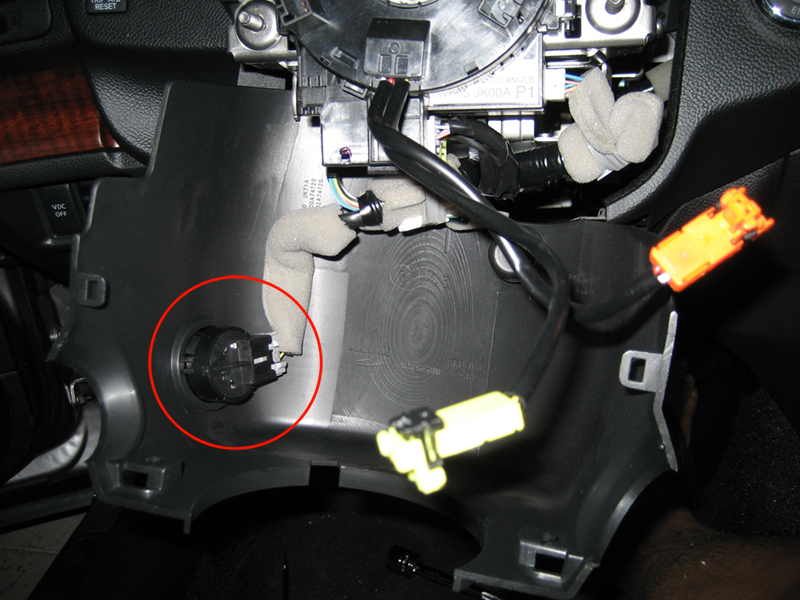
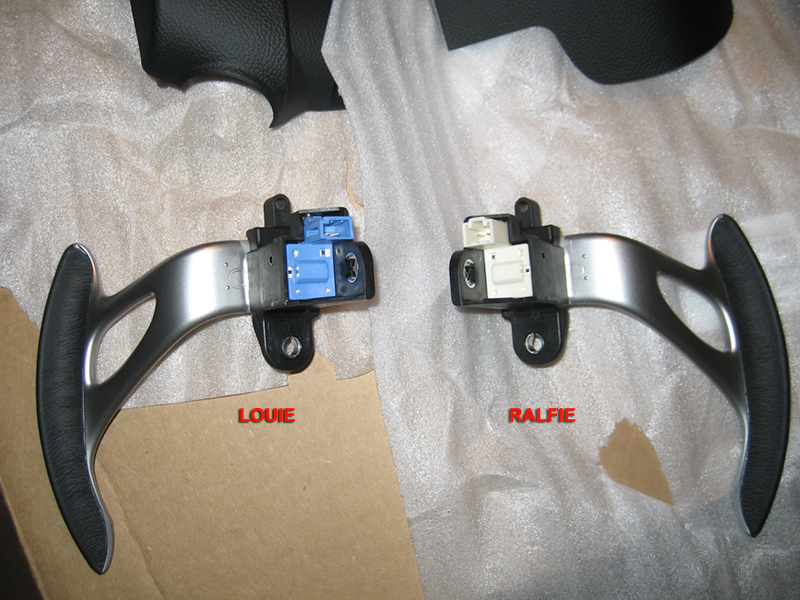
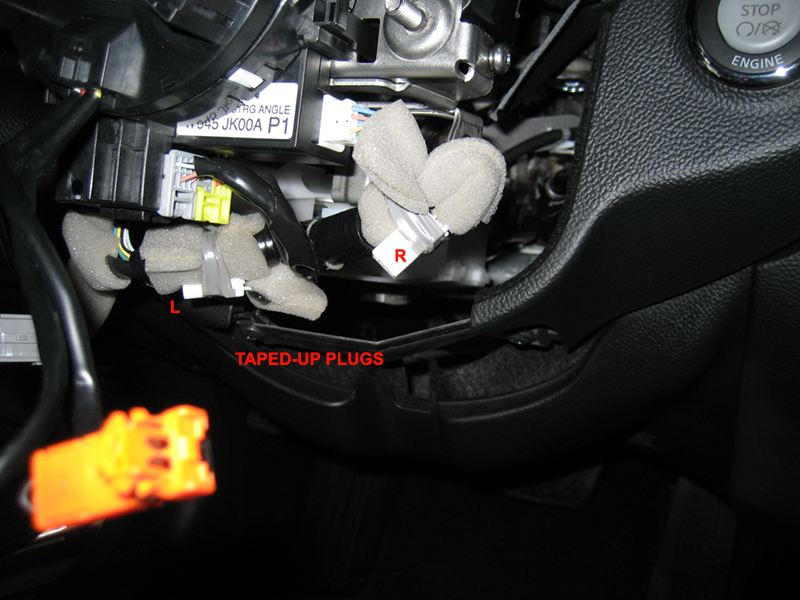
These are the pre-wired plugs the the paddles will hook up to, it is taped together with other wires; just cut the tape to free it before mounting the paddles.
I worked on the right paddles first (not important). Plug the pre-wired plug to the paddle before you mount them to the column. Attach the paddle to the column with the 10mm bolts provided with your kit. If not, you'll need (2) 10mm bolts w/ 6mm threads per side.

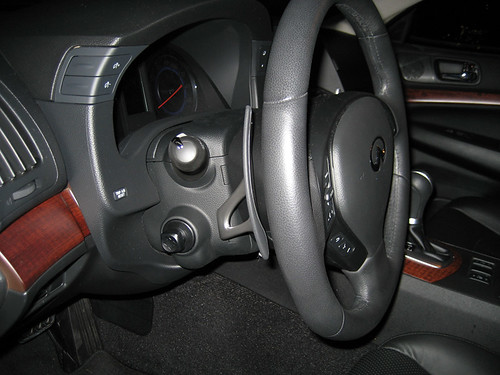
Nice no?
OK, reassembling the trim/housing in this order: First attach the lower trim piece and screwing it from the bottom and face with the two additional coarse thread screws (or the 10mm bolts provided with kit) see photo below for location of the two new screws.
Hint: as you assemble the left trim, it is easier to plug the power steering adjustment **** in before you snap it back into the left trim piece (you'll have to route the plug through the hole first and don't forget to re-align the notch). Assemble the right side, making sure everything snaps into place.
Center the clockspring at the of the column to the 12 o'clock position and re-route the airbag plugs back through the steering wheel before reinstalling steering wheel.

Align the marks on the steering wheel and bolt and retorque the center nut to 25 lbs/ft.
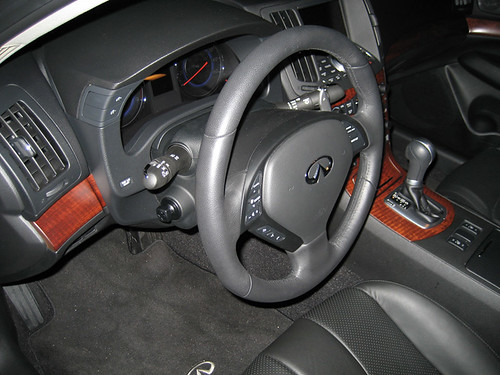
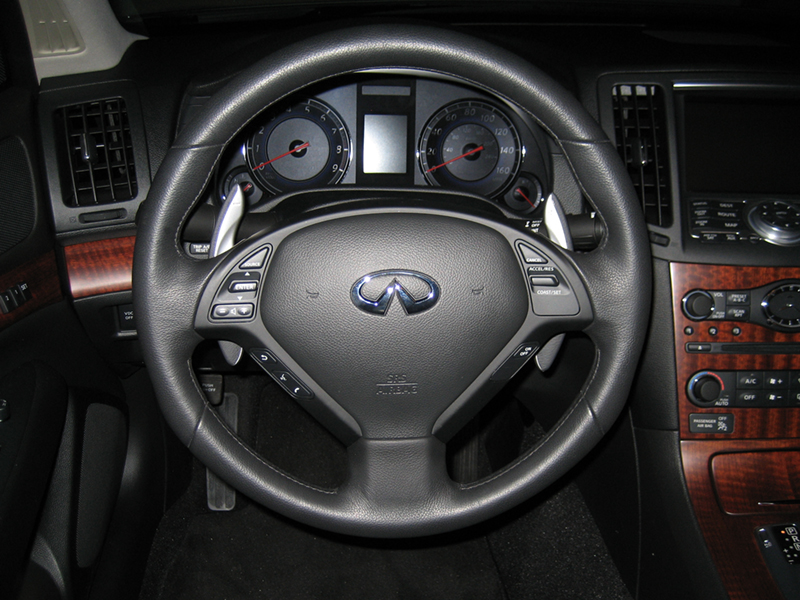
Re-attach all the plugs and slide the airbag back into place and re-attach with torx screws. If done properly, it should look like this when done:

Lastly, go on a test drive and when you get, back drink second beer!
Trouble shooting: If your car does not start after this mod, that's because you forgot to re-connect the battery.
(edit 12.21.07) you'll have to reset or activate your auto up/down of your windows by lowering the power window more than half way then hold it up until it closes; maintain that possition for about about 3 secs. You'll have to do all four windows individually.
You'll also have to turn the auto tilt function back on through the setting/convenience settings if you car is equipt wth that function.
some words: Please handle the airbag with great care as it may be needed to save your life. I am not responsible for anything you do with the information I posted. I only documented my proccess for educational purposes. I may have left out information but will have to recheck later since it is very late. Please forgive my grammar, spelling, terminologies, and methodologies feel free to correct me. If anyone reading this found a better or different proccess than what I posted, please post it so that it can benefit everyone.
Good luck.
I followed turbocad's instruction and it went very smoothly.
Tools I used:
- T-30 tamper-proof bit or wrench
- 10mm socket
- 19mm socket w/ extension
- Socket wrench for the above
- Phillip screwdriver
- 2 additional coarse thread #8 or #6 screws x 1" (match original on trim)
- a small,fine flat head screw driver
- two beers
Here are some before pictures(just in case you're not familiar with you own car).
And here are the parts you'll need (sorry, will have to add part numbers later), but here is the hook-up on the parts: https://g35driver.com/forums/showthread.php?p=2523343
Da Boys
Before you start, disconnect your battery!! <--- very important. Drink first beer while waiting for electrical system to discharge. Then center your steering wheel and adjust it so that it is all the way out and up.
First you must take the Airbag assembly off of the steering wheel by popping the little round covers off each sides of the steering wheel and unscrew the tamper-resistant torx screws with the the T-30 Torx.
Once removed, gently slide the airbag assembly out of the steering wheel. Do not allow the assembly to hang from it's plugs. Here's what it should look like once you have it out:
The airbag assembly plugs are yellow and orange. To remove them, I used a small screwdriver and pried up partially as shown (I killed a good 15 mins trying to figue out how to do this). As a precaution, I kept the airbag away from my face just in case as I worked.
Once removed:
Before removing the steering wheel, remove the steering wheel control plug and ground connector.
Then using a 19mm socket with an extension, remove the steering wheel nut. You must dislodge the the airbag plugs from its guide before you pull on the wheel. Grab the wheel at 3 and 9 and pull (may have to pull the 9 once then the 3, it then should come straight out); mine came out pretty easily. Once the wheel is off, remove the two screws holding the trim pieces (phillipss screwdriver).
To remove the lower trim, unscrew the one screw located off-centered and slightly to the right at the bottom lower trim to remove it. As you are removing the lower steering column trim piece, be aware that the power steering adjuster is attached to the trim piece. Diconnect the plug by pressing in the tabs around the base and pushing it out from behind. I assume you don't have to worry about this if your have manual steering adjustment.
These are the pre-wired plugs the the paddles will hook up to, it is taped together with other wires; just cut the tape to free it before mounting the paddles.
I worked on the right paddles first (not important). Plug the pre-wired plug to the paddle before you mount them to the column. Attach the paddle to the column with the 10mm bolts provided with your kit. If not, you'll need (2) 10mm bolts w/ 6mm threads per side.
Nice no?
OK, reassembling the trim/housing in this order: First attach the lower trim piece and screwing it from the bottom and face with the two additional coarse thread screws (or the 10mm bolts provided with kit) see photo below for location of the two new screws.
Hint: as you assemble the left trim, it is easier to plug the power steering adjustment **** in before you snap it back into the left trim piece (you'll have to route the plug through the hole first and don't forget to re-align the notch). Assemble the right side, making sure everything snaps into place.
Center the clockspring at the of the column to the 12 o'clock position and re-route the airbag plugs back through the steering wheel before reinstalling steering wheel.
Align the marks on the steering wheel and bolt and retorque the center nut to 25 lbs/ft.
Re-attach all the plugs and slide the airbag back into place and re-attach with torx screws. If done properly, it should look like this when done:
Lastly, go on a test drive and when you get, back drink second beer!
Trouble shooting: If your car does not start after this mod, that's because you forgot to re-connect the battery.
(edit 12.21.07) you'll have to reset or activate your auto up/down of your windows by lowering the power window more than half way then hold it up until it closes; maintain that possition for about about 3 secs. You'll have to do all four windows individually.
You'll also have to turn the auto tilt function back on through the setting/convenience settings if you car is equipt wth that function.
some words: Please handle the airbag with great care as it may be needed to save your life. I am not responsible for anything you do with the information I posted. I only documented my proccess for educational purposes. I may have left out information but will have to recheck later since it is very late. Please forgive my grammar, spelling, terminologies, and methodologies feel free to correct me. If anyone reading this found a better or different proccess than what I posted, please post it so that it can benefit everyone.
Good luck.
Last edited by Lemodular; Apr 8, 2008 at 03:57 PM. Reason: updated texts

Lemodular - FANTASTIC tutorial! Thanks a million! I love it. The first wood trimmed G35 WITH PADDLE SHIFTERS! Whoo Hoo!!!!!
One question - When I asked Viguera, he indicated the paddle shifters didn't do anything if the car was in D. They only worked in DS mode. Is this correct? Or can you still shift w/ the paddle shifters even when the car is in D as you can in the G35 sport AT?
Thanks again.
One question - When I asked Viguera, he indicated the paddle shifters didn't do anything if the car was in D. They only worked in DS mode. Is this correct? Or can you still shift w/ the paddle shifters even when the car is in D as you can in the G35 sport AT?
Thanks again.


Thread Starter
|
Registered User
Joined: Jul 2007
Posts: 473
Likes: 3
From: Jupiter
Originally Posted by AlterZgo
Lemodular - FANTASTIC tutorial! Thanks a million! I love it. The first wood trimmed G35 WITH PADDLE SHIFTERS! Whoo Hoo!!!!!
One question - When I asked Viguera, he indicated the paddle shifters didn't do anything if the car was in D. They only worked in DS mode. Is this correct? Or can you still shift w/ the paddle shifters even when the car is in D as you can in the G35 sport AT?
Thanks again.
One question - When I asked Viguera, he indicated the paddle shifters didn't do anything if the car was in D. They only worked in DS mode. Is this correct? Or can you still shift w/ the paddle shifters even when the car is in D as you can in the G35 sport AT?
Thanks again.
It works in both D and DS mode

in D mode, it will go back to D after about 5 sec. unless you are in a turn or active.
in DS mode, it will hold the gear until you shift.
Last edited by Lemodular; Dec 20, 2007 at 08:14 AM.


Trending Topics


Originally Posted by CarFreak
Best write-up I've ever seen. Too bad I already have paddle...looks like a fun install 

Originally Posted by ChristianN
Thanks for taking the time to make this DIY guide. I'm not sure yet if I'm going to do this, but it will be a great resource if I do.
