
DIY: Installing Sport paddles


Yeah, the anti-theft bolt is only $10 and is listed on the Infiniti site as an available accessory.
I'll have Jason send me one of those as well, when I order the kit.
I figure, why not...
I've never had an airbag stolen, but I know they're a small fortune to replace and for only $10 and if I'm already into the guts of the steering wheel, why not just do it?
I'll have Jason send me one of those as well, when I order the kit.
I figure, why not...
I've never had an airbag stolen, but I know they're a small fortune to replace and for only $10 and if I'm already into the guts of the steering wheel, why not just do it?

Lemodular,
Just installed my paddle shifters using your DIY. Great instructions. Everything works perfectly.
One question - Did you remove the stop steering colum plastic trim piece and replace with the one supplied in the kit? When I looked at both pieces they appeared to be identical so I left the old top trim piece in place and everything seems to snap together fine.

Thread Starter
|
Registered User
Joined: Jul 2007
Posts: 473
Likes: 3
From: Jupiter
Originally Posted by AlterZgo
Lemodular,
Just installed my paddle shifters using your DIY. Great instructions. Everything works perfectly.
One question - Did you remove the stop steering colum plastic trim piece and replace with the one supplied in the kit? When I looked at both pieces they appeared to be identical so I left the old top trim piece in place and everything seems to snap together fine.
Just installed my paddle shifters using your DIY. Great instructions. Everything works perfectly.
One question - Did you remove the stop steering colum plastic trim piece and replace with the one supplied in the kit? When I looked at both pieces they appeared to be identical so I left the old top trim piece in place and everything seems to snap together fine.
I'm glad my write-up is helping someone. Yes, I left the top trim cover piece on the whole time I was working and did not replace it when putting things back, it seemed identical to me too.
congrats on the install.
BTW. As someone asked earlier about the base model: I did get a chance to look at the column cover and it looks like you'll need a different kit. The lower half looks completely diferent.

Thread Starter
|
Registered User
Joined: Jul 2007
Posts: 473
Likes: 3
From: Jupiter
Fit? maybe, see this post:
https://g35driver.com/forums/showthr...ghlight=paddle
however I don't think your 05 was setup for paddles from the factory so you'll need a custom harness. See the above post, it's exactly what Zack's working on.
https://g35driver.com/forums/showthr...ghlight=paddle
however I don't think your 05 was setup for paddles from the factory so you'll need a custom harness. See the above post, it's exactly what Zack's working on.

Are you talking about the supplied bolts for attaching the paddles or the screws used on the trim pieces?
Could you explain what you had an issue with???
Ordered mine today.... can't wait!
Could you explain what you had an issue with???
Ordered mine today.... can't wait!
Originally Posted by disgookonfiya
i completed mine, works great but had a little problem with the bolts supplied. I'm probably going to re-do it with some different screws to see it it works better
the bolts had washers that made it difficult to use for the bottom of the trim, and since it had a slightly larger head it wouldn't let the side trim panels that cover it plug in right...
(AlterZgo) Did you have any problems with the bolt for the bottom trim panel? or was it just easy to screw in. Did you screw it in with the head facing you, or from behind?
Just trying to figure out why mine wasn't screwing in right, besides that, every thing works perfectly....
(AlterZgo) Did you have any problems with the bolt for the bottom trim panel? or was it just easy to screw in. Did you screw it in with the head facing you, or from behind?
Just trying to figure out why mine wasn't screwing in right, besides that, every thing works perfectly....
Last edited by SVLRx; Jan 8, 2008 at 10:15 PM.
Are you talking about the screw that goes on from the bottom of the lower trim panel? That one went on pretty easily. I had a little bit of difficulty with the 2 matching trim cover screws in this picture:
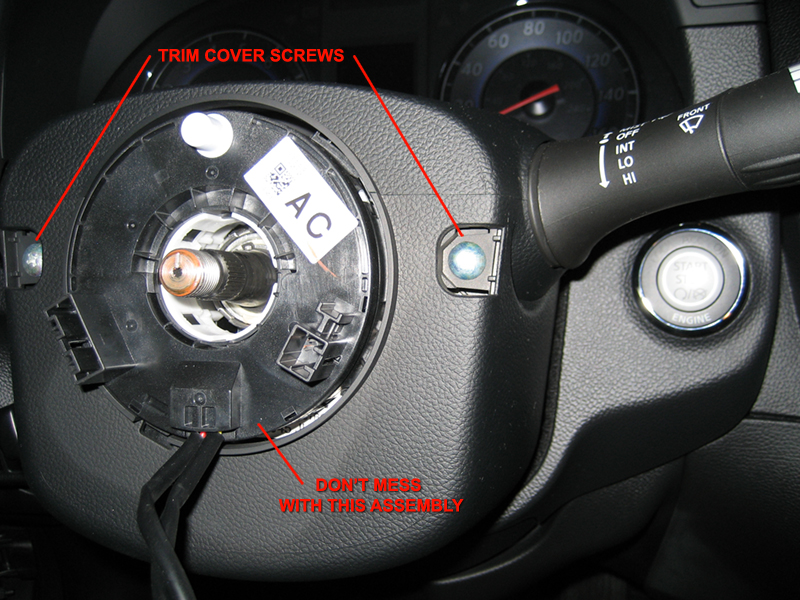
One of them started to strip a bit so I backed it out, sprayed a bit of WD40 on it and it went in w/o problems. Since the bottom screw is the same as these 2 trim cover screws, I can see how it could strip easily since it seems to be made out of aluminum.
One of them started to strip a bit so I backed it out, sprayed a bit of WD40 on it and it went in w/o problems. Since the bottom screw is the same as these 2 trim cover screws, I can see how it could strip easily since it seems to be made out of aluminum.
oh, the kit i received had bolts instead of screws, so the same bolt used for the side of the paddle shifter was used for the bottom two screws (bottom trim panel).... That's why it went in easily in your car, you had the same screws as the top panel. I'm just going to home depot to get some screws after work today and re do it
Thread Starter
|
Registered User
Joined: Jul 2007
Posts: 473
Likes: 3
From: Jupiter
There was only one type of bolts provided when I bought my kit. I did not use it to fasten the trim piece not because I did't think it would fit, but rather because it was a bolt and not a screw. I felt that a machine threaded bolts were not well suited for the non-threaded plastic piece. If you go out ans buy a screw, make sure the head is relatively flat (in profile).

At least you guys got screws with your kit... John had to rummage around through his boxes looking for screws when I went to get mine installed. I was worried a damn 3 cent screw was gonna keep me from using my paddles that night. 

To properly disconnect a battery, you really only need to worry about the Red '+' terminal.
The '-' is just a ground.
My paddles haven't shipped yet.
I'm like a little kid waiting for Christmas morning.")
The '-' is just a ground.
My paddles haven't shipped yet.
I'm like a little kid waiting for Christmas morning.