
DIY: Cutting Rear Springmount aka "the springmount mod"


I have an 08 Sedan and cut the rear spring mounts 1/2" and installed 2009 370Z springs up front. It looks great and is a very easy mod. I bought a new set of spring perches from the dealer so I could just swap them out.

I just did this to my 04 G35x and it was a good compromise. I had had cut springs previously on the rear and it probably sat about 3/4 of an inch lower but it didn't match up with the front. Before that, I had had 350z springs on the rear but it sat to high. So, by cutting these and keeping the Z springs I got the right height and the ride is much better than it was previously (cut springs suck,  ). I'll try to get some pics of it tonight.
). I'll try to get some pics of it tonight.


Hi,
I have few questions i want to ask, anyone can help me would be perfect.
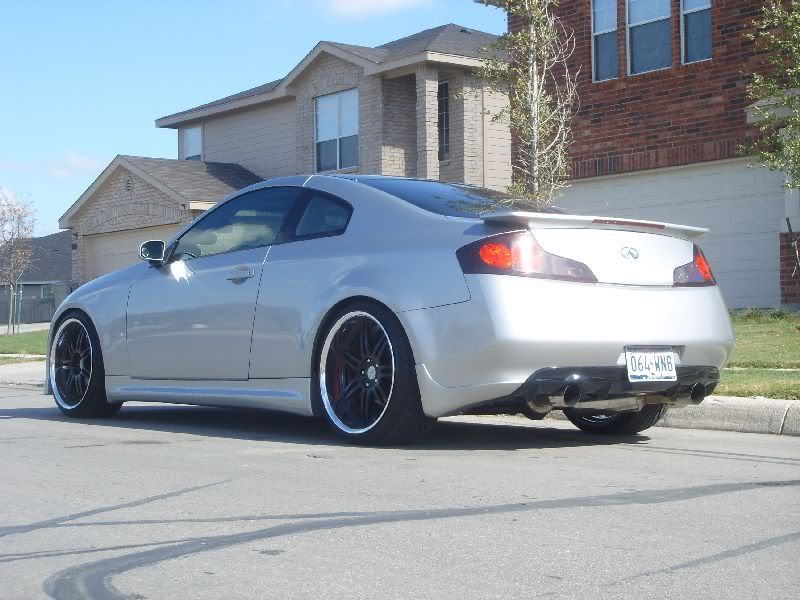
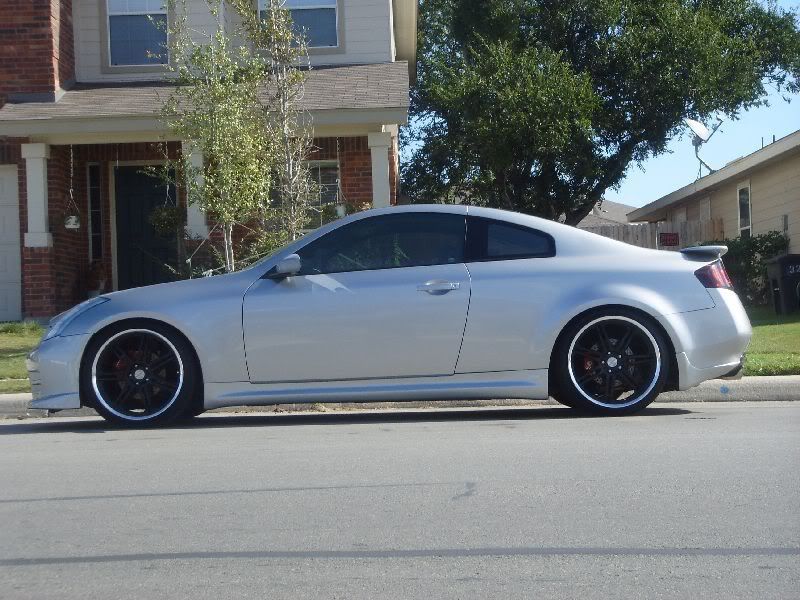
So i am lowered on stechs(dunno if for g or z) but i bought new wheels. When i put it on, ive notice that the rear sits way higher than the front. It looked like stock height. So my question is, is this anything to do with the spring mount mod? Do i need to do the mod? Will it be lowered after the mod?
Here r some pics


Thanks
I have few questions i want to ask, anyone can help me would be perfect.
So i am lowered on stechs(dunno if for g or z) but i bought new wheels. When i put it on, ive notice that the rear sits way higher than the front. It looked like stock height. So my question is, is this anything to do with the spring mount mod? Do i need to do the mod? Will it be lowered after the mod?
Here r some pics
Thanks
Last edited by izzueeek; Nov 19, 2012 at 03:31 PM.


You are not cutting the spring. You are cutting the rubber and plastic mount me tween the spring and the body. It is an easy to do and awesome mod. I did that and swapped in 370G front springs. Perfect drop.


Registered User
Joined: Jun 2013
Posts: 102
Likes: 2
Here are som handy pics from pg 3
Love this mod, I'll do it soon and take pics on my sedan
Love this mod, I'll do it soon and take pics on my sedan
Here are some before and afters. This is how the rear of my car use to stand... i had about a 2 and a half finger gap...
THIS IS HOW MUCH I CUT
BEFORE

AFTER

BEFORE

AFTER
now i have about a 1 finger gap all the way around...I FREAKIN LOVE IT!!! I HIGHLY RECOMMEND THIS MOD TO ANYONE RUNNING Z H-TECHS!!!


THIS IS HOW MUCH I CUT
BEFORE
AFTER
BEFORE
AFTER
now i have about a 1 finger gap all the way around...I FREAKIN LOVE IT!!! I HIGHLY RECOMMEND THIS MOD TO ANYONE RUNNING Z H-TECHS!!!


Registered User
Joined: Aug 2014
Posts: 1
Likes: 3
I found this post while looking for ways to only slightly lower my G37x. I really wanted to see these pictures as I'm a visual person. I noticed that the picture links were dead and looked like they were from when the OP was at college. I found an archived version of the page (thanks to being introduced to the Internet time machine) and downloaded the archived pictures. I have uploaded them to my Photobucket account and credited the OP with a link to this thread. I thought I'd re-post the original content with the new picture links for anyone else who may need and/or want to see this in the future.
Jeremy
Jeremy
Since I keep getting PMs about this mod, and I needed to get a couple more MM of clearance in the rear. I decided to purchase a new set up rear springmounts and recut them, taking a little bit less off this time. Credit goes to Gsedan35, who was the first to do this, and Borahatch for giving me tips on how to go about cutting the mounts.
See Gsedan35's DIY on installing springs to remove the rear springmounts.
http://www.g-owners.com/article_read.asp?id=25
The pieces look something like this:
Side

Top

Tools:
Hacksaw
Tape
C-Clamp
Vise
WD-40 or similar lubricating spray
Rags
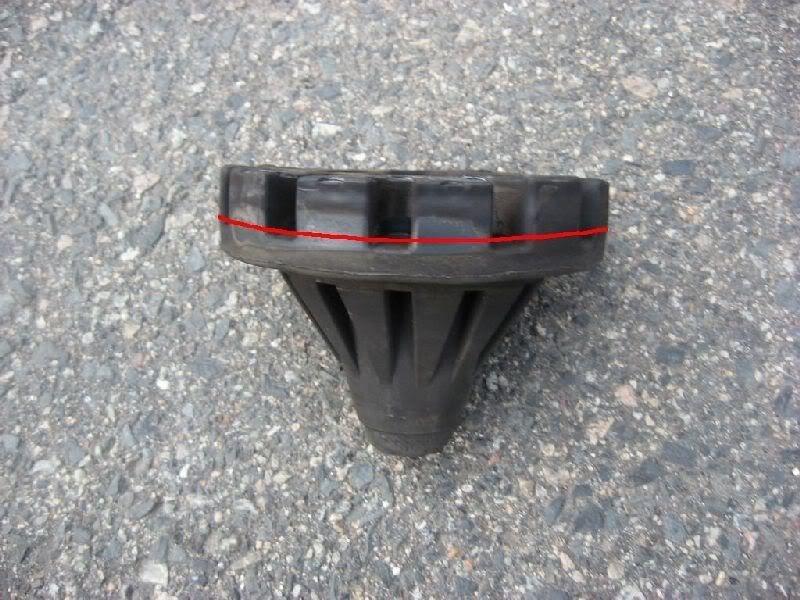
Start by taping a ring around the springmount of exactly how much you want to cut off. How much you cut will be how much more drop you will get so measure accordingly before cutting. I used Duct tape, but anything will work as long as it sticks to the rubber. I don't recommend blue painter's tape, because I used it the first time and it doesn't really stick to the rubber.

Next, get a rag or in my case some disposable gloves and insert into the hollowed out end of the springmount to provide a cushioned area for the C-clamp to seat to. Install the C-Clamp like in the picture and tighten until the springmount is difficult to rotate/move. Make sure to not overclamp or you can crack the plastic.


Insert the C-Clamp into your vise to provide a stable cutting rig

Get out your hacksaw and WD-40 or equiv

Begin by lubricating your hacksaw blade and springmount by spraying WD-40 onto the blade and rubber, and begin sawing along your tapeline. The outer ring of the springmount is rubber, but the inner ring is made of a plastic, so saw through the plastic. Loosen the clamp and rotate the mount 1 notch and retighten and continue sawing until you cut all the way around the mount, being careful to cut as straight and evenly as you can.

Once you finish cutting, you should end up with something that looks like this, they aren't exactly straight, but close enough, I've been running them for 6 months and no problems here


Here is a comparison of the height difference after cutting, ~1/2"

Reinstall in stock location

End up with a even drop! Dropped on 350z Tein H-Techs, but will work with any spring


Be prepared for camber issues in the rear, just like any drop in the rear over 0.4", I installed the SPC rear camber kit as well and will be getting an alignment soon.

See Gsedan35's DIY on installing springs to remove the rear springmounts.
http://www.g-owners.com/article_read.asp?id=25
The pieces look something like this:
Side

Top

Tools:
Hacksaw
Tape
C-Clamp
Vise
WD-40 or similar lubricating spray
Rags
Start by taping a ring around the springmount of exactly how much you want to cut off. How much you cut will be how much more drop you will get so measure accordingly before cutting. I used Duct tape, but anything will work as long as it sticks to the rubber. I don't recommend blue painter's tape, because I used it the first time and it doesn't really stick to the rubber.

Next, get a rag or in my case some disposable gloves and insert into the hollowed out end of the springmount to provide a cushioned area for the C-clamp to seat to. Install the C-Clamp like in the picture and tighten until the springmount is difficult to rotate/move. Make sure to not overclamp or you can crack the plastic.


Insert the C-Clamp into your vise to provide a stable cutting rig

Get out your hacksaw and WD-40 or equiv

Begin by lubricating your hacksaw blade and springmount by spraying WD-40 onto the blade and rubber, and begin sawing along your tapeline. The outer ring of the springmount is rubber, but the inner ring is made of a plastic, so saw through the plastic. Loosen the clamp and rotate the mount 1 notch and retighten and continue sawing until you cut all the way around the mount, being careful to cut as straight and evenly as you can.

Once you finish cutting, you should end up with something that looks like this, they aren't exactly straight, but close enough, I've been running them for 6 months and no problems here


Here is a comparison of the height difference after cutting, ~1/2"

Reinstall in stock location

End up with a even drop! Dropped on 350z Tein H-Techs, but will work with any spring


Be prepared for camber issues in the rear, just like any drop in the rear over 0.4", I installed the SPC rear camber kit as well and will be getting an alignment soon.

Last edited by jsampsell; Aug 28, 2014 at 03:44 PM.