
DIY: Rear Wheel Bearing Removal


Joined: May 2003
Posts: 2,395
Likes: 7
From: San Diego Area
DIY: Rear Wheel Bearing Removal
STOP: Please read the entire DIY before proceeding.
if you are interested in removing your front wheel bearings, go HERE
PROBLEM: My wheel was extremely wobbly to the point where when the car moved, the rear caliper was rubbing metal on metal with the rotor. I diagnosed it as a axle nut that had come very loose, so I re-tightened. Everything was fine until a week ago when I discovered that the nut had become loose again.
Upon re-tightening and driving, I could hear a distinct rubbing sound at slow speeds. I checked my entire suspension and did not notice anything unusual. When I had the rear of the car jacked-up, I placed one hand on top of the tire and the other hand on the bottom of the tire and moved it in and out and felt play along the vertical and horizontal axis. The passenger side did not exhibit this movement.
I researched and discovered it could be the result of a wheel bearing that had failed. I have taken my 2003 G35 Coupe to three track events and a couple of drag events and the car currently has 45,XXX miles.
Drivetrain warranty is 6 yrs / 70,000 miles, I had no choice to do it myself or pay a dealership close to $500 in labor. A reputable shop in the LA quoted me a bit under $300.
Still waiting for the parts I ordered, but this thread will be the beginning of my DIY.
A link to a few videos courtesy of ByThaBay for a G35 Sedan:
I have not viewed the two videos below, but given his past DIY videos, I feel comfortable posting.
G35 Sedan Wheel Bearing Separation
G35 Sedan Wheel Bearing Install
Last edited by drsifu1; Feb 24, 2014 at 01:17 AM.
Joined: May 2003
Posts: 2,395
Likes: 7
From: San Diego Area
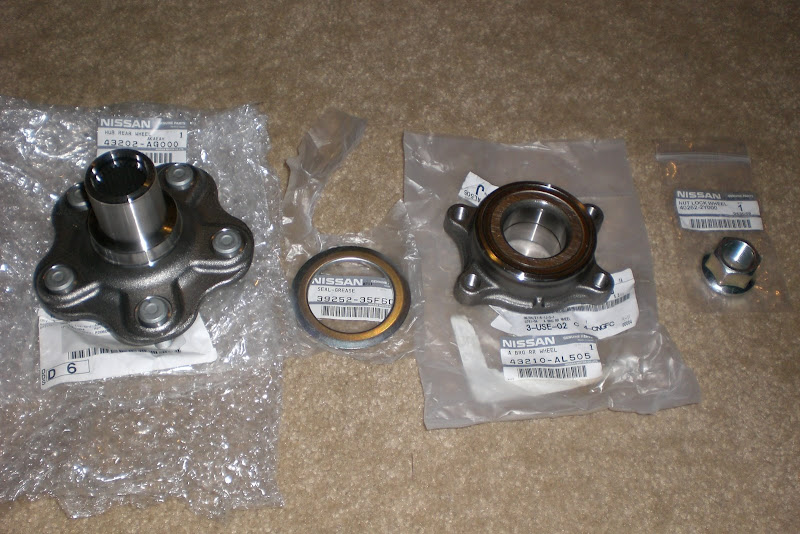
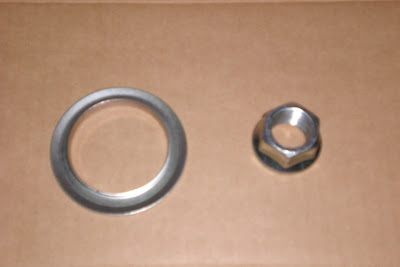
Parts that were ordered:
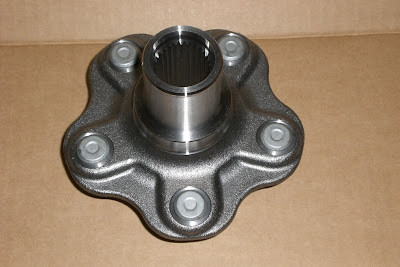
$119- Hub assembly (comes with studs pre-installed)
$56- Bearing assembly
$16- Seal
$4- New axle nut
Below picture is courtesy of WaiJai. It includes everything I bought, just missing the axle nut. Nut is not required, but it's for my own piece of mind.
The hub assembly is also NOT required to replace the bearing, but again, it's for my own piece of mind.

Tools that are required:
Pliers - to remove cotter pin (not pictured)
32 axle nut socket - to remove axle nut (rent from Autozone)
Breaker bar - to remove axle nut and other bolts/nuts
3/8" ratchet
19 mm socket (will vary depending on lug nut size) - remove wheel
1/2" socket - to remove Stoptech caliper from mounting bracket IF you have stock brakes or OEM brembos, may need a 19 mm socket.
17 mm socket - to remove four bolts holding bearing to axle
various 3/8" extensions
Bearing puller - rent from autozone
Brush to clean up
Shop with a Press - you will need to have the new wheel bearing pressed onto the new hub. I plan on going to the dealership to get this done.

$119- Hub assembly (comes with studs pre-installed)
$56- Bearing assembly
$16- Seal
$4- New axle nut
Below picture is courtesy of WaiJai. It includes everything I bought, just missing the axle nut. Nut is not required, but it's for my own piece of mind.
The hub assembly is also NOT required to replace the bearing, but again, it's for my own piece of mind.
Tools that are required:
Pliers - to remove cotter pin (not pictured)
32 axle nut socket - to remove axle nut (rent from Autozone)
Breaker bar - to remove axle nut and other bolts/nuts
3/8" ratchet
19 mm socket (will vary depending on lug nut size) - remove wheel
1/2" socket - to remove Stoptech caliper from mounting bracket IF you have stock brakes or OEM brembos, may need a 19 mm socket.
17 mm socket - to remove four bolts holding bearing to axle
various 3/8" extensions
Bearing puller - rent from autozone
Brush to clean up
Shop with a Press - you will need to have the new wheel bearing pressed onto the new hub. I plan on going to the dealership to get this done.
Last edited by drsifu1; Jun 5, 2009 at 11:08 PM.
Joined: May 2003
Posts: 2,395
Likes: 7
From: San Diego Area
Step 1 - Jack up the rear of the car and place jackstands to support the car
Step 2 - Remove rear wheel
Step 3 - Remove cotter pin with pliers
Step 4 - Apply E-Brake or have someone step on the brakes
Step 5 - Remove axle nut (will require the use of the breaker bar)
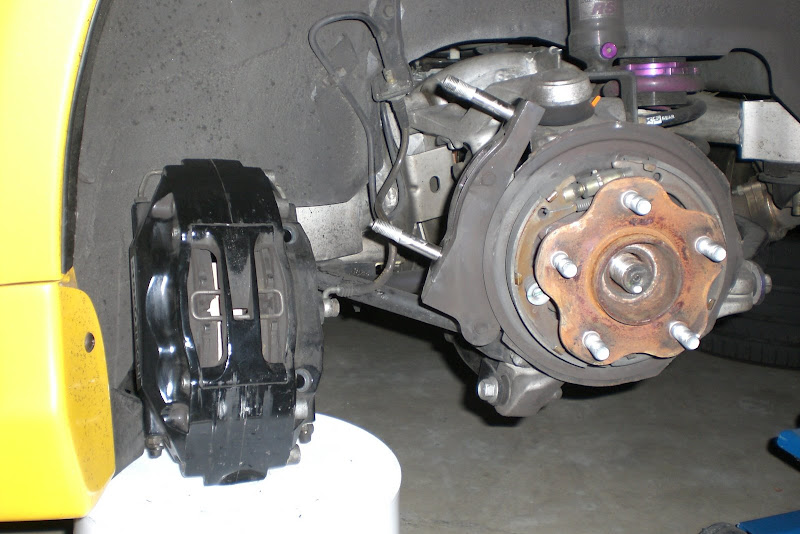
Step 6 - Remove nuts/bolts holding caliper to rotor. Secure caliper so that it is not hanging from the brake line
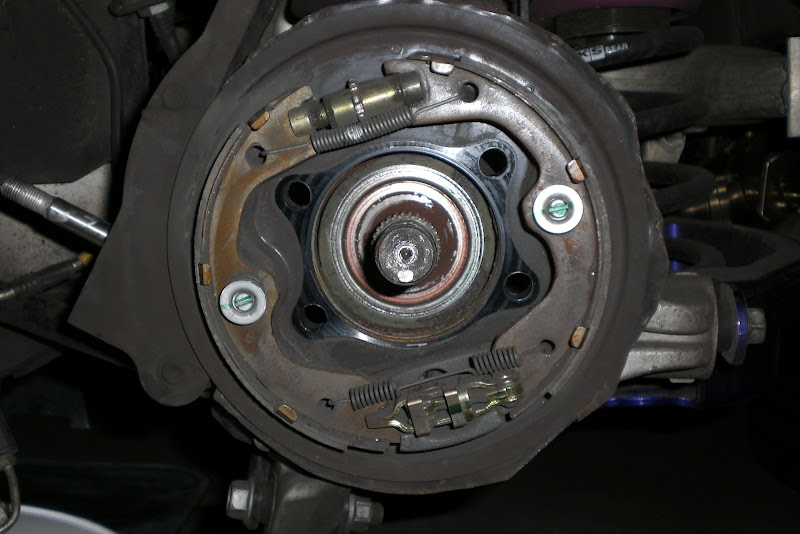
Step 7 - Remove rotor
Here is a pic of what it should like:
Here is the back of the axle showing the four bolts that secure the bearing to the axle:


arrow in red shows the bolts
arrow in the blue shows something I'll describe later
Step 2 - Remove rear wheel
Step 3 - Remove cotter pin with pliers
Step 4 - Apply E-Brake or have someone step on the brakes
Step 5 - Remove axle nut (will require the use of the breaker bar)
Step 6 - Remove nuts/bolts holding caliper to rotor. Secure caliper so that it is not hanging from the brake line
Step 7 - Remove rotor
Here is a pic of what it should like:
Here is the back of the axle showing the four bolts that secure the bearing to the axle:
arrow in red shows the bolts
arrow in the blue shows something I'll describe later
Joined: May 2003
Posts: 2,395
Likes: 7
From: San Diego Area
When everything is installed, there is ZERO chance of you ever getting a socket to get to those four bolts. The service manual actually has you remove all the suspension components attached to the axle and remove it to get access to those four bolts. The gap you see between the drive shaft and the axle (blue arrow in above picture) is a result of me pushing on the end of the shaft. I can now fit a 17mm socket, but not a ratchet.

red arrow shows end of shaft
blue arrow shows hub assembly
I suspect after I get the bearing puller tomorrow, and pull the hub/bearing, it'll push the shaft in a little bit further to give me the room I need to get a socket, swivel joint and ratchet to break those bolts loose.
thanks so far to Joaquin03 and WaiJai for answering my questions. if anyone has any input, please feel free.
Last edited by drsifu1; Jun 3, 2009 at 03:14 AM.
Joined: May 2003
Posts: 2,395
Likes: 7
From: San Diego Area
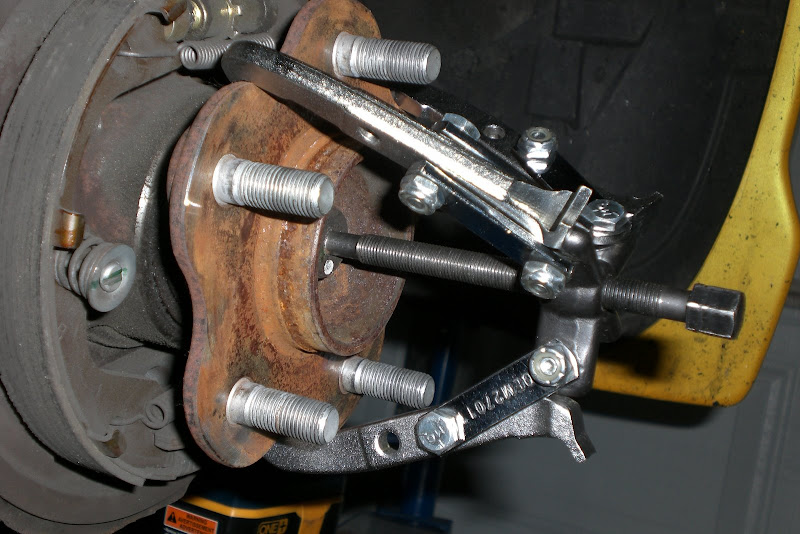
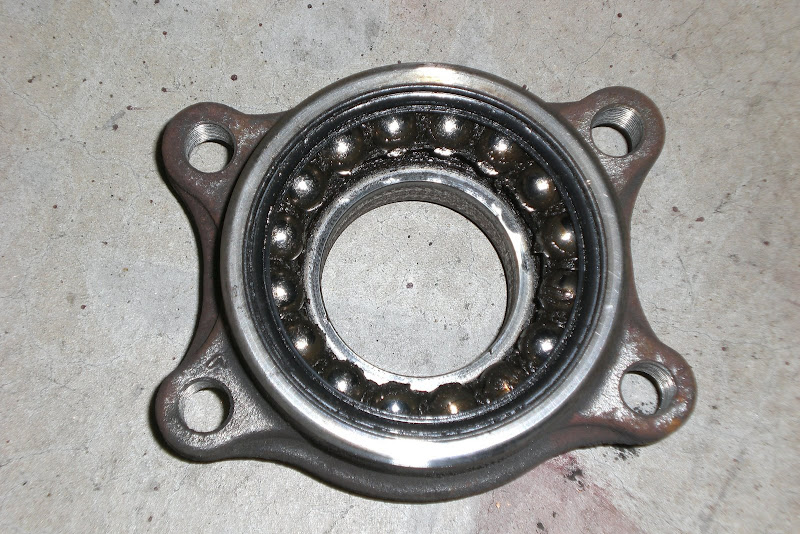
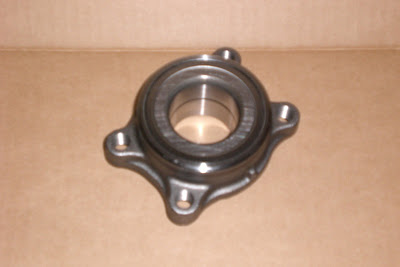
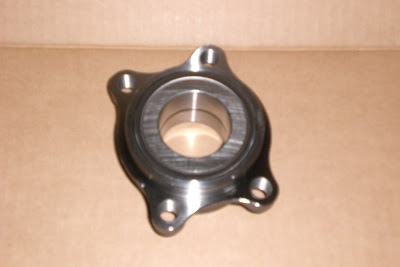
here is the bearing puller attached to the hub. crank down on the center with a 1/2" socket to separate the hub from the bearing.
picture of area after hub is removed:
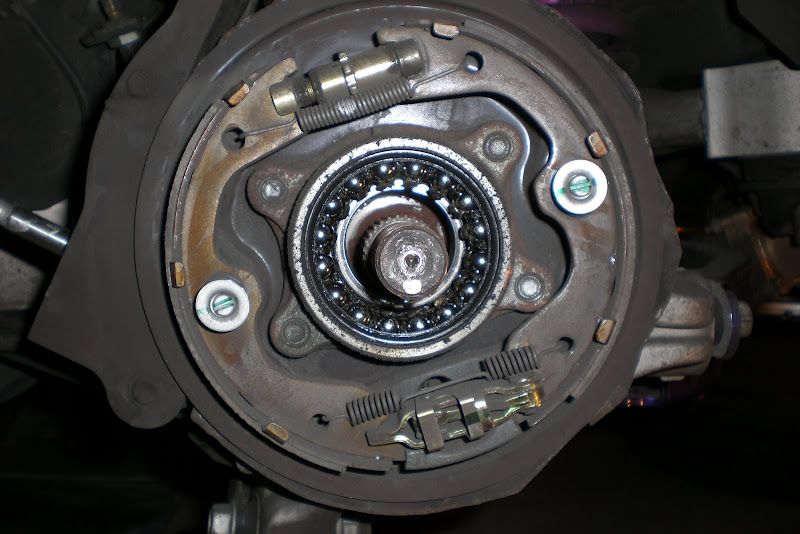
picture of hub removed:

You do not need to remove any suspension components to get access to those four bolts that hold the bearing in place. As I suspected, the shaft can be pushed in far enough to give you access to those four bolts. You'll need a 17mm socket and two different extensions to get to those bolts. First picture below is without the shaft pushed in and second picture is with it pushed in far enough to get access to the bolts. In the picture, I had already removed the bolts.

Picture after the bearing is removed:
Still waiting for parts to arrive before I put everything back together. Bearing looks to be in good shape. Below is a picture of Joaquin03's bearing compared to mine. His car has 133,000 miles on it. I still believe that when I drove around with a loose axle nut, it ruined my bearings. Hopefully I have made the correct diagnosis.
Joaquin03

DrSifu1
picture of area after hub is removed:
picture of hub removed:
You do not need to remove any suspension components to get access to those four bolts that hold the bearing in place. As I suspected, the shaft can be pushed in far enough to give you access to those four bolts. You'll need a 17mm socket and two different extensions to get to those bolts. First picture below is without the shaft pushed in and second picture is with it pushed in far enough to get access to the bolts. In the picture, I had already removed the bolts.
Picture after the bearing is removed:
Still waiting for parts to arrive before I put everything back together. Bearing looks to be in good shape. Below is a picture of Joaquin03's bearing compared to mine. His car has 133,000 miles on it. I still believe that when I drove around with a loose axle nut, it ruined my bearings. Hopefully I have made the correct diagnosis.
Joaquin03
DrSifu1
Last edited by drsifu1; Jun 3, 2009 at 03:36 AM.
Joined: May 2003
Posts: 2,395
Likes: 7
From: San Diego Area
installation pics to come, but it will go like this:
-bring new hub and bearing to dealership to press bearing into hub
-install bearing/hub assembly to axle and tighten four bolts (56-69 ft-lb)
-install 32 mm nut to drive shaft and hand tighten
-install rotor
-install caliper and tighten two nuts to mounting bracket
-apply brake or using e-brake while tightening 32mm axle nut to 152-202 ft-lb
-install wheel
-lower car
-enjoy new bearing
Last edited by drsifu1; Jun 3, 2009 at 06:56 AM.

Excellent write-up!!!! I recently replaced a rear wheel bearing and it was very easy! Key point is to have the dealer press in the new bearing as it does not come in one piece. A slide hammer will make the removal of the old bearing EASY.
Trending Topics
Joined: May 2003
Posts: 2,395
Likes: 7
From: San Diego Area
^agreed. thus far, the removal of the old parts has been relatively pain free.
can you let us know the price the dealer charged to press the new bearing to the hub?
new parts should arrive next Thursday, so I'll be able to finish up and post final pics that weekend.
now that you mentioned it, I should note this DIY is for those who are replacing the bearing along with the hub. if you are just replacing the bearing, than the additional step of removing the outer bearing from the back of the hub is necessary.
People may find it easier to diagnose a worn wheel bearing with the axle removed. I thought my axle was clicking and could not fix the noise by following the TSB. It ended up being my wheel bearing, as I spun the wheel (without the axle attached) I heard a slight grinding/rubbing noise.
I only replaced the bearing when I brought the hub and bearing assembly to the dealer. They had the bearing in stock and charged $125 of labor to press the bearing onto the hub. The rear wheel bearings are $85 each. I know that is VERY expensive, but I was in a rush and wanted to finish the project that day and found it easiest to have the dealer do everything. Once the new bearing is pressed onto the hub, installation will be a piece of cake.
I only replaced the bearing when I brought the hub and bearing assembly to the dealer. They had the bearing in stock and charged $125 of labor to press the bearing onto the hub. The rear wheel bearings are $85 each. I know that is VERY expensive, but I was in a rush and wanted to finish the project that day and found it easiest to have the dealer do everything. Once the new bearing is pressed onto the hub, installation will be a piece of cake.

Registered User
Joined: May 2009
Posts: 471
Likes: 2
you can re use the hub. you could have saved yourself some significant cash.
and you didnt remove it properly. you pulled the bearing apart. that shouldnt happen.
remove the bolts on the back, and the hub and bearing should come out in one piece.
and you didnt remove it properly. you pulled the bearing apart. that shouldnt happen.
remove the bolts on the back, and the hub and bearing should come out in one piece.
Joined: May 2003
Posts: 2,395
Likes: 7
From: San Diego Area
there is very limited space behind the axle to get to those four bolts. Without removing the axle itself, there is no way in hell you can fit a socket to get those bolts out.
before removing the hub assembly, I was able to push the shaft in far enough to get more room for the bolts, but still could not fit a socket to get them out. after I removed the hub, it gave me more room to wiggle the shaft to get my socket at those bolts.
how did you get to those four bolts? might help members avoid having to rent that tool from autozone.
noticed you are a mechanic at an Infiniti dealership? If so, any other tips you might have would be appreciated. Looking the the service manual, it instructs you to remove all the suspension components attached to the axle and than remove the axle itself. Another member removed some suspension components and the drive shaft where it connects to the differential to get to the bolts. I thought I was going the easier route, but maybe not. Any idea on costs to have the bearing pressed on?
PM sent
thanks in advance.
Last edited by drsifu1; Jun 8, 2009 at 11:18 AM.
Joined: May 2003
Posts: 2,395
Likes: 7
From: San Diego Area
reply from pwebb via PM:
"you can push the axle in enough to get a shallow swivel socket onto the nut. you could also use a shallow socket with a swivel extension. at that point all the bolts will be free, but most likely than not the hub will be stuck in place by a ring of rust and corrosion. a few well placed hits with a hammer will break it free.
the bearing should come off in one piece. the fact that you pulled it apart like that should have been a red flag the wrong procedure was used."
this is another way of approaching the removal of the wheel bearing. I do not own a shallow socket, so if you do, you can avoid having to remove the hub before the bearing and can do it as one piece. I don't see the harm in having the bearing separated in two pieces if you will be replacing the hub and bearing. Not sure if it makes much difference to have the bearing separated even if you re just replacing the bearing.
But thank you for the input. Gives everyone another way to do things.
Last edited by drsifu1; Jun 8, 2009 at 05:02 PM.
Joined: May 2003
Posts: 2,395
Likes: 7
From: San Diego Area
all the parts arrived today. i am starting to realize if you just wanted to replace the bearing, all you need to buy is the bearing. the seal back is a metal seal and probably doesn't need to be replaced nor does the nut or the hub. so maybe you shouldn;t waste the money like I did. i'll continue to convince myself it is best to replace everything
")

I would completely remove the axle from the car for the easiest access to the four hub bolts. That way you will be able to clean and re-grease the part of the axle that touches the hub.