
DIY: Rear Wheel Bearing Removal


I think it's pretty difficult to mess it up by just pressing it on.
I replaced my rear passenger bearing after I noticed it clicking. Only a few months later I noticed the rear driver side bearing humming really loud. Wish I just replaced both of them at the same time. I think both of your rear bearings need to be changed.
I replaced my rear passenger bearing after I noticed it clicking. Only a few months later I noticed the rear driver side bearing humming really loud. Wish I just replaced both of them at the same time. I think both of your rear bearings need to be changed.

Registered User
Joined: Jul 2007
Posts: 300
Likes: 0
From: ATL
I just finished doing my left rear and here are a few tips that might help
* Remove the driveshaft - for the 7 extra nuts/bolts it really makes life so much easier to see what you are doing and you can clean the drive splines and grease them
* Axle nut - I broke my 1/2 breaker bar trying to get the damned thing off. Use a propane torch and heat it up first.
I was able to hit it with an electric impact gun and after a minute of clattering away it slowly came off *phew*
I found I did not need a puller to push the axle from the hub but if it's stubborn and you must beat on the axle, put the nut back on it so the threads are flush and use a sacrificial socket on the nut then wail away, the nut has a flange on it so the socket will push the axle out and save your threads.... again, that torch is your friend !
If you pay attention and are careful you do not need a press to install the hub - I removed the hub/bearing and was able to drive the hub out of the bearing with the race stuck to the hub as shown in the pictures shown in earlier posts.
I used a high speed grinder with a cut off wheel and CAREFULLY cut the race 180 degrees as far as possible without nicking the hub - after that I hit it with a chisel and the race cracked in two.
Cleaned the hub with emery cloth and stuck it in a pan with ice/water and left it in the freezer for a few hours.
I used the head of a 13# sledge hammer that was 4" diameter, 5"high and placed the hub studs facing down so the bore of the hub was resting on the head ( any good solid chunk of metal will work as long as the wheel studs are not taking the stress)
I warmed up the bearing with a heat gun (emphasis on warm NOT hot) then carefully set the hub into the bearing and lightly seated it with my weight then tapping with a small hammer.
Freezing the hub will shrink the hub and heating the bearing will expand it- Makes things go much easier!
Once I was sure everything was square I used an old 1/2 thick flat steel bracket set on the bearing and seated everything with a 2# hand sledge.
It really didn't take that much force to get it seated - All I really wanted to do was get the hub started and take it to my friends press but it went really easy so I continued on and lucked out.
I will add though if you really are not experienced in driving bearing/races out and having the feel for when something is not right do not even try what i did... I saw someone posted that "if you don't know which way to loosen a bolt you shouldn't be doing this stuff"... It does sound mean but to a point is true.
Registered User
Joined: Jul 2007
Posts: 300
Likes: 0
From: ATL
Another question guys. I have a press now. Is there anything special that has to be done when you press the bearing onto the hub? Should there be any kind of lube put on the hub before you put the bearing on it? Is there some special action that should be taken to get the bearing started on the hub before you put it in the press and press it down?

In the middle of replacing mine. Just got the new bearings pressed on at a local machine shop. Putting everything back together tonight. Dismantling was pretty straight forward. Definitely remove the half shafts in order to gain access to the (4) hub bolts. This whole process is time consuming, not difficult at all.
New bearings cost $45 each, machine shop said he'd press them for free but I gave him $20
$110 total + one wasted weekend
Oh ya, put in 10 new wheel studs while I was at it.
New bearings cost $45 each, machine shop said he'd press them for free but I gave him $20
$110 total + one wasted weekend
Oh ya, put in 10 new wheel studs while I was at it.

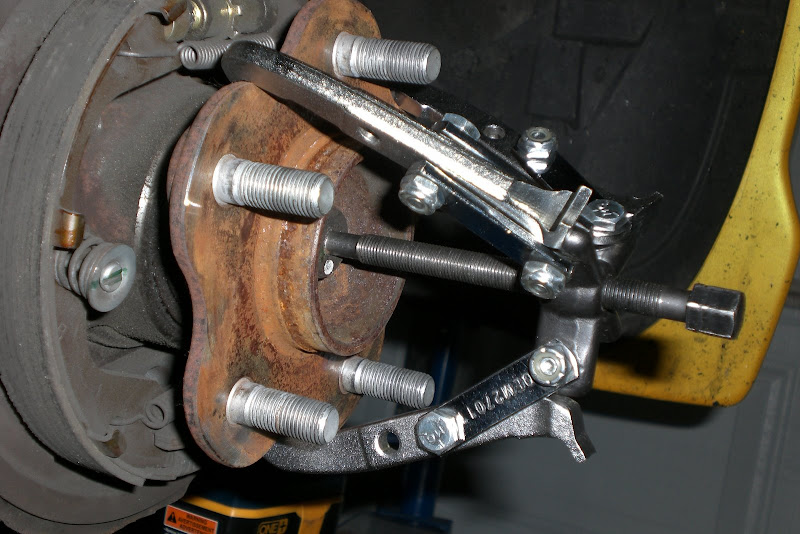
here is the bearing puller attached to the hub. crank down on the center with a 1/2" socket to separate the hub from the bearing.
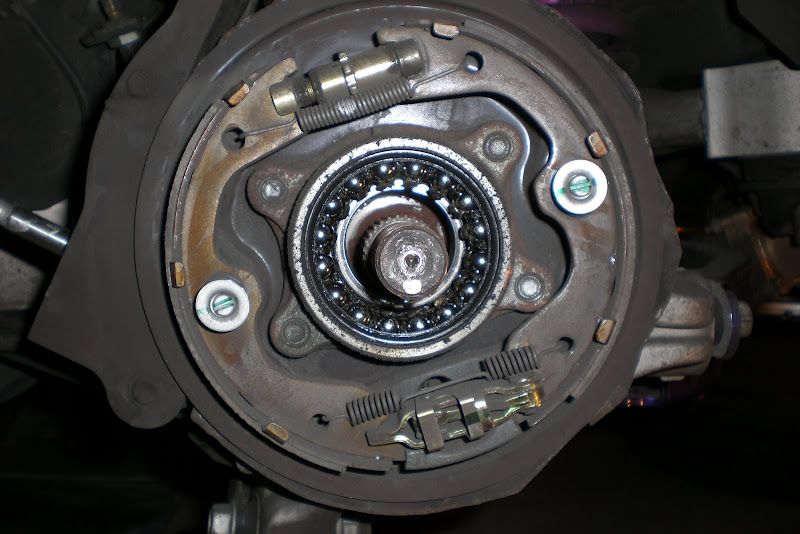
picture of area after hub is removed:
picture of hub removed:

Was wondering when you removed the hub there was a piece that was still attached to the hub. Do you have to remove it or does i stay on?
Was wondering when you removed the hub with the puller did you reuse that once piece that was still attached to the hub? or did that have to be removed?
You do not need to remove any suspension components to get access to those four bolts that hold the bearing in place. As I suspected, the shaft can be pushed in far enough to give you access to those four bolts. You'll need a 17mm socket and two different extensions to get to those bolts. First picture below is without the shaft pushed in and second picture is with it pushed in far enough to get access to the bolts. In the picture, I had already removed the bolts.

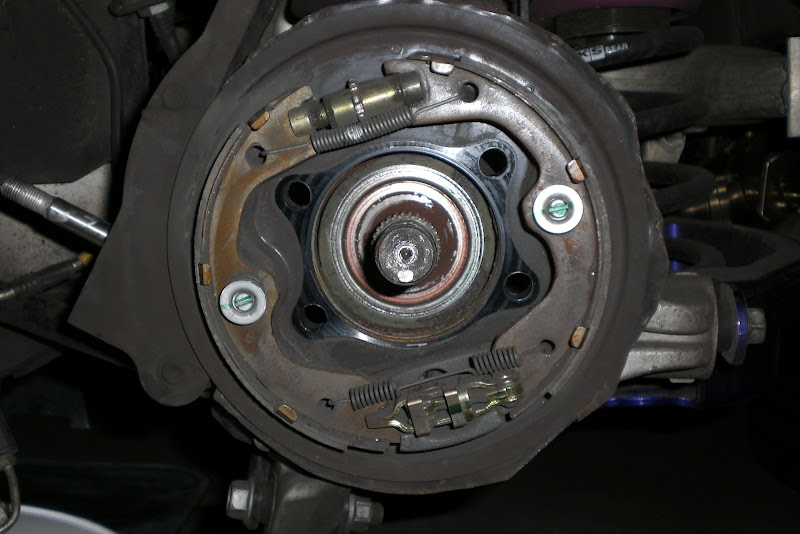
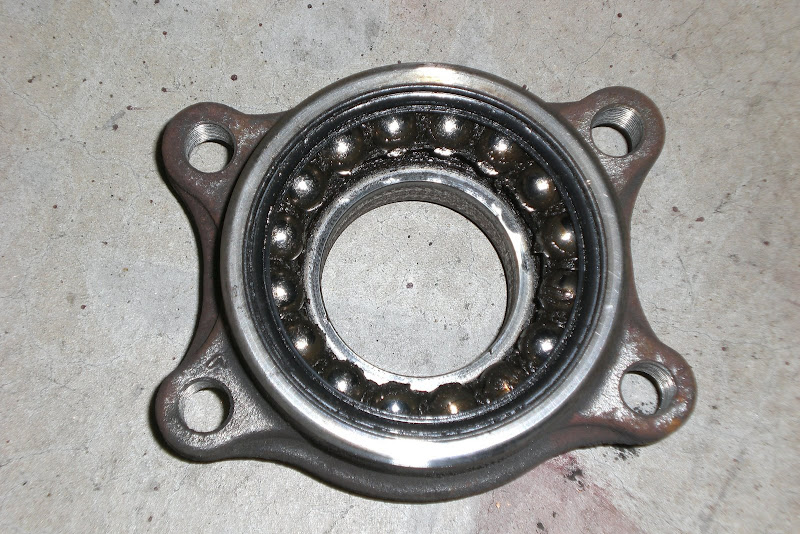
Picture after the bearing is removed:
Still waiting for parts to arrive before I put everything back together. Bearing looks to be in good shape. Below is a picture of Joaquin03's bearing compared to mine. His car has 133,000 miles on it. I still believe that when I drove around with a loose axle nut, it ruined my bearings. Hopefully I have made the correct diagnosis.
Joaquin03

DrSifu1
picture of area after hub is removed:
picture of hub removed:
Was wondering when you removed the hub there was a piece that was still attached to the hub. Do you have to remove it or does i stay on?
Was wondering when you removed the hub with the puller did you reuse that once piece that was still attached to the hub? or did that have to be removed?
You do not need to remove any suspension components to get access to those four bolts that hold the bearing in place. As I suspected, the shaft can be pushed in far enough to give you access to those four bolts. You'll need a 17mm socket and two different extensions to get to those bolts. First picture below is without the shaft pushed in and second picture is with it pushed in far enough to get access to the bolts. In the picture, I had already removed the bolts.
Picture after the bearing is removed:
Still waiting for parts to arrive before I put everything back together. Bearing looks to be in good shape. Below is a picture of Joaquin03's bearing compared to mine. His car has 133,000 miles on it. I still believe that when I drove around with a loose axle nut, it ruined my bearings. Hopefully I have made the correct diagnosis.
Joaquin03
DrSifu1
I thought so... That just means Auto parts warehouse did send me the wrong bearing UGH!!!! Was wondering why when I pressed the old bearing off and was about to press the new one on the hub dropped right in and had all this play around it. Said to myself that's just not right... Looks like car will be down for another day DAMIT!!!

Registered User
iTrader: (3)
Joined: May 2007
Posts: 4,383
Likes: 27
From: pinellas county FLA, queens N.Y.
Btw, just to add to this thread.
I ordered Timken front bearings for my X and pleasantly discovered them to be OEM NTN bearings in a Timken box. The box stated the bearings were not manufactured by Timken, but redistributed by them.
So, if you google these part numbers, you can find cheaper prices.
Front:
AWD: BM500013 (bearing only)
2wd : HA590027 (bearing and hub assey)
Rear
All: BM500006 (bearing only)
http://www.autozone.com/autozone/par...839_3214_7482_
for 71.99 per
im having issues with my rear drivers side i think my caliper is screwed as well .
and whene i recently replaced the rear pads .. they were down to bare metal on the inside pad and half way worn on the outside pad .
and the passenger side was half way worn on both inner and outer pads.
and i have the grinding whirling noise as i drive and feel pressure pushing back at me whene i brake in whirling pulses ..
so i think my caliper is fudged . as well as my bearings ..
any thoughts ??
any way i can tell if caliper is fudged .or if the uneven pad wear .is due to bad bearing only ..??
Last edited by WILLIE BEANS; Feb 8, 2013 at 09:39 PM.

Registered User
Joined: Jan 2010
Posts: 301
Likes: 19
From: Maryland
^I'm no expert but it sounds like your caliper isnt returning the brake pads to the proper position which is causing drag on the inside pad. Be sure to check that your pads are seated properly and that the return levers are in the correct positions. The other thing it could be is the caliper piston. If they arent lubed occasionally, the rubber boot can deteriorate, causing the piston to stick.
Registered User
iTrader: (3)
Joined: May 2007
Posts: 4,383
Likes: 27
From: pinellas county FLA, queens N.Y.
yeah im pretty sure the piston is sticking or seizing .
whene i replaced my pads . i also noticed that i had alot of rusty shards or pieces of what use to be the piston .sitting inbetween the piston and inside brake pad on my rear drivers side .
the pistons basically looks like they are deteriorating ..
im going under the car later today .to see if theres any way i can tell if the bearings on the rear drivers side are bad .
Registered User
Joined: Jan 2010
Posts: 301
Likes: 19
From: Maryland
Here you go:
Hub Assembly 43202-A9000
Bearing Assembly 43210-AL505
These are for a sedan's rear end; not sure if theres a difference between sedans and coupes...
Hub Assembly 43202-A9000
Bearing Assembly 43210-AL505
These are for a sedan's rear end; not sure if theres a difference between sedans and coupes...
Last edited by GreenPenguin; Mar 1, 2013 at 08:01 AM.

Registered User
Joined: Jan 2011
Posts: 130
Likes: 2
From: Houston
You know if the rwd and AWD are the same?

Registered User
Joined: Feb 2011
Posts: 7
Likes: 1
Is DIY worth it?
Assuming your time is worth something (I know mine is), it sounds like having a shop do the job might make more sense.
I see that there are a couple hundred dollars in parts
Some guys are buying presses so that's an additional expense
Then labor:
So the question is, if you get a reasonable quote from a reputable shop (not a dealer), assuming the parts costs are not too far off from online prices, what makes more sense? Wasting a weekend or having the work done by a pro?
I could do this job but it sounds like around 10 hours or so when including ALL labor. So if a shop could do it for under $500 (including parts, that sounds like it could be better route to go (unless mechanic work really winds your watch).
I see that there are a couple hundred dollars in parts
Some guys are buying presses so that's an additional expense
Then labor:
- Involving: friends and neighbors
- There is the time to go and get the assembly pressed at a shop (which not only costs $ but also your travel and waiting time)
- Your labor for the removal/reassembly process which might be extensive due to corrosion or other unforeseen problems.
So the question is, if you get a reasonable quote from a reputable shop (not a dealer), assuming the parts costs are not too far off from online prices, what makes more sense? Wasting a weekend or having the work done by a pro?
I could do this job but it sounds like around 10 hours or so when including ALL labor. So if a shop could do it for under $500 (including parts, that sounds like it could be better route to go (unless mechanic work really winds your watch).