
DIY: Rear Wheel Bearing Removal


Registered User
Joined: Jan 2011
Posts: 130
Likes: 2
From: Houston
Assuming your time is worth something (I know mine is), it sounds like having a shop do the job might make more sense.
I see that there are a couple hundred dollars in parts
Some guys are buying presses so that's an additional expense
Then labor:
So the question is, if you get a reasonable quote from a reputable shop (not a dealer), assuming the parts costs are not too far off from online prices, what makes more sense? Wasting a weekend or having the work done by a pro?
I could do this job but it sounds like around 10 hours or so when including ALL labor. So if a shop could do it for under $500 (including parts, that sounds like it could be better route to go (unless mechanic work really winds your watch).
I see that there are a couple hundred dollars in parts
Some guys are buying presses so that's an additional expense
Then labor:
- Involving: friends and neighbors
- There is the time to go and get the assembly pressed at a shop (which not only costs $ but also your travel and waiting time)
- Your labor for the removal/reassembly process which might be extensive due to corrosion or other unforeseen problems.
So the question is, if you get a reasonable quote from a reputable shop (not a dealer), assuming the parts costs are not too far off from online prices, what makes more sense? Wasting a weekend or having the work done by a pro?
I could do this job but it sounds like around 10 hours or so when including ALL labor. So if a shop could do it for under $500 (including parts, that sounds like it could be better route to go (unless mechanic work really winds your watch).

Registered User
Joined: Jul 2007
Posts: 300
Likes: 0
From: ATL
Ten hours?! No way. I bought my press from Harbor Freight with a coupon that I paid like a dollar for on ebay. Yeah, I bought a coupon. But it made the press only about sixty bucks. Changing two bearings makes that worth it. And then I have the inner bushing on my left lower control arm that needs replacing, and I'll get to use the press again. Definitely beat paying the stealership. And I have the peace of mind of knowing they didn't screw something else up so they could then replace that and charge me for it too. With 230K, it'd be so easy to say this or that needs replacing and then charge me another $250. I freakin hate them.

Registered User
Joined: Jul 2011
Posts: 124
Likes: 0
From: Northeast Ohio
I think my driver side rear bearing needs replaced. I've done both fronts in the last year and I think the rear is starting to go as well. 75,000 miles 2006 G35X. So it sounds like for the rears I just need the bearing and not the hub like I did on the fronts correct?
Also, if anyone in the NE Ohio area has done this before DIY and would be willing to do mine, I'd gladly pay you for your time!
Also, if anyone in the NE Ohio area has done this before DIY and would be willing to do mine, I'd gladly pay you for your time!
Registered User
Joined: Jul 2007
Posts: 300
Likes: 0
From: ATL
I think my driver side rear bearing needs replaced. I've done both fronts in the last year and I think the rear is starting to go as well. 75,000 miles 2006 G35X. So it sounds like for the rears I just need the bearing and not the hub like I did on the fronts correct?
Also, if anyone in the NE Ohio area has done this before DIY and would be willing to do mine, I'd gladly pay you for your time!
Also, if anyone in the NE Ohio area has done this before DIY and would be willing to do mine, I'd gladly pay you for your time!

Registered User
Joined: Mar 2013
Posts: 2
Likes: 0
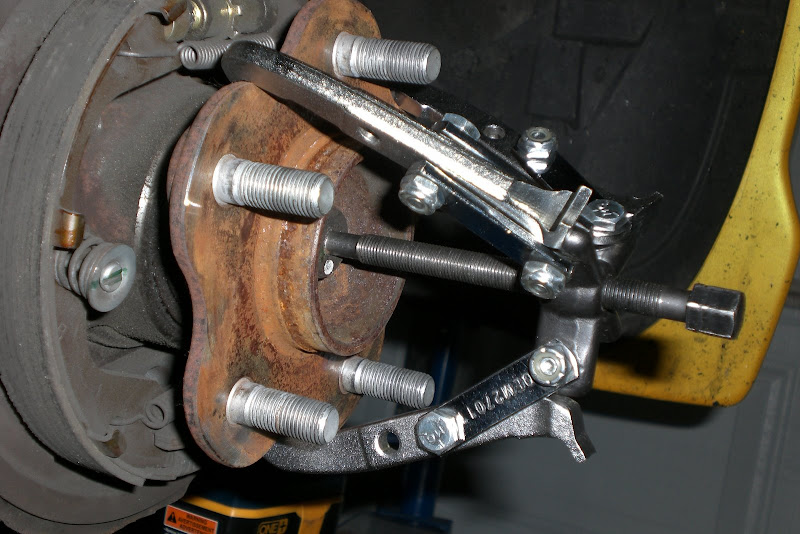
here is the bearing puller attached to the hub. crank down on the center with a 1/2" socket to separate the hub from the bearing.
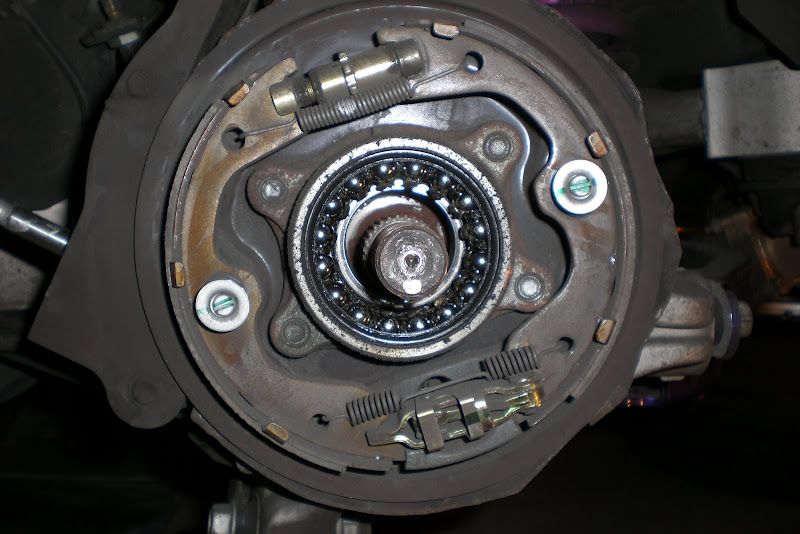
picture of area after hub is removed:
picture of hub removed:

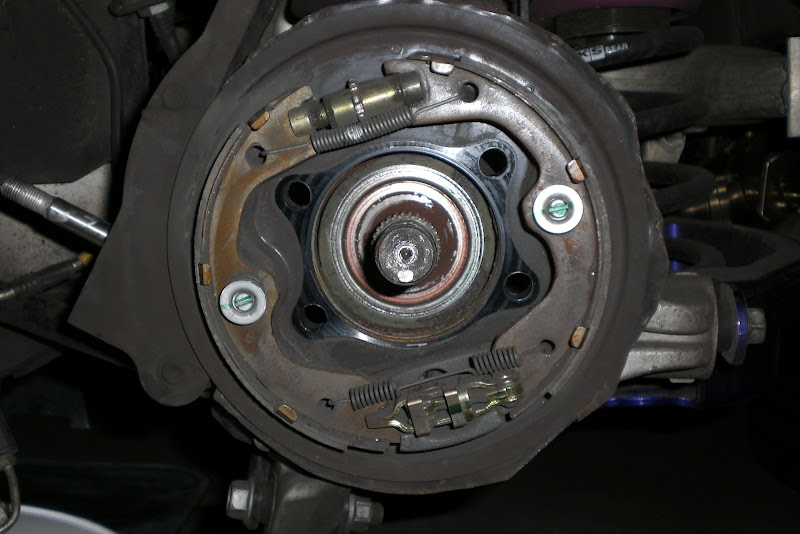
You do not need to remove any suspension components to get access to those four bolts that hold the bearing in place. As I suspected, the shaft can be pushed in far enough to give you access to those four bolts. You'll need a 17mm socket and two different extensions to get to those bolts. First picture below is without the shaft pushed in and second picture is with it pushed in far enough to get access to the bolts. In the picture, I had already removed the bolts.

Picture after the bearing is removed:
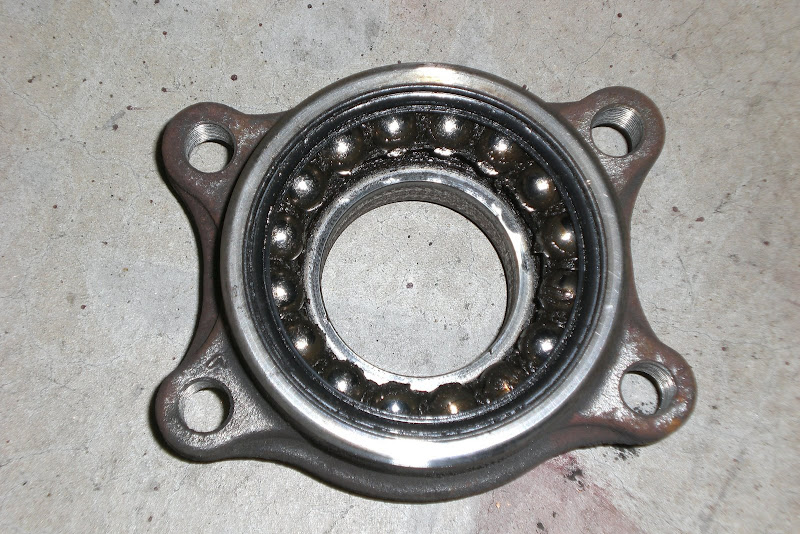
Still waiting for parts to arrive before I put everything back together. Bearing looks to be in good shape. Below is a picture of Joaquin03's bearing compared to mine. His car has 133,000 miles on it. I still believe that when I drove around with a loose axle nut, it ruined my bearings. Hopefully I have made the correct diagnosis.
Joaquin03

DrSifu1
picture of area after hub is removed:
picture of hub removed:
You do not need to remove any suspension components to get access to those four bolts that hold the bearing in place. As I suspected, the shaft can be pushed in far enough to give you access to those four bolts. You'll need a 17mm socket and two different extensions to get to those bolts. First picture below is without the shaft pushed in and second picture is with it pushed in far enough to get access to the bolts. In the picture, I had already removed the bolts.
Picture after the bearing is removed:
Still waiting for parts to arrive before I put everything back together. Bearing looks to be in good shape. Below is a picture of Joaquin03's bearing compared to mine. His car has 133,000 miles on it. I still believe that when I drove around with a loose axle nut, it ruined my bearings. Hopefully I have made the correct diagnosis.
Joaquin03
DrSifu1
will this one work?
Registered User
Joined: Jul 2007
Posts: 300
Likes: 0
From: ATL
Maybe you could fit a bearing and hub in there to press them together, but I don't think that one will give you enough space vertically to separate the hub and bearing. This is what I got.
http://www.harborfreight.com/12-ton-...ess-33497.html
Had to use some strategery to get the bearings off the hubs, but putting the new bearing on the hubs was a cinch.
http://www.harborfreight.com/12-ton-...ess-33497.html
Had to use some strategery to get the bearings off the hubs, but putting the new bearing on the hubs was a cinch.
Registered User
Joined: Mar 2013
Posts: 2
Likes: 0
Maybe you could fit a bearing and hub in there to press them together, but I don't think that one will give you enough space vertically to separate the hub and bearing. This is what I got.
http://www.harborfreight.com/12-ton-...ess-33497.html
Had to use some strategery to get the bearings off the hubs, but putting the new bearing on the hubs was a cinch.
http://www.harborfreight.com/12-ton-...ess-33497.html
Had to use some strategery to get the bearings off the hubs, but putting the new bearing on the hubs was a cinch.
Could you describe your strategy of pressing out the old bearing? Obviously a bearing puller won't work as this tears apart the bearing assembly and leaves part of it on the hub.
Nissan pisses me off sometimes.
Registered User
Joined: Jul 2007
Posts: 300
Likes: 0
From: ATL
I couldn't figure out how to separate them on the press with the stuff I had, so I used four old rotors I had recently changed out. I used C-clamps to bind one pair (a front and a rear) with the outside sides of the rotors facing (so they would like H's) and then did the same with the other pair. I turned them flat (front rotors on top so there was more space on the bottom) and hung the bearing edges on the top rotors. I found something that fit down in the bearing about the diameter of the splined part of the hub and wailed away with a hammer until that sucker fell out. I couldn't find anything and didn't want to ruin any sockets I had so I ordered this freaking huge washer from Grainger with the exact diameter I needed. Lemme know if you need pics of this wacky setup; or I could draw it in windows' paint program later.
Okay here's a drawing. Crude but I think it shows what I did. I forgot to show the clamps, though, but you can probably guess you'd have to put them through the centers of the rotors and keep the clamp away from the center of the whole setup so that you have the space for hammerin'. Hope this at least gives you some ideas.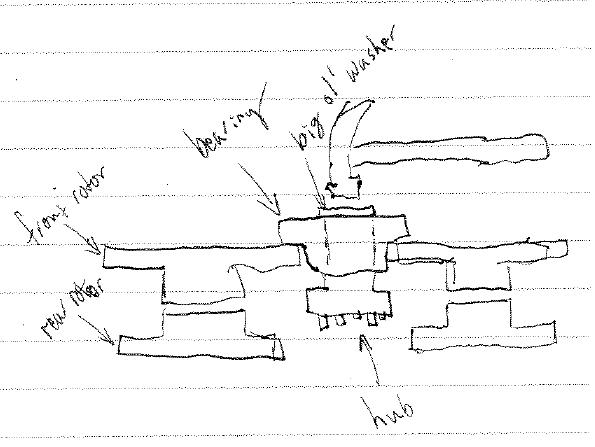
Putting the new bearing on the hub with my nifty press took all of 90 seconds, and I was taking it really slowly to make sure I didn't screw anything up.
Last edited by obsdnoblivion; Mar 14, 2013 at 12:46 PM. Reason: Add image.

Registered User
Joined: Nov 2012
Posts: 5
Likes: 0
I just replaced the bearing on my G this weekend. In one of the pictures it shows a dust ring, but when I pressed my hub out of the old bearing I didn't see that ring. I had to cut the top portion of the bearing off because it was fused onto the hub, so maybe it was part of that and I didn't notice. When I pressed the new bearing on, I didn't add that ring. Will this cause any issues? I would hate to go through this whole process again for that ring not being there. Thanks

Registered User
Joined: Jan 2010
Posts: 301
Likes: 19
From: Maryland
I just replaced the bearing on my G this weekend. In one of the pictures it shows a dust ring, but when I pressed my hub out of the old bearing I didn't see that ring. I had to cut the top portion of the bearing off because it was fused onto the hub, so maybe it was part of that and I didn't notice. When I pressed the new bearing on, I didn't add that ring. Will this cause any issues? I would hate to go through this whole process again for that ring not being there. Thanks
The pictures you mention above show the bearing being taken apart in TWO pieces. The same happened to me- when i took the old hub off my car, one piece of the bearing came off with it while the other was rusted solid to the knuckle exposing the packing grease and ***** inside. If you were able to get your bearing off in one piece congrats. There was definitly no dust cover with my assembly.
Registered User
Joined: Nov 2012
Posts: 5
Likes: 0
The pictures you mention above show the bearing being taken apart in TWO pieces. The same happened to me- when i took the old hub off my car, one piece of the bearing came off with it while the other was rusted solid to the knuckle exposing the packing grease and ***** inside. If you were able to get your bearing off in one piece congrats. There was definitly no dust cover with my assembly.


Can someone link me to the coupe bearings for the front and back? I am tired of searching and want to replace these ASAP  . I would appreciate something better then OEM quality, but OEM is fine too! Also if there is any necessary grease I should buy let me know that too
. I would appreciate something better then OEM quality, but OEM is fine too! Also if there is any necessary grease I should buy let me know that too
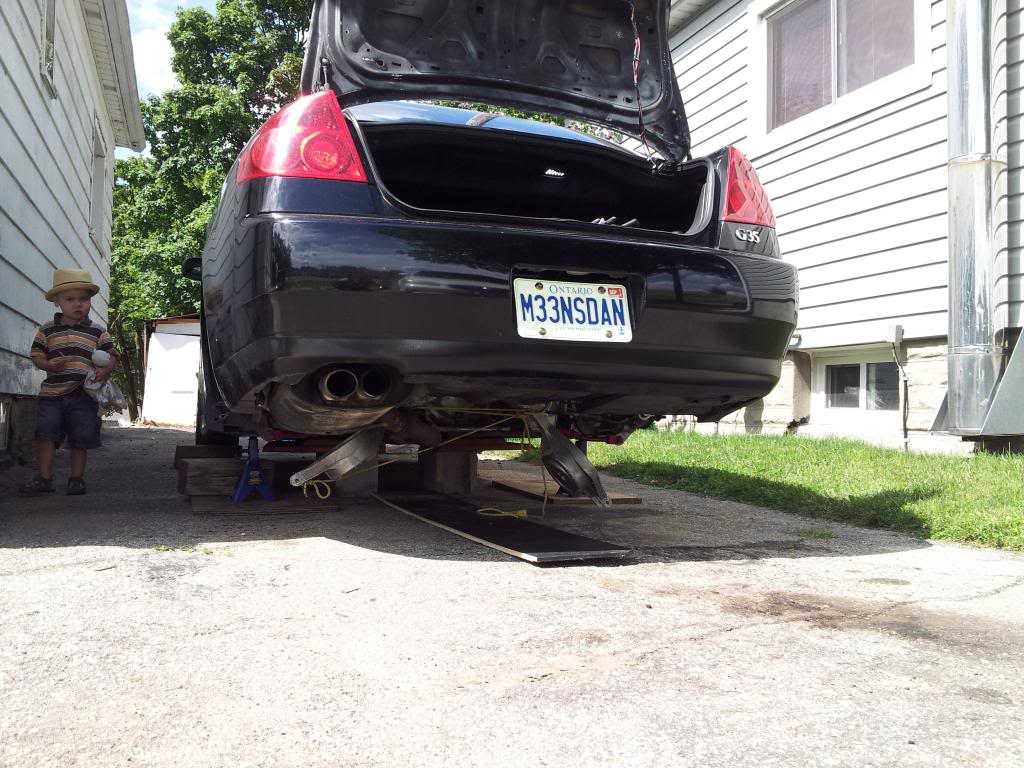
How I did it:
I chose to drop the spring buckets. You can do it without but it's a big PITA especially if you need to do this in your driveway, and you will probably need a big bar to crack the bolts free on the calipers and the wheel bearings, so the added room is priceless considering how easy it is to drop the spring buckets 
Use a jack to support the bucket, remove the one 17mm Head bolt closest to the wheel end, and lower/pry it out as you lower the jack, then remove the spring. If the bushing is tight you can use rope, etc to keep it down and out of the way (as pictured).
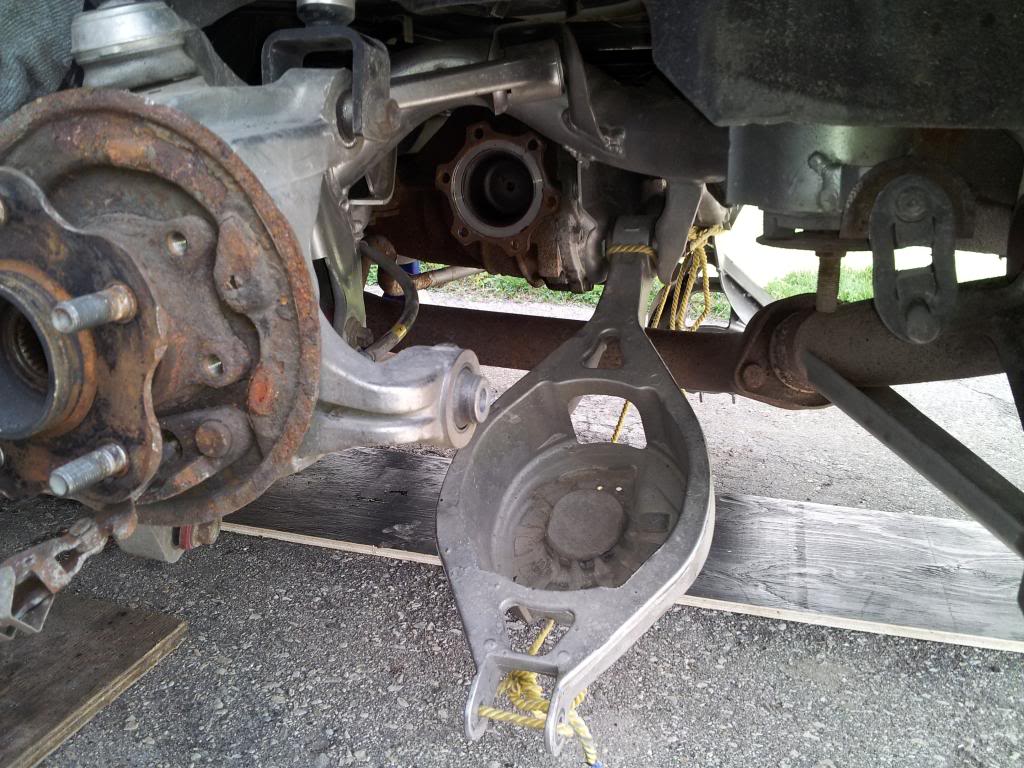
At this point you have easy access to pull the CV shafts out safely without tearing the boots, and you have access to get a bar on the wheel bearing and Caliper bolts, which will likely be tighter than heck, especially if you live in a climate like mine!
Use a jack to support the bucket, remove the one 17mm Head bolt closest to the wheel end, and lower/pry it out as you lower the jack, then remove the spring. If the bushing is tight you can use rope, etc to keep it down and out of the way (as pictured).


At this point you have easy access to pull the CV shafts out safely without tearing the boots, and you have access to get a bar on the wheel bearing and Caliper bolts, which will likely be tighter than heck, especially if you live in a climate like mine!