DIY: Power steering and Alternator/ Air conditioning belt change


Joined: Aug 2006
Posts: 7,244
Likes: 23
From: Austin, Texas
DIY: Power steering and Alternator/ Air conditioning belt change
Well guys my belts were finally starting to become dry rotted after 70,000 Miles. While i was changing the belts i figured i would make a DIY on how to do it.....Hope it helps here you go!
This is for 03 and 04 Auto Coupes
A/C Belt -- http://www.trademotion.com/partlocat...03&catalogid=2
Alternator Belt --- http://www.trademotion.com/partlocat...03&catalogid=2
Tools : Jack, jack stands, 9/16 Wrench, 9/16 Socket and Wrench, 12MM socket, and 10MM socket.
1. First thing to do is obviously get the car up on some safe jack stands and have enough room so you can be under the car.
2. Once the car is off the ground there is the plastic peice or sheild that covers the bottom of the engine from contaminants on the groud. You will need a 10MM socket and the socket wrench to take off the screws that hold the plastic peice up (there are around 30 i believe).
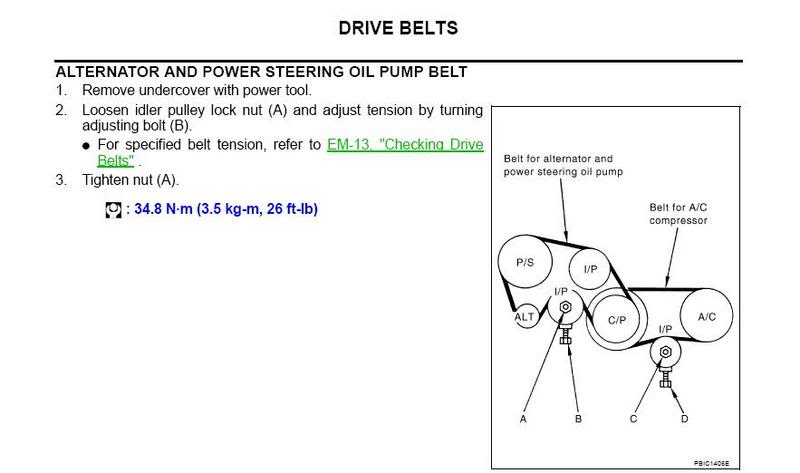
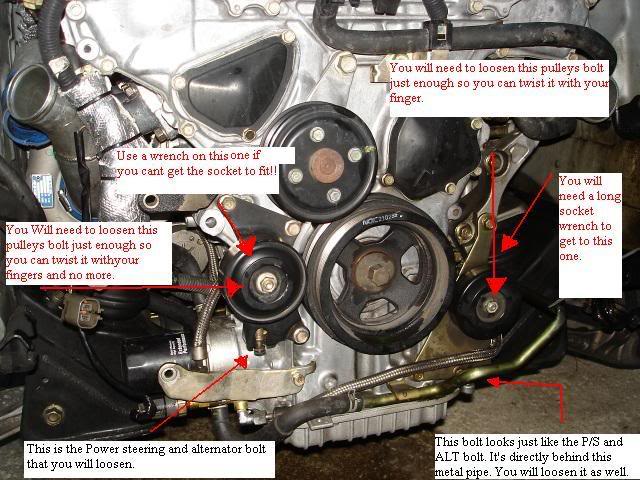
3. After you have taken off the bottom plastic peice you will then be able to access the bolts that add tension to the pulleys. Before you loosen these bolts you will need to LOOSEN (dont take off) the pulley bolts first (In the picture i show which ones to loosen in red). Use a 9/16 wrench on the Power steering and Alternator pulley bolt and use a 9/16 socket on the A/C pulley bolt. Once you have loosened the bolts on the pulleys you will then be ready to get underneith the car and loosen the bolts that force the pulley up.
The bolts you are about to loosen do not come off so dont keep loosening them. The more you loosen the bolt the lower the pulley comes to the ground.
4. Now slide under the car and look at the oil pan. Just to the front left of the oil pan you will see a gold colored bolt that is facing directly at the ground. Start loosening this bolt using a 12MM socket and after a few turns you will see the pulley starting to lower towards you. Loosen it enough so that the A/C belt has enough slack to come off without a problem.
5. Now you are ready to loosen the Power steering and Alternator bolt. It will be a little hidden, but it is not hard to find at all. It is a gold color as well and is also facing directly at the ground. Begin to loosen this bolt using the 12MM socketas well, loosen it just enough so there is slack on the belt and you will have no problem switching it.
6. Now you just need to slide the 2 pulleys off and replace them. Note that the A/C belt is towards the back and the Power Steering and Alternator belt is in the front.
7. Once you have replaced the Belts it is now time to tighten up the bottom bolts (underneith the car). Start with either one, but make sure that the pulleys are lined up with the rivits on the belt. Get under the car and tighted the 2 gold belts with the 12MM socket. Tighten them until they are fairly tight, the bolts will not tighten to the point where you need force...they will be snug.
8. After you have tightened the bottom 2 golden colored bolts it is now time to tighten the pulleys. Get you 9/16 wrench and begin to tighten the Power Steering and Alternator pulley. Crank it so that it is pretty damn tight, not super tight, but tight. Then get your 9/16 socket and tighten the A/C belt so that it is not super tight but snug as well (a little force).
9. After you have tighten both the pulleys using the 9/16 wrench and the 9/16 socket be sure to inspect that the belts are tight and snug and that they line up perfect. Do not let any part of the belt be hanging over the pulleys.
10. Now put the key in the ignition, do not sit in the car with the jack stands holding the car up, and just turn it over to pre ignition and you will hear the belts turn a couple times. Have someone standing there to see that the belts turned smoothly with no problems. This way if the belt is not on correctly it will come off before you lower the car and attach the plastic...so you wont have to take everything off and jack the car up again.
11. That should complete it for the belt change. Now just bolt on that bottom plastic peice and you should be ready to rock. Lower the car back down to the ground and turn it on. Be sure to listen for a second to make sure everything sounds normal before getting out of the car.
Below is the picture of the VQ engine and the pulleys and bolts you need to loosen.
[
-Sean
This is for 03 and 04 Auto Coupes
A/C Belt -- http://www.trademotion.com/partlocat...03&catalogid=2
Alternator Belt --- http://www.trademotion.com/partlocat...03&catalogid=2
Tools : Jack, jack stands, 9/16 Wrench, 9/16 Socket and Wrench, 12MM socket, and 10MM socket.
1. First thing to do is obviously get the car up on some safe jack stands and have enough room so you can be under the car.
2. Once the car is off the ground there is the plastic peice or sheild that covers the bottom of the engine from contaminants on the groud. You will need a 10MM socket and the socket wrench to take off the screws that hold the plastic peice up (there are around 30 i believe).
3. After you have taken off the bottom plastic peice you will then be able to access the bolts that add tension to the pulleys. Before you loosen these bolts you will need to LOOSEN (dont take off) the pulley bolts first (In the picture i show which ones to loosen in red). Use a 9/16 wrench on the Power steering and Alternator pulley bolt and use a 9/16 socket on the A/C pulley bolt. Once you have loosened the bolts on the pulleys you will then be ready to get underneith the car and loosen the bolts that force the pulley up.
The bolts you are about to loosen do not come off so dont keep loosening them. The more you loosen the bolt the lower the pulley comes to the ground.
4. Now slide under the car and look at the oil pan. Just to the front left of the oil pan you will see a gold colored bolt that is facing directly at the ground. Start loosening this bolt using a 12MM socket and after a few turns you will see the pulley starting to lower towards you. Loosen it enough so that the A/C belt has enough slack to come off without a problem.
5. Now you are ready to loosen the Power steering and Alternator bolt. It will be a little hidden, but it is not hard to find at all. It is a gold color as well and is also facing directly at the ground. Begin to loosen this bolt using the 12MM socketas well, loosen it just enough so there is slack on the belt and you will have no problem switching it.
6. Now you just need to slide the 2 pulleys off and replace them. Note that the A/C belt is towards the back and the Power Steering and Alternator belt is in the front.
7. Once you have replaced the Belts it is now time to tighten up the bottom bolts (underneith the car). Start with either one, but make sure that the pulleys are lined up with the rivits on the belt. Get under the car and tighted the 2 gold belts with the 12MM socket. Tighten them until they are fairly tight, the bolts will not tighten to the point where you need force...they will be snug.
8. After you have tightened the bottom 2 golden colored bolts it is now time to tighten the pulleys. Get you 9/16 wrench and begin to tighten the Power Steering and Alternator pulley. Crank it so that it is pretty damn tight, not super tight, but tight. Then get your 9/16 socket and tighten the A/C belt so that it is not super tight but snug as well (a little force).
9. After you have tighten both the pulleys using the 9/16 wrench and the 9/16 socket be sure to inspect that the belts are tight and snug and that they line up perfect. Do not let any part of the belt be hanging over the pulleys.
10. Now put the key in the ignition, do not sit in the car with the jack stands holding the car up, and just turn it over to pre ignition and you will hear the belts turn a couple times. Have someone standing there to see that the belts turned smoothly with no problems. This way if the belt is not on correctly it will come off before you lower the car and attach the plastic...so you wont have to take everything off and jack the car up again.
11. That should complete it for the belt change. Now just bolt on that bottom plastic peice and you should be ready to rock. Lower the car back down to the ground and turn it on. Be sure to listen for a second to make sure everything sounds normal before getting out of the car.
Below is the picture of the VQ engine and the pulleys and bolts you need to loosen.
[
-Sean
Last edited by Nismo G; Aug 29, 2007 at 12:24 PM.


Registered User
Joined: Jan 2004
Posts: 1,504
Likes: 2
Originally Posted by Nismo G
After you have tightened the bottom 2 golden colored bolts it is now time to tighten the pulleys. Get you 9/16 wrench and begin to tighten the Power Steering and Alternator pulley. Crank it so that it is pretty damn tight, not super tight, but tight. Then get your 9/16 socket and tighten the A/C belt so that it is not super tight but snug as well (a little force).

Originally Posted by avs007
I don't know about super-tight. The service manual says these bolts are only supposed to be tightened to 26 pound ft.
Thanks,