
DIY - Painting Your Headlights


Joined: Jun 2003
Posts: 14,505
Likes: 451
From: NorCal
^Hey stranger  Glad to hear they are holding up after all this time. You did a great job on them
I just didn't want to do anymore headlights which is the main reason I wrote this DIY lol
I still need to add pictures one day though

Glad to hear they are holding up after all this time. You did a great job on them I just didn't want to do anymore headlights which is the main reason I wrote this DIY lol
I still need to add pictures one day though


Joined: Jun 2003
Posts: 14,505
Likes: 451
From: NorCal
^You just did up your OEM headlights or did you use eBay lenses...etc?
You can buy some butyl and open them up and reseal them if the condensation didn't go away already.
http://www.mynismo.com/products/?id=5577&rsku=0
You can buy some butyl and open them up and reseal them if the condensation didn't go away already.
http://www.mynismo.com/products/?id=5577&rsku=0
Joined: Jun 2003
Posts: 14,505
Likes: 451
From: NorCal
I just added some pics (finally!) and cleaned up some of the verbage. I'll be adding more pics later on to complete the DIY
Photobucket is being a pain...I'll try to fix the first pic tomorrow.
Photobucket is being a pain...I'll try to fix the first pic tomorrow.
 on making an already great DIY, dummy proof.


^You just did up your OEM headlights or did you use eBay lenses...etc?
You can buy some butyl and open them up and reseal them if the condensation didn't go away already.
http://www.mynismo.com/products/?id=5577&rsku=0
You can buy some butyl and open them up and reseal them if the condensation didn't go away already.
http://www.mynismo.com/products/?id=5577&rsku=0
Haha I'll be in west Virginia next week lol
Joined: Jun 2003
Posts: 14,505
Likes: 451
From: NorCal
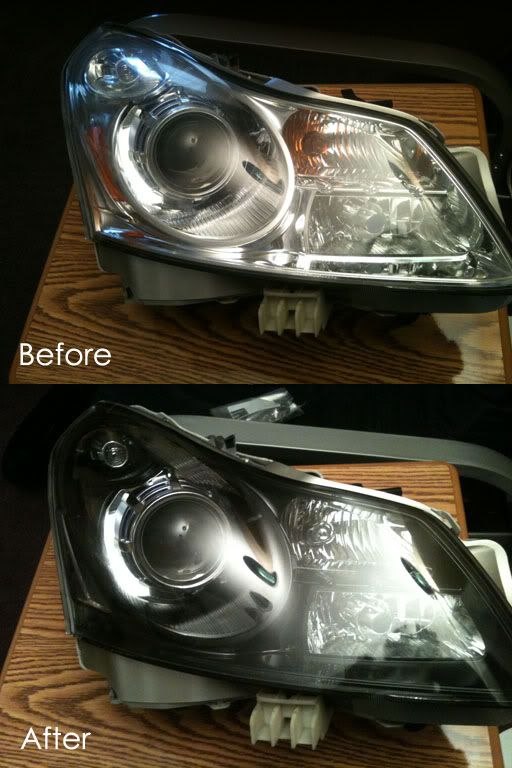
Very nice! I like how you left the shrouds chrome. Nice touch

A couple questions:
My headlights are moderately oxidized already going into the project so should I buff them before baking and painting or after?
What kind of paint should I use? I'm look for a matte black finish.
Also, since I'm already going to have the headlight open and all, I might as well switch my low beams to 6000k from stock so where could I get the best quality aftermarket bulbs that won't stop working within a month? lol
Thanks in advance, this is a great DIY write up.
Joined: Jun 2003
Posts: 14,505
Likes: 451
From: NorCal
Have you already tried using PlastiX Lens Cleaner to remove the haze?
It doesn't matter if you do it before or after.
I've been using Duplicolor Bumper Coating for headlights and just about all other parts in and out. It's a really dark matte black. I love the finish of it.
There's a lot of different bulbs to get. I'm just using a cheap non-name brand bulb so I don't really have much experience with others. Philips, PIAA are some name brands that I've used for other bulb replacements and had them on for years with none burning out yet.
Happy modding


Sooooo prying these things open are a pain in the ***. Is there any special trick you guys used or any thing that worked for you all? Got it slightly used but its hella stuck on there