

Makeshift Oil Catch Can


Registered User
Joined: Aug 2010
Posts: 199
Likes: 3
From: Los Lunas NM
Ok then Yea they are two diffrent Filters. And yes i have read that some or most people dont use the filter. I was too not using the filter untill i found excessive amount of oil bieng passed through the other side into the manifold. Now that i have of 1 HD catch can(without filter) hooked up for the oil to hit and break off to liquid and the second HD catch can(With Filter) to filter excessive oil and it seems to be working perfect. Also I dont have to dump the filters out because Of there bieng two points for the oil to break up and be caught in. I checked the line going into the mani and nothing so now i kno this is an effective way of catch ing the oil and none getiing passed through

Registered User
Joined: Aug 2010
Posts: 199
Likes: 3
From: Los Lunas NM
The pvc throws quite a bit of oil maybe half a quart or some have said 1 hole quart they have seen lost wen using catch can setups within a 3000 interval oil change. Id really doubt that the vq35de burns oil but i could be wrong. Just my two cents


Was going to post a new thread with my catch can setup I just installed, but I then figured it'd be best to post it here..
So I referred to my own parts/install on my last car (an '03 Nissan Altima 2.5S) here:
http://www.nissanclub.com/forums/eng...cuum-leak.html
Same exact concept.. So my part listing is as follows:
I'll post back this weekend on how much oil fills up!
So I referred to my own parts/install on my last car (an '03 Nissan Altima 2.5S) here:
http://www.nissanclub.com/forums/eng...cuum-leak.html
Same exact concept.. So my part listing is as follows:
- modified Home Depot Husky air compressor 3/8" inline filter (removed unnecessary pieces, bored out the restrictive uptake piece, and filled the bottom plug with RTV after boring it out)
- 3/8" male barbed x 3/8" male threaded 90� fittings (x2) bought off amazon @
- "plumber's tape" (used on the threaded fittings for a good seal)
- approximately 2-3 feet of fuel injection hose
- small >3/8" hose clamps (x4)
- large hose clamp to clamp it to the closest resevoir
- new PCV valve
- 3/8" male barbed x 3/8" male threaded 90� fittings (x2) bought off amazon @
- "plumber's tape" (used on the threaded fittings for a good seal)
- approximately 2-3 feet of fuel injection hose
- small >3/8" hose clamps (x4)
- large hose clamp to clamp it to the closest resevoir
- new PCV valve
I'll post back this weekend on how much oil fills up!


out of curiosity, will it be more harmful to add one on now if i have over 150,000 miles and have never ever taken off my plenum? I did replace my TB and there was oil at the end of plenum.

No way a catch can would be harmful in any way, it simply removes oil vapor waste that is otherwise meant to be burnt up in your engine... adding a catch can is a great idea at any mileage
Last edited by UR2EZ; May 2, 2012 at 11:56 PM.
Not Pretty but works as intended!
This....^....was my third mod, the Home Depot catch can functions perfectly by catching oil we don't want running thru our plenums.
Gary
Gary

Registered User
Joined: Jan 2008
Posts: 109
Likes: 0
From: Raleigh,NC
This last January, our fellow forum member, GEE PASTA, posted a thread on a makeshift Oil Catch Can. He noticed that when working on the lower collector, there was a small amount of oil in the said. I had noticed the same when installing the MREV+ back in October. Subsequently, other members had posted about the same experience.
https://g35driver.com/forums/showthr...=oil+catch+can
At that point, I gave serious consideration to installing a Stillen Oil Catch Can. However, due to its size, I did not know where to install it.
Just recently, our friend, DaveO found a great thread in a FX forum,which dealt with this issue. DaveO posted his results and pics of his makeshift oil catch can for his Z.
https://g35driver.com/forums/engine-drivetrain-forced-induction/97246-catchin-oil.html
I took DaveO's lead and have done the same. Many have stated that this is not neccessary. That may or may not be true and I will not argue that point. Nonetheless, for those of you whom may have concerns with regard to this issue . . . Here is my makeshift Oil Catch Can DIY.
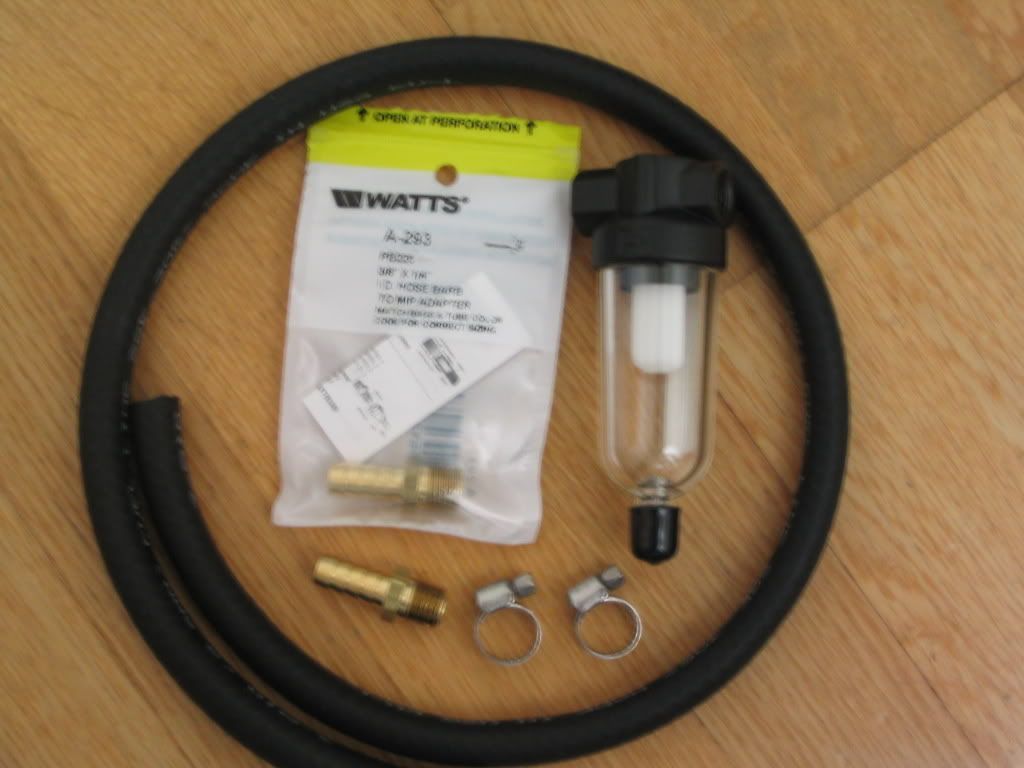
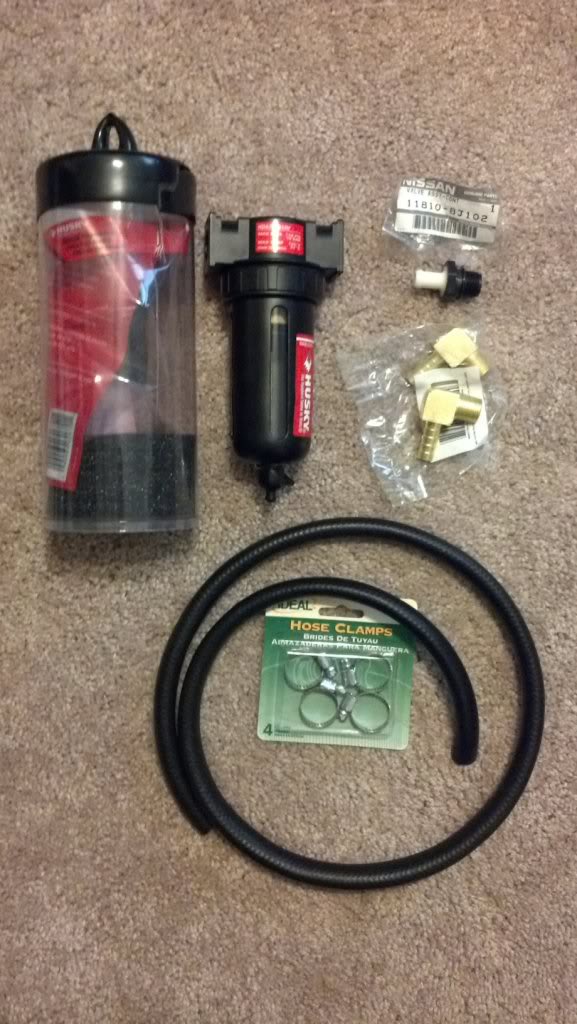
The parts needed and shown above are:
1. 2 - 1/4" dia. threaded (male) to 3/8" barbed fittings
**Edit: 2 - 3/8" elbows and 2- 3/8" x 1" nutted nipples
These additional parts are reflected in the pics in post #46.
A 16 gauge anodized Aluminum bracket was added, as well.
2. 2- 5/8" hose clamps
3. 2 feet of 3/8" dia. Fuel line hose **(edited: After some 3 days of using the fuel line hose . . . I swapped out the said for fuel injection hose. This new hose prevents the hoses from collapsing during idling rpm and may prevent the "Sucking" sound, which some have experienced.)**
4. 1- Mini All Purpose Filter with 1/4" dia. threaded female connectors
The 3/8" dia. fuel line hose was purchased at Kragen for $2.40. Everything else was purchase at Home Depot for some $17.00. So, this quick and easy mod cost me less than $20.00.

Note: The filter comes with comments reading . . . "Avoid synthetic oils, chemicals, solvents, paints and fumes which may cause bowl failure."

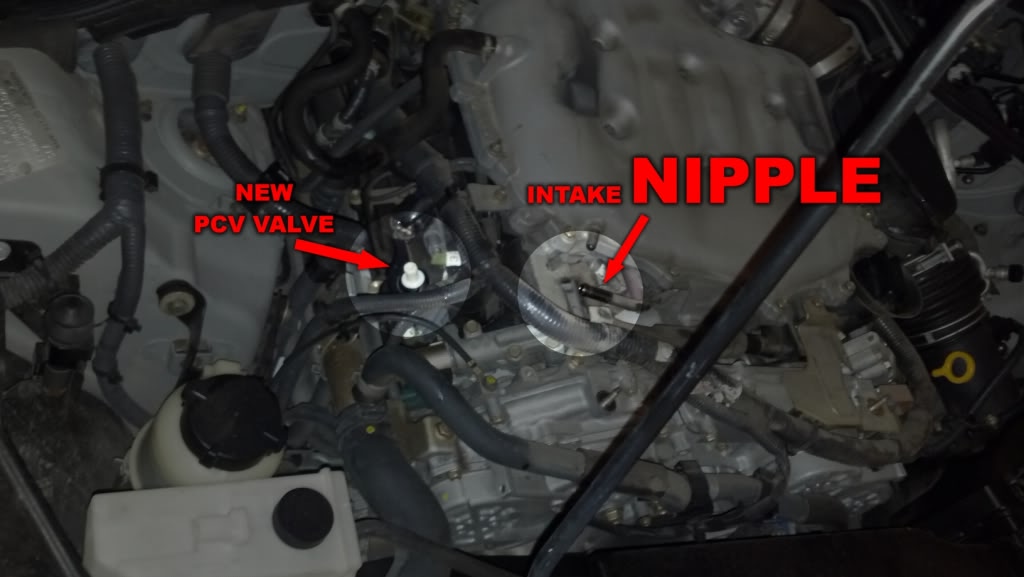
The above 3/8" dia. hose needs to be removed. This existing hose connects to and from the PCV valve and to the fitting at the lower collector, which is shown.
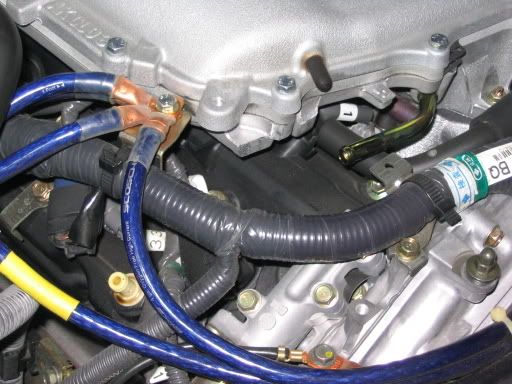
This is what it looks like after the existing hose has been removed. Note the oil residue at the base of the yellowish PCV valve.

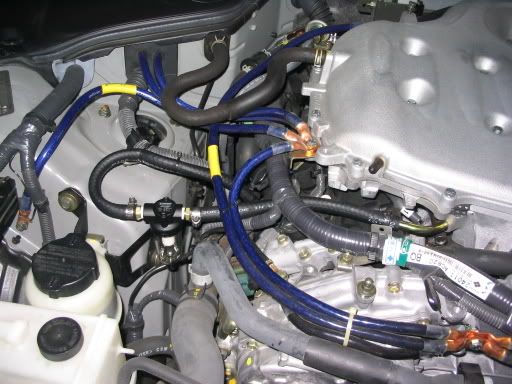
Apply some white teflon tape to the threaded portions of the 2 - 1/4" dia./3/8" dia. fittings and thread them into the filter. Note the "ARROW" stamped on the filter housing. The arrow is the side of the filter which will be connected to the lower collector.
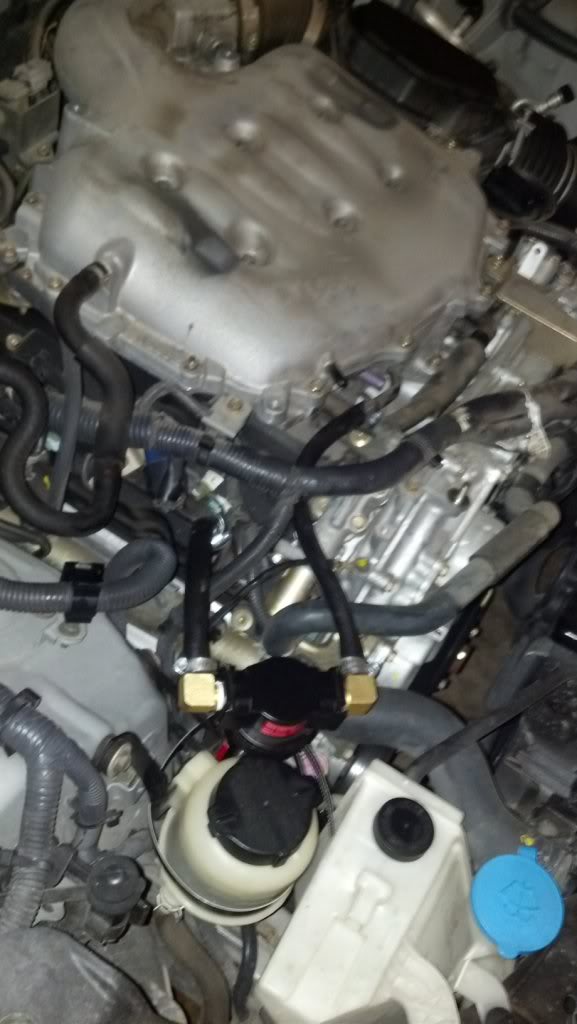
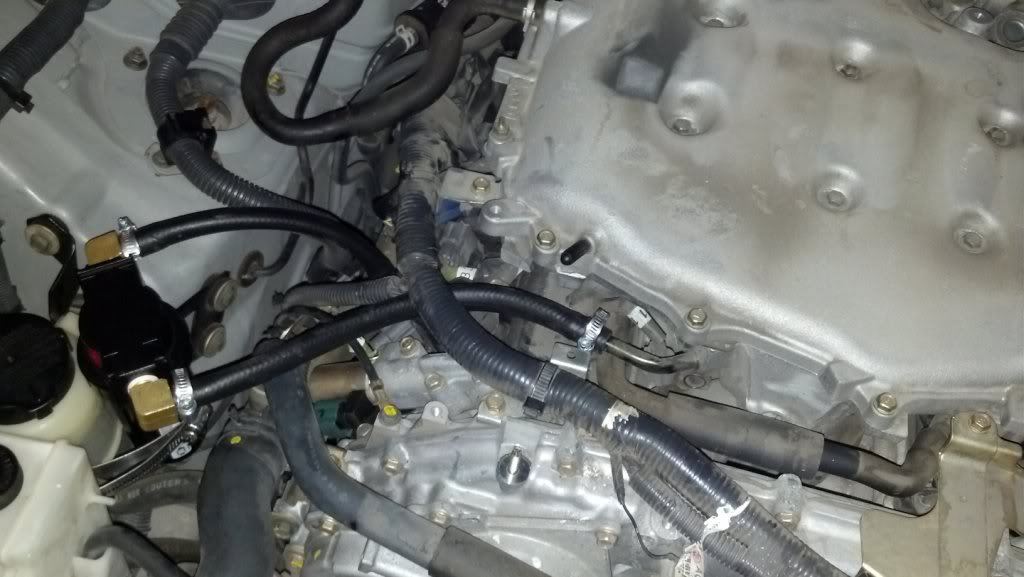
When all is said and done . . . The following pics are the final product. This little project took all of 30 minutes including the snapping of the pics.
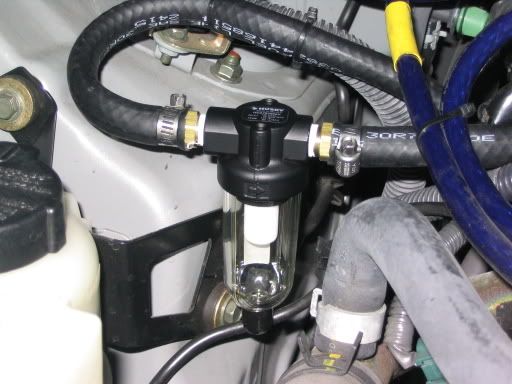
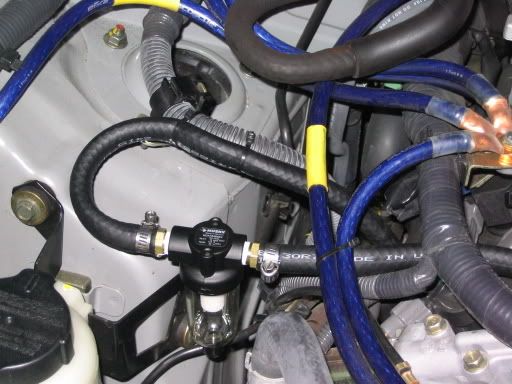
I reused the existing hose clamps at the PCV valve and lower plenum connections and used the new hose clamps at the new filter assembly.The glass bowl is easily removed. When removing the bowl, note that there is a thin rubber "O" ring, which can fall out. The entire assembly can be removed at the PCV valve and the lower collector connections in a matter of seconds, if one should wish or need to replace the existing OEM hose assembly.
Thanks to GEE PASTA for pointing out a potential issue . . . And thanks to DaveO for digging up the info to afford me a very simple and cost effective mod.
https://g35driver.com/forums/showthr...=oil+catch+can
At that point, I gave serious consideration to installing a Stillen Oil Catch Can. However, due to its size, I did not know where to install it.
Just recently, our friend, DaveO found a great thread in a FX forum,which dealt with this issue. DaveO posted his results and pics of his makeshift oil catch can for his Z.
https://g35driver.com/forums/engine-drivetrain-forced-induction/97246-catchin-oil.html
I took DaveO's lead and have done the same. Many have stated that this is not neccessary. That may or may not be true and I will not argue that point. Nonetheless, for those of you whom may have concerns with regard to this issue . . . Here is my makeshift Oil Catch Can DIY.
The parts needed and shown above are:
1. 2 - 1/4" dia. threaded (male) to 3/8" barbed fittings
**Edit: 2 - 3/8" elbows and 2- 3/8" x 1" nutted nipples
These additional parts are reflected in the pics in post #46.
A 16 gauge anodized Aluminum bracket was added, as well.
2. 2- 5/8" hose clamps
3. 2 feet of 3/8" dia. Fuel line hose **(edited: After some 3 days of using the fuel line hose . . . I swapped out the said for fuel injection hose. This new hose prevents the hoses from collapsing during idling rpm and may prevent the "Sucking" sound, which some have experienced.)**
4. 1- Mini All Purpose Filter with 1/4" dia. threaded female connectors
The 3/8" dia. fuel line hose was purchased at Kragen for $2.40. Everything else was purchase at Home Depot for some $17.00. So, this quick and easy mod cost me less than $20.00.
Note: The filter comes with comments reading . . . "Avoid synthetic oils, chemicals, solvents, paints and fumes which may cause bowl failure."
The above 3/8" dia. hose needs to be removed. This existing hose connects to and from the PCV valve and to the fitting at the lower collector, which is shown.
This is what it looks like after the existing hose has been removed. Note the oil residue at the base of the yellowish PCV valve.
Apply some white teflon tape to the threaded portions of the 2 - 1/4" dia./3/8" dia. fittings and thread them into the filter. Note the "ARROW" stamped on the filter housing. The arrow is the side of the filter which will be connected to the lower collector.
When all is said and done . . . The following pics are the final product. This little project took all of 30 minutes including the snapping of the pics.
I reused the existing hose clamps at the PCV valve and lower plenum connections and used the new hose clamps at the new filter assembly.The glass bowl is easily removed. When removing the bowl, note that there is a thin rubber "O" ring, which can fall out. The entire assembly can be removed at the PCV valve and the lower collector connections in a matter of seconds, if one should wish or need to replace the existing OEM hose assembly.
Thanks to GEE PASTA for pointing out a potential issue . . . And thanks to DaveO for digging up the info to afford me a very simple and cost effective mod.
Registered User
Joined: Jan 2008
Posts: 109
Likes: 0
From: Raleigh,NC
[QUOTE=nadjkovic;6377785]Was going to post a new thread with my catch can setup I just installed, but I then figured it'd be best to post it here..
So I referred to my own parts/install on my last car (an '03 Nissan Altima 2.5S) here:
http://www.nissanclub.com/forums/eng...cuum-leak.html
Same exact concept.. So my part listing is as follows:
I'll post back this weekend on how much oil fills up!
is it necessary to bored out the UPTAKE PIECE
So I referred to my own parts/install on my last car (an '03 Nissan Altima 2.5S) here:
http://www.nissanclub.com/forums/eng...cuum-leak.html
Same exact concept.. So my part listing is as follows:
- modified Home Depot Husky air compressor 3/8" inline filter (removed unnecessary pieces, bored out the restrictive uptake piece, and filled the bottom plug with RTV after boring it out)
- 3/8" male barbed x 3/8" male threaded 90� fittings (x2) bought off amazon @
- "plumber's tape" (used on the threaded fittings for a good seal)
- approximately 2-3 feet of fuel injection hose
- small >3/8" hose clamps (x4)
- large hose clamp to clamp it to the closest resevoir
- new PCV valve
- 3/8" male barbed x 3/8" male threaded 90� fittings (x2) bought off amazon @
- "plumber's tape" (used on the threaded fittings for a good seal)
- approximately 2-3 feet of fuel injection hose
- small >3/8" hose clamps (x4)
- large hose clamp to clamp it to the closest resevoir
- new PCV valve
I'll post back this weekend on how much oil fills up!
is it necessary to bored out the UPTAKE PIECE
